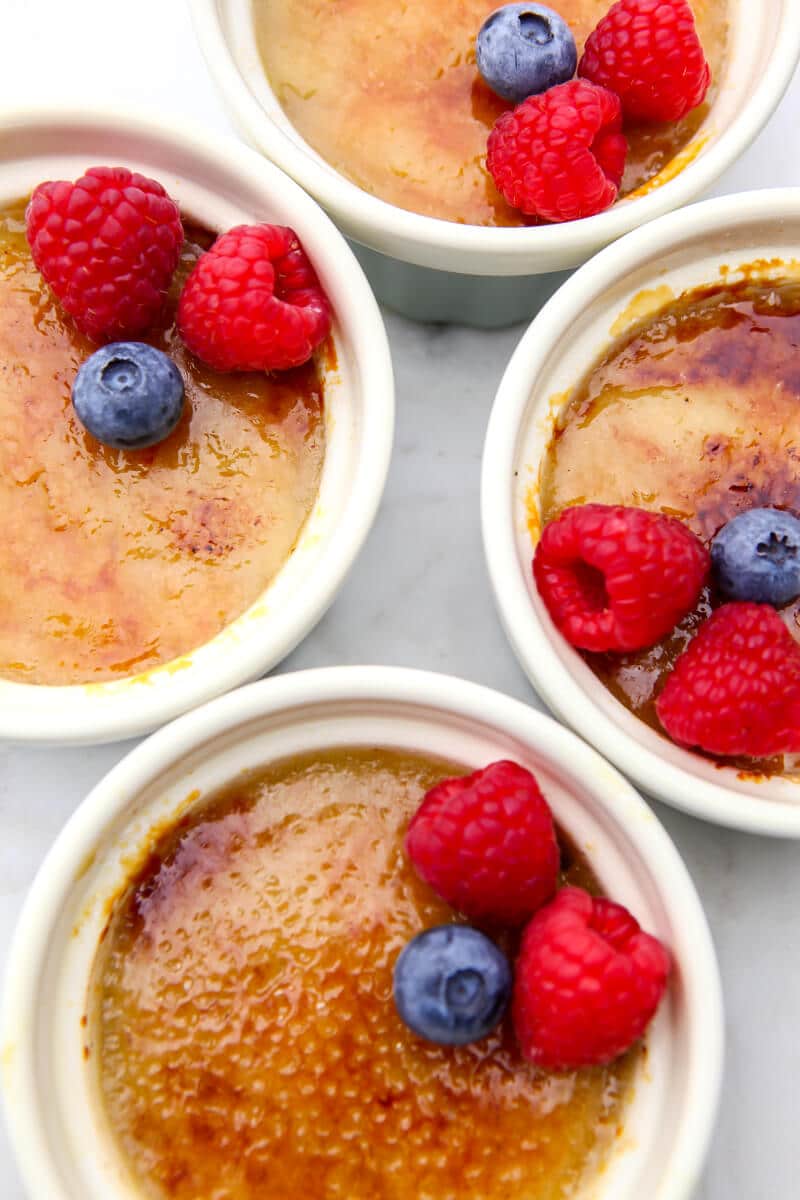
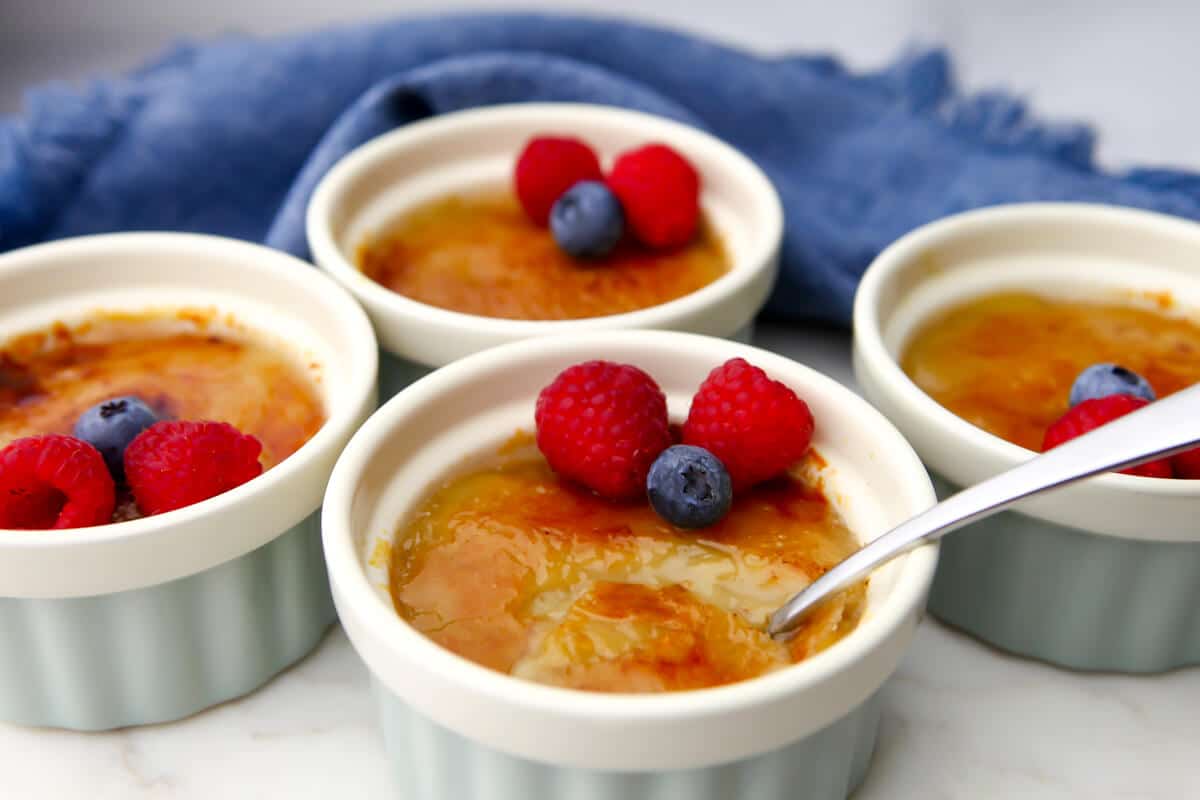
Vegan Creme Brulee
This rich and creamy vegan creme brulee is a dessert to impress, yet quick and easy enough to make any old time. Made with creamy vegan custard and topped with a layer of crispy toasted sugar, this eggless creme brulee has an unbelievably authentic taste and texture!
Want to save this recipe?
Enter your email below and get it sent straight to your inbox. Plus, get more amazing vegan recipes that will satisfy your cravings!
Creme brulee is a French dessert with a name that translates to “burnt cream.” It is traditionally made with cream and eggs, yet this recipe uses creamy oat milk to replace the cream and chickpea flour “eggs” to replace the egg with a truly amazing result!
What makes this recipe great?
Unlike other plant-based creme brulee recipes that just call for thickening agents like corn starch or arrowroot powder to thicken the custard, this vegan custard recipe uses an egg replacer with a taste, texture, and protein content more similar to eggs for a more authentic result.
This vegan creme brulee recipe is nut-free, gluten-free, and easy to make on the stovetop with no need to bake in the oven or use a broiler.
Ingredients and substitutions
- Chickpea Flour – To mix with water to form a chickpea flour egg replacer. This helps the creme brulee to set firm without the use of too much cornstarch or agar agar and gives it an authentic egg-like flavor.
- Water – To mix with the chickpea flour.
- Vegan Sugar – To sweeten the custard and for the toasted sugar topping. Any organic brand of sugar is vegan. You can use any sweetener that you would like, but the whiter the sugar, the lighter your custard will be.
- Cornstarch – to thicken the custard.
- Sea Salt – Just a pinch for flavor.
- Plant-Based Milk – After testing nearly every type of vegan milk, my family and I decided that oat milk had the best flavor and consistency. However, you can also use almond milk, soy milk, or full-fat coconut milk. Canned coconut milk also gives it a very rich texture, but it does have a coconut flavor.
- Vanilla Extract – For flavor.
- Vegan Butter – For a rich and creamy consistency. You can use any type of vegan butter that you want. I like my homemade vegan butter.
Helpful tools
- Wire Mesh Strainer – for sifting the chickpea flour and cornstarch to avoid lumps.
- Heavy Bottomed Pan – a heavy saucepan will provide more even heat distribution and keep your custard from burning.
- Whisk – for stirring the custard.
- Blender – for grinding the vegan sugar into smaller pieces for the topping.
- Kitchen Torch – for toasting the sugar on top of the custard. You must have one to make a true creme brulee. Don’t try to do this with any other method.
- Ramekins – to serve the creme brulee in. You can use any little heat-safe bowls that you have, but be sure that they can withstand the heat of the kitchen torch.
- Pastry Brush – to even out the sugar on the top of the creme brulee before toasting it.
How to make vegan creme brulee
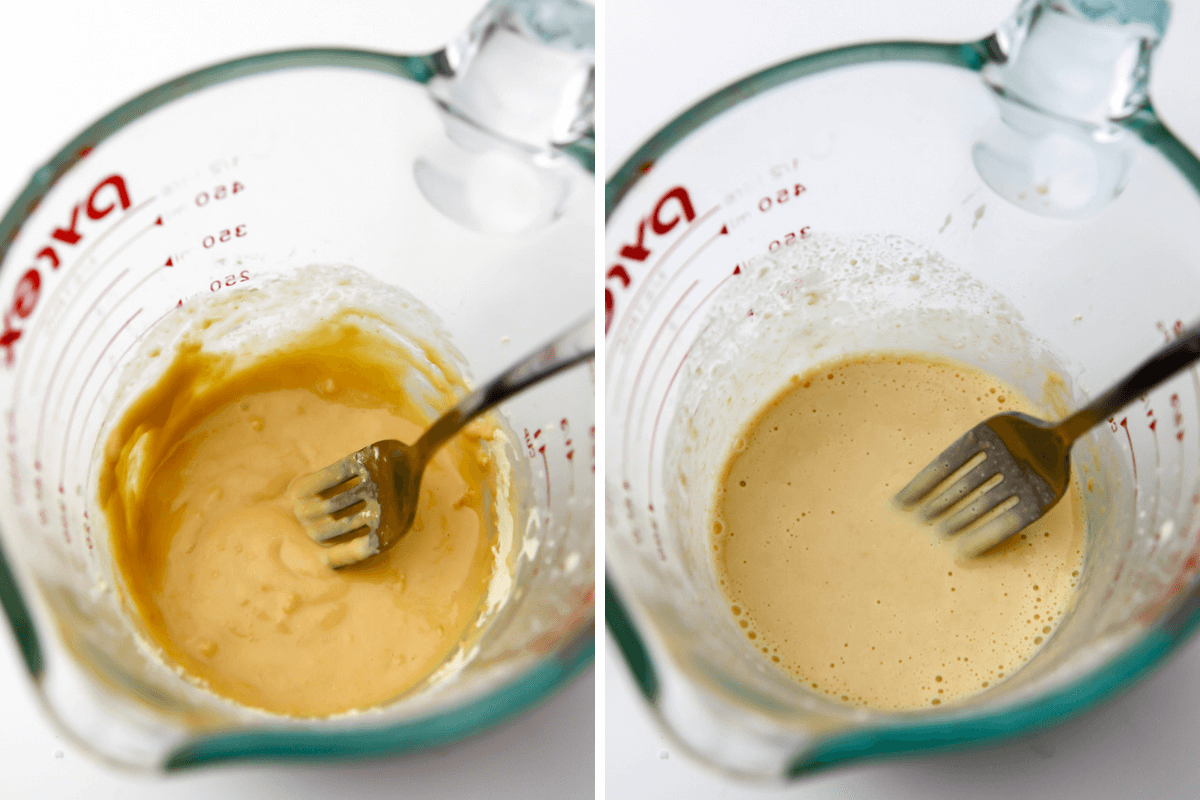
Make the vegan “egg”
Step 1 – Sift 3 tablespoons of chickpea flour into a small container and then add 2 tablespoons of water and stir well until all of the lumps are out.
Step 2 – Add the remaining 1 tablespoon of water to the chickpea flour mixture and stir again until it’s very smooth. Allow it to sit for at least 10 minutes.
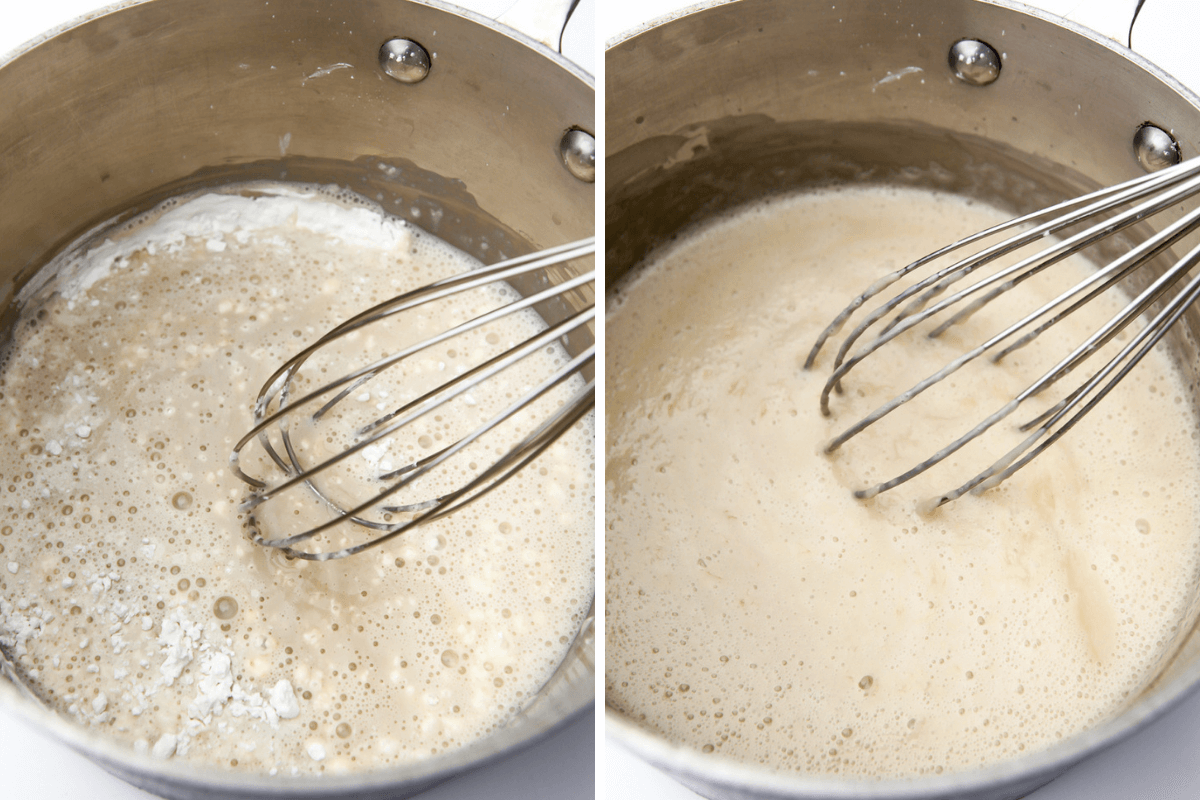
Make the custard base
Step 3 – Sift 3 tablespoons of cornstarch into a heavy-bottomed saucepan. (Sifting will help avoid lumps.)
Step 4 – Add 3/4 cup of sugar, and 1/4 teaspoon of salt, and slowly pour in 1/2 cup of cold oat milk and stir well with a whisk until all of the lumps are gone and the cornstarch is fully dissolved. Then add the remaining 1 1/2 cups of cold oat milk and stir again.
Step 5 – Turn on the heat to medium and stir frequently with a whisk. As it starts to boil slowly, stir constantly.
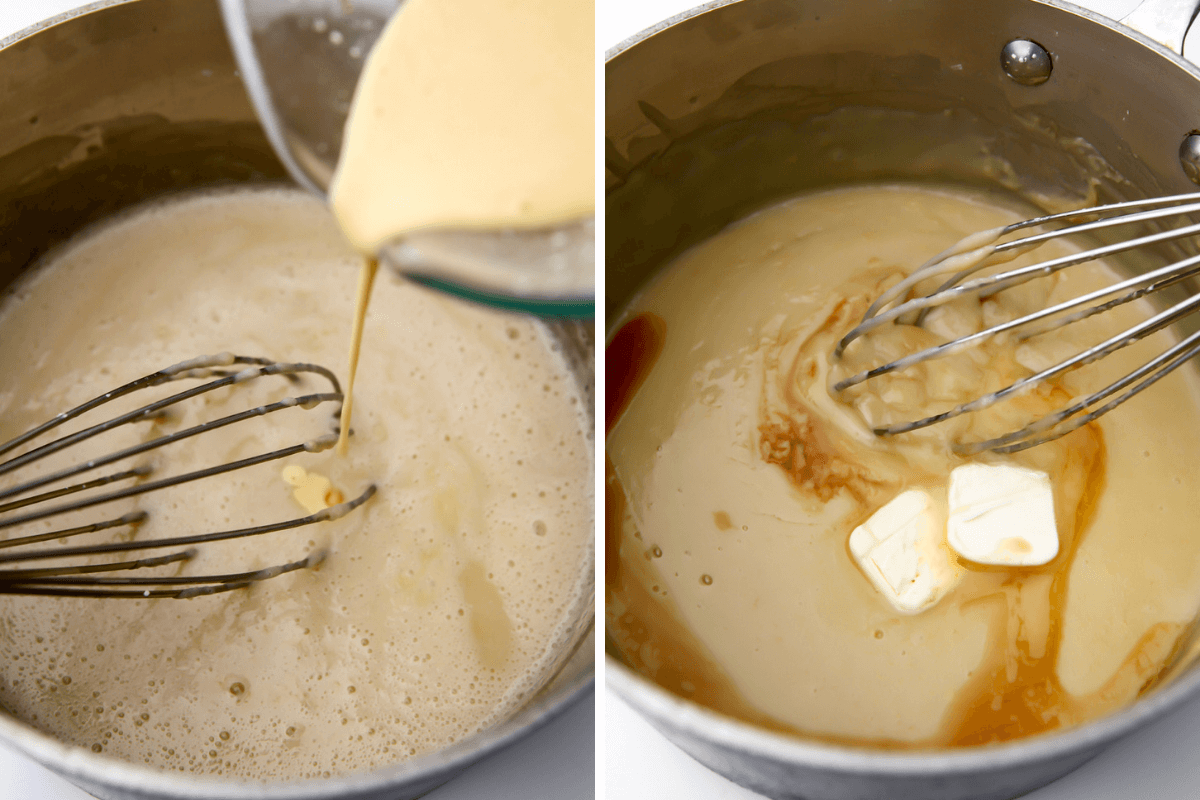
Step 6 – Once the mixture has boiled slowly for about 30 seconds, slowly add the chickpea flour egg mixture while continuing to stir with the whisk.
Step 7 – Once all of the chickpea “egg” has been added simmer at a low boil for 3 minutes stirring constantly.
After cooking
Step 8 – Remove the custard from the heat then add 14 tablespoons of vegan butter and 2 teaspoons of vanilla extract and stir well until it’s incorporated.
Step 9 – Pour the custard into 4 little ramekins (or small heat-safe bowls) and lay a sheet of plastic wrap directly over each one so that no air is touching the custard. (This will prevent it from getting a skin on top.)
Step 10 – Place them in the fridge for at least 4 hours before toasting the top.
How to make the crackable top
You want to toast the creme brulee before serving. Don’t let it sit for more than 15-20 minutes before serving or your topping won’t be as crispy.
Note – Traditional creme brulee calls for caster sugar (a superfine sugar) on top to make a perfect toasted shell. Vegan sugar has grains that are too large to form a proper shell on top of the custard, but you can make your own vegan caster sugar with a few pulses in the blender.
- Add 1/4 cup of granulated vegan sugar to a blender and plus a few times until you get a fine sand consistency. It should be more coarse than powdered sugar, but finer than traditional sugar. (This is an essential step to get a beautiful toasted sugar top to your vegan creme brulee.)
- Sprinkle 1 1/2 teaspoons of the fine sugar on top of your custard and spread it around with a pastry brush if needed to get an even coating.
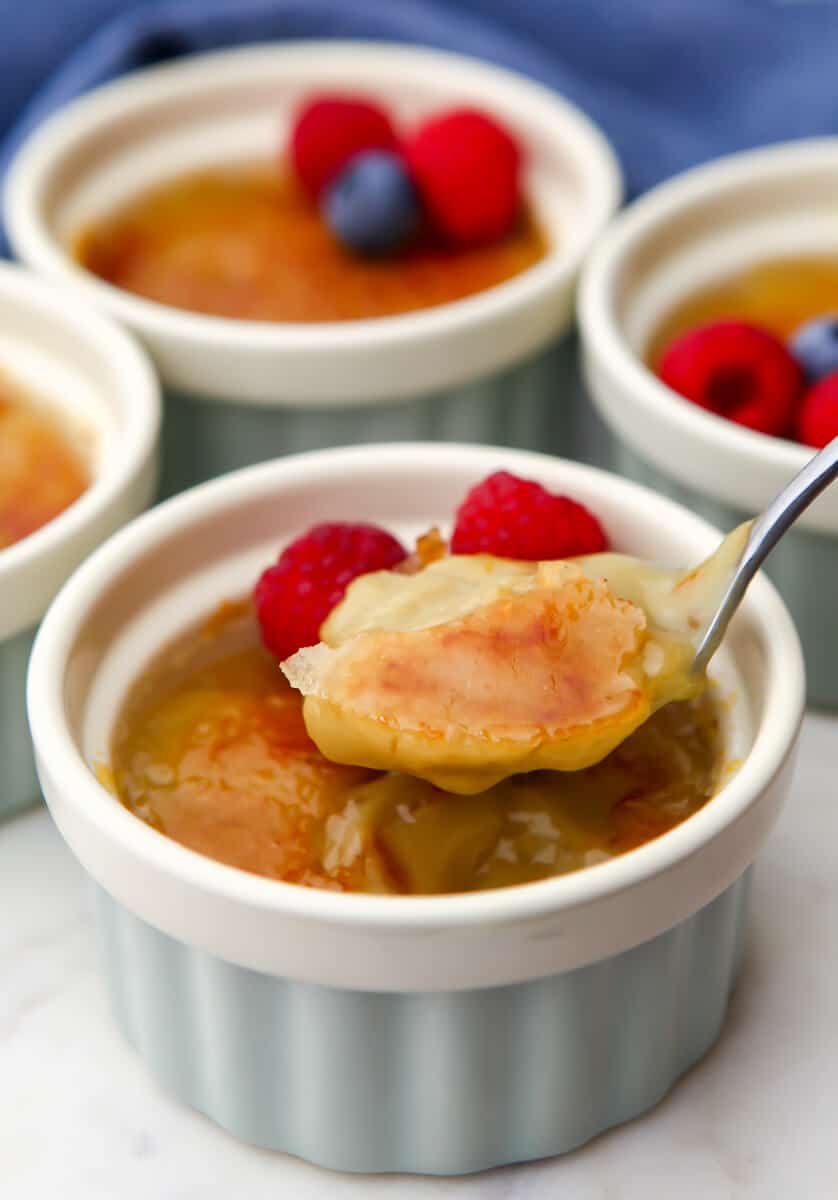
- Hold the kitchen torch about 2-3 inches away from the top of the sugar and move back and forth until the sugar has turned golden brown and melted together.
- Top with some berries if you choose and serve immediately.
Note – When you crack and break the topping, the sugar can be sharp. Be sure to make sure children (and eager adults) eat it slowly and chew the top layer.
Pro Tips
- Be sure to add a small amount of liquid to both the chickpea egg and the cornstarch mixture and stir well before adding the remaining liquid. This will help you avoid clumps.
- Add the chickpea flour egg to the custard slowly while stirring with a whisk. If the mixture is allowed to settle to the bottom, it will harden before it gets incorporated.
- Grind the vegan sugar into finer grains before toasting it with a kitchen torch for a perfect crunchy topping.
Frequently asked questions?
To make a dairy-free creme brulee you can swap the cream out for any dairy-free milk. I find that oat milk gives the best results. Canned coconut milk is also a good choice, however, it will give your creme brulee a coconut flavor.
Yes, creme brulee is a great dessert to make a day ahead of time and keep in the fridge until you are ready to serve. Simply cover each cup with plastic wrap so that no air gets to the custard, then add the toasted sugar topping just before serving.
How to store vegan creme brulee
Refrigerate: You can make the custard portion of the creme brulee up to 3 days ahead and store it in the fridge with plastic wrap over the top so that no air can get to the custard.
More vegan desserts
- Vegan Fruit Tart
- Vegan Chocolate Cheesecake
- Dairy-Free Pudding
- Vegan Lemon Curd
- Vegan Blueberry Cheesecake
- Silken Tofu Chocolate Mouse
Vegan crème brûlée recipe

Vegan Creme Brulee
Ingredients
For the chickpea egg
- 3 tablespoons chickpea flour
- 3 tablespoons water
For the custard
- 3/4 cup vegan sugar
- 3 tablespoons corn starch
- 1/8 teaspoon salt
- 2 cups oat milk, (or any plant-based milk)
After cooking
- 2 teaspoons vanilla extract
- 4 tablespoons vegan butter, (use soy-free if needed)
For the topping
- 1/4 cup vegan sugar
Instructions
Make the chickpea egg
- Sift 3 tablespoons of chickpea flour into a small container and then add 2 tablespoons of water and stir well until all of the lumps are out.
- Add the remaining 1 tablespoon of water to the chickpea flour mixture and stir again until it’s very smooth. Allow it to sit for at least 10 minutes.
Make the custard base
- Sift 3 tablespoons of corn starch into a heavy-bottomed saucepan. (Sifting will help avoid lumps.)
- Add 3/4 cup of sugar, 1/8 teaspoon of salt, and slowly pour in 1/2 cup of cold oat milk and stir well with a whisk until all of the lumps are gone and the cornstarch is fully dissolved. Then add the remaining 1 1/2 cups of cold oat milk and stir again.
- Turn on the heat to medium and stir frequently with a whisk. As it starts to boil slowly, stir constantly.
- Once the mixture has boiled slowly for about 30 seconds, slowly add the chickpea flour egg mixture while continuing to stir with the whisk.
- Once all of the chickpea “egg” has been added simmer at a low boil for 3 minutes stirring constantly.
After cooking
- Remove the custard from the heat and add 4 tablespoons of vegan butter and 2 teaspoons of vanilla extract and stir well until it's incorporated.
- Pour the custard into a bowl and lay a sheet of plastic wrap directly over it so that no air is touching it. (This will prevent it from getting a skin on top.)
- Refrigerate the creme brulee for at least 4 hours before topping with toasted sugar.
Toast the sugar
- Add 1/4 cup of granulated vegan sugar to a blender and plus a few times until you get a fine sand consistency. It should be more coarse than powdered sugar, but finer than traditional sugar. (This is an essential step to get a beautiful toasted sugar top to your vegan creme brulee.)
- Sprinkle 1 1/2 teaspoons of the fine sugar on top of your custard and spread it around with a pastry brush if need to get an even coating.
- Hold the kitchen torch about 2-3 inches away from the top of the sugar and move back and forth until the sugar has turned golden brown and melted together.
- Top with some berries if you choose and serve immediately.
Notes
- Be sure to add a small amount of liquid to both the chickpea egg and the cornstarch mixture and stir well before adding the remaining liquid. This will help you avoid clumps.
- Add the chickpea flour egg to the custard slowly while stirring with a whisk. If the mixture is allowed to settle to the bottom, it will harden before it gets incorporated.
 Did you make this recipe?Please leave a star rating and review below!
📌 Be sure to follow me on Pinterest for new vegan recipes!


I made this for Easter and I’m going to make it again for Mother’s Day. It was delicious and easier than I thought to make. Thanks for this great recipe!
I’m so happy that you liked the recipe, Sarah! 🙂