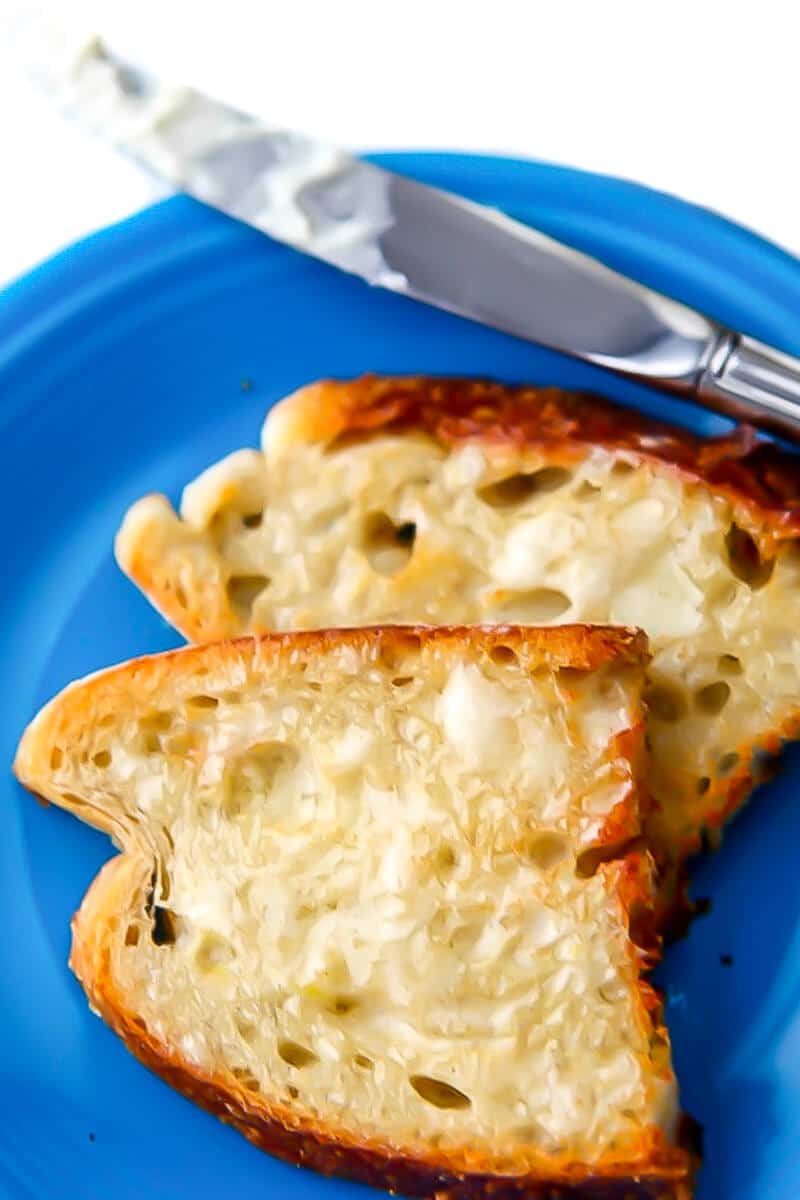
The Best Vegan Butter
Once you try this easy homemade vegan butter, you will never want to use any other vegan margarine or butter alternative again! I call this vegan “butter” because it has a true butter taste. You can make up a batch in minutes, and it will save you a ton of money.
Want to save this recipe?
Enter your email below and get it sent straight to your inbox. Plus, get more amazing vegan recipes that will satisfy your cravings!
Don’t buy those store-bought brands of margarine that contain palm oil and just don’t taste as good; make the very best buttery spread yourself!
I’ve been perfecting the recipe over the past few years, testing and retesting ingredients and proportions, and I finally have it down to a science. I call it butter because that is what it tastes like.
I’ve NEVER commented on a recipe before. This recipe exceeded my expectations. It was so tasty and smooth. I toasted a slice of bread for my husband, and added the butter. He’s normally easily fooled, but he was this time. Simply delicious!! Thanks so much for sharing!
— Jacquelyn
Earth Balance and other vegan varieties of margarine now taste waxy and fake to me. Even my non-vegan family and friends go crazy over this butter! You can whip up a batch in minutes for about half the price of soy margarine and 100 times better tasting!
This butter recipe is
- Simply the most like real butter of anything that you’ll try!
- Vegan, nut-free, gluten-free, and palm oil-free!
- Perfect for melting, spreading, cooking, and baking.
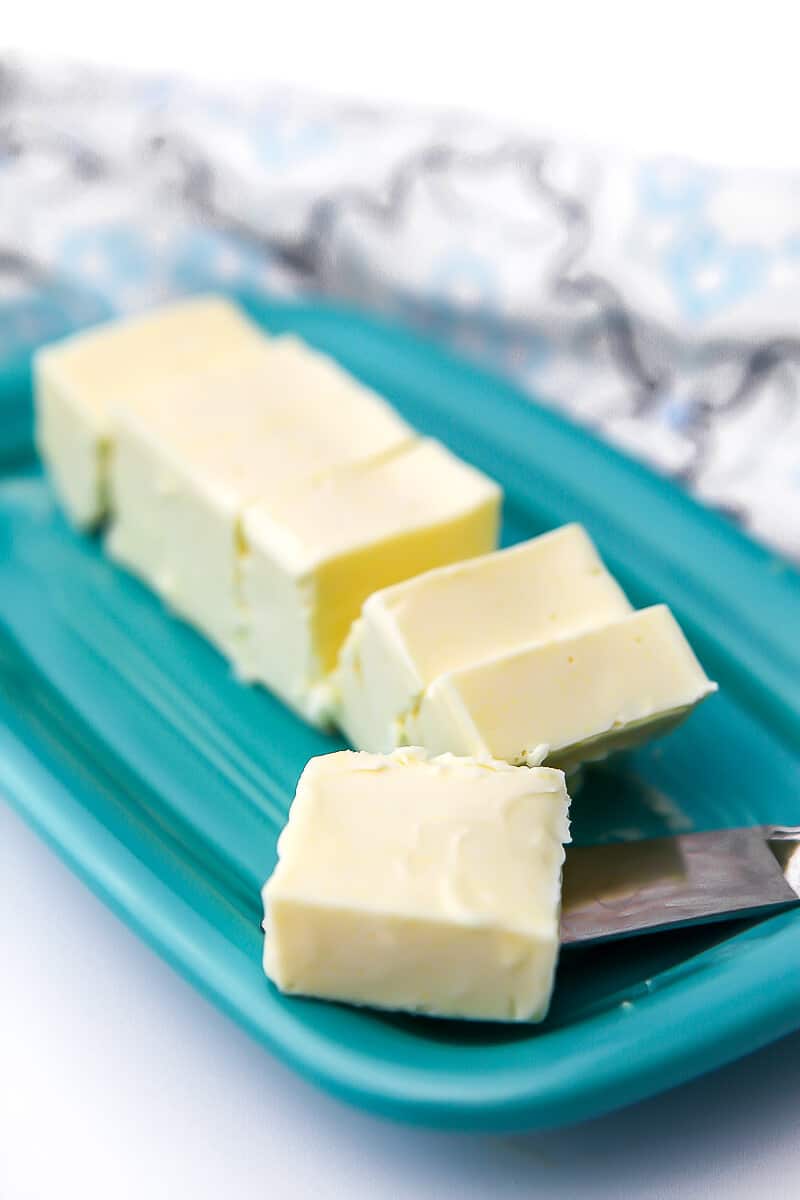
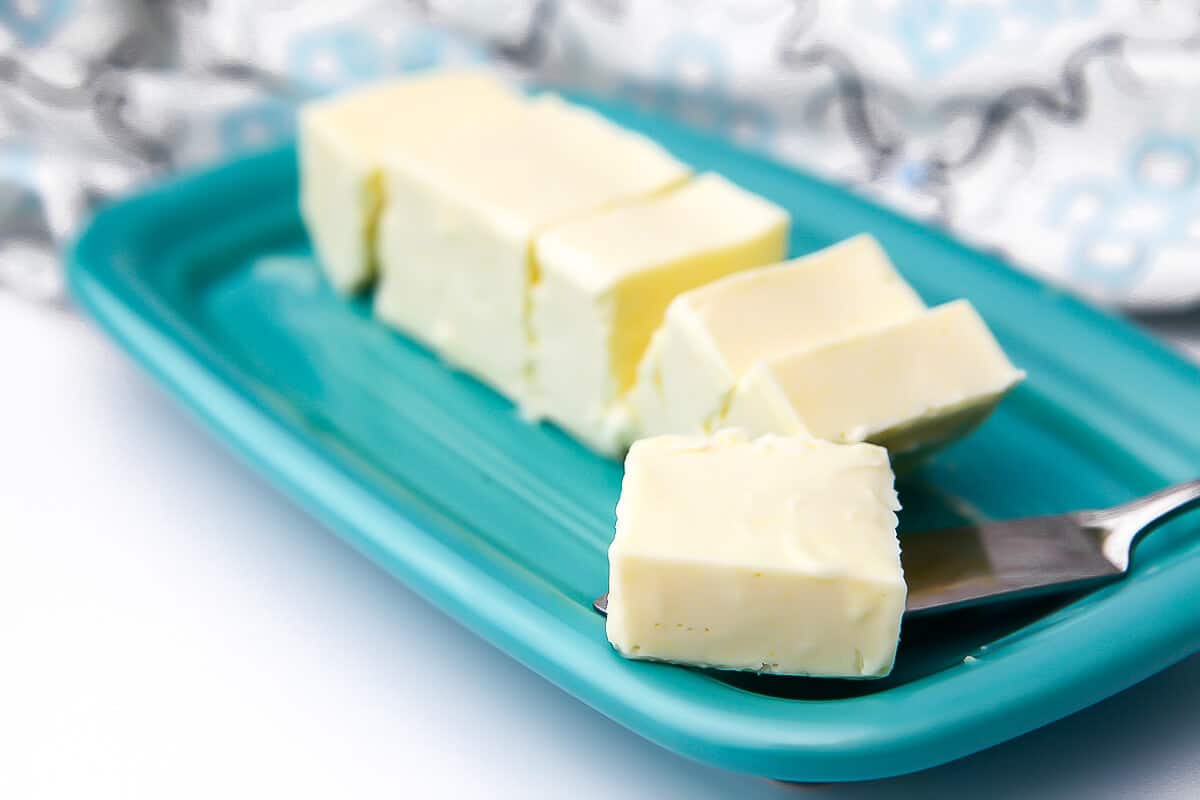
- Easy to make in tub or stick form to suit your spreading or baking needs.
Ingredients and substitutions
- Refined Coconut Oil – for the base of the butter. You need to use coconut oil because it has a melting point of 76°F. This will cause your butter to solidify at room temperature. Use refined coconut oil so it has a neutral taste. Unrefined will have a coconut flavor and will not taste like butter.
- Canola Oil – to make your butter softer and spreadable. You can also use light olive oil, avocado oil, sunflower oil, or any other neutral-tasting oil, but each type of oil will slightly alter the flavor. I have found that canola oil gives the most buttery flavor.
- Soy Milk – to give your butter a rich, creamy flavor and the protein that it needs to gel and set. You can also use Ripple brand milk if you prefer a soy-free option. I don’t recommend oat milk, almond milk, or rice milk, as they lack sufficient protein for proper emulsification.
- Lemon Juice – to curdle the milk. This gives it a richer flavor and also helps it gel up into a buttery consistency. Either fresh-squeezed or bottled will work well. You can also use apple cider vinegar as an alternative. This acidity is important for the flavor of European-style butter.
- Salt – for flavor. Leave it out for unsalted butter.
- Soy Lecithin – to make the oil and milk bind together so it doesn’t separate after it sits for a while. You can also use sunflower lecithin to make soy-free butter. You can find lecithin at health food stores, vitamin shops, or Amazon. If you don’t have this, you can leave it out; however, your butter will separate slightly, especially if left out at room temperature for too long.
Helpful tools
- Immersion Blender – aka stick blender. I make this butter so much that I have drawn lines on my immersion blender cup to indicate where to add the oil, making the process faster.
- Or a Blender – any traditional blender will work too. You may need to stop it and scrape the edges a few times to get it well mixed.
- Glass Container – to store your butter. I have found that butter easily absorbs flavors. Plastic or silicone containers give the butter a funny taste. I prefer using glass Snapware containers or mason jars because they are made of glass and feature lids with airtight seals.
- Butter Mold – You can use anything that you would like as a butter mold, and your butter will take that shape. If you want traditional-looking stick butter, you can use a butter mold to easily achieve this.
Why do you need lecithin?
Lecithin is a crucial ingredient if you want your plant-based butter to perform like Earth Balance, Miyoko’s, or other store-bought brands in cooking or baking. Do you know how oil and water don’t mix? Lecithin binds water and fat molecules together, keeping them from separating. It helps the consistency of your butter, but it doesn’t change the taste. You can leave it out if you prefer, but your butter may separate slightly.
What type of lecithin is best?
Soy lecithin is available in either liquid or granular form. The liquid gives it a nice color, but it is sticky and hard to work with. I usually use granulated lecithin because it is less messy.
I find the soy lecithin at GNC or The Vitamine Shoppe, but it may be easiest to order it on Amazon. You will only need a small amount in each batch, which will last a long time. If you prefer not to use soy, you can also substitute sunflower lecithin.
How to make vegan butter
Step 1 – Measure 1/2 cup of plain soy milk, then add 1/4 tsp lemon juice to it and let it sit for about 5 minutes.
Step 2 – Melt the coconut oil until it is just barely melted, then pour it into a blender or an immersion blender container.
Step 3 – Add canola oil, salt, and soy lecithin to the blender.
Step 4 – Pour the soy milk into the blender after it has sat for about 5 minutes, allowing it to curdle with the addition of lemon juice.
Step 5 – Blend on high for 1 minute, or until the mixture is well combined.
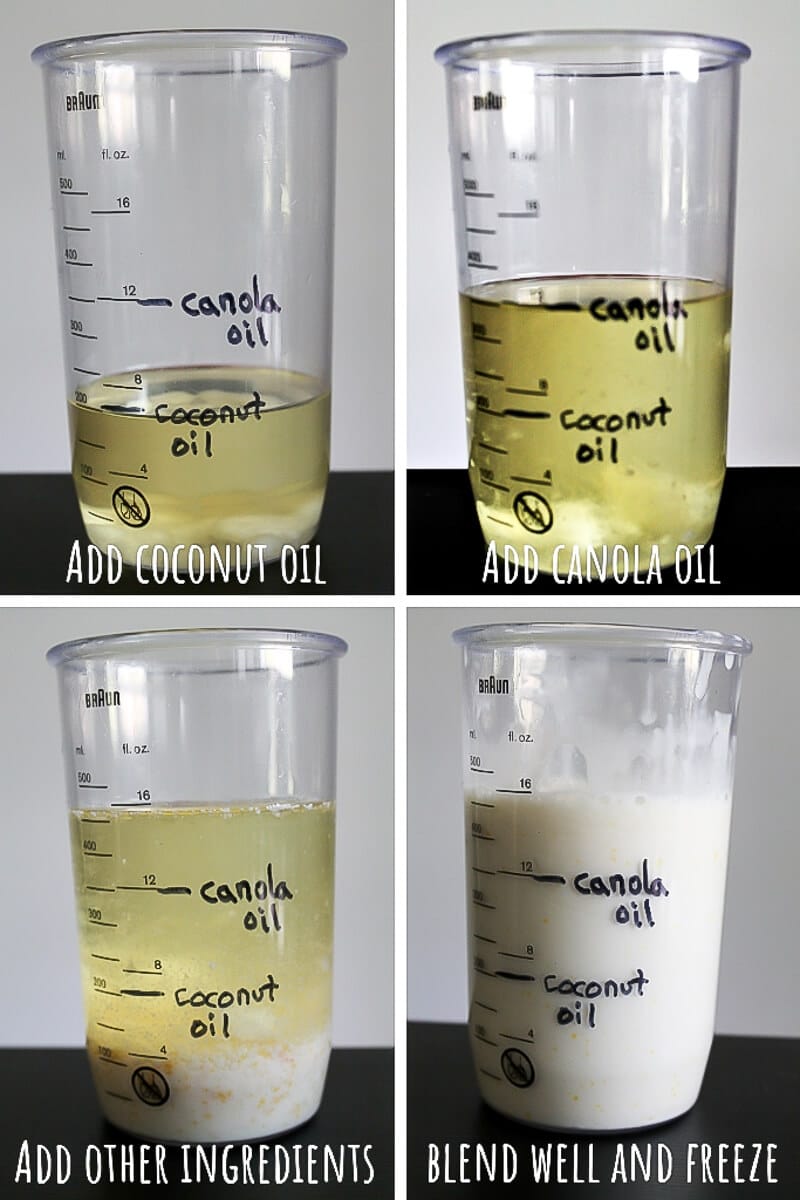
Step 6 – Pour into a glass container with a lid.
Step 7 – Place in the freezer for at least 1/2 hour, until it sets firm. Then, transfer it to the refrigerator.
Step 8 – Keep in the refrigerator for up to 5-7 days.
Note– this vegan butter is naturally very white; if you want it to be more yellow, add a very small dash of turmeric to the mixture before blending.
Pro Tips
Tips about vegan milk
- I usually use plain soy milk from Aldi, but for some reason, I find that it yields the best results. Different brands of soy milk will work differently depending on their ingredients. I have even found that the butter comes out thicker if I use the last of the soy milk in the bottom of the carton, vs. soymilk from a whole carton. I have also noticed that the Silk brand comes out a little thicker than other brands. (Whatever brand you use, just make sure you use plain and not vanilla.)
- Measure out the soy milk and add the lemon juice first. This will give it time to start curdling while you measure out the remaining ingredients.
- Be sure not to add more than 1/4 tsp of lemon juice, or it will make your butter more of a mayonnaise consistency.
- If your butter whips up into a more mayonnaise-like consistency, don’t worry. Just freeze the butter solid, and then thaw it in the fridge, and it will be perfect.
Tips about temperature
- Don’t overheat your coconut oil. You want it just warm enough to be melted but not hot. This will allow the butter to cool faster, which is part of the trick to making it taste good.
- Make sure to cool it in the freezer immediately after blending. Something magical happens when it cools quickly. The butter will be set up correctly, and it even tastes better, so don’t skip this step.
✨ Butter sticks vs tub butter
- Tub Butter – The spreadable tub butter version is a great, versatile alternative to Earth Balance, offering a similar usage experience. It remains firm, yet soft in the fridge, and is spreadable, melting easily.
- Stick Butter – If you want firmer butter that traditionally comes in a stick form, such as Miyoko’s European-style butter or other stick margarine, you will need to adjust the oil ratio. This stick butter is great for baking, making vegan buttercream, or general cooking.
How to make vegan stick butter
- Increase the coconut oil to 1 cup and reduce the canola oil to 1/2 cup.
- Follow all the other ingredients and steps the same way.
- Pour into butter stick molds to shape your butter if desired.
Storage
- It keeps well in the fridge for about 5-7 days.
- I like to store it in glass Snapware containers. The glass prevents unwanted flavors from being absorbed by your butter, and the Snapware containers have a good seal to keep out refrigerator odors.
Freezing vegan butter
- You can freeze the vegan butter for up to 3 months. The recipe makes about 3 cups of butter. This is about a week’s supply for my family of 4, but it may be too much for you to use up in a week.
- You may want to divide it up into smaller containers and keep some in the freezer until you’re ready to use them. The small 4-oz Mason jars work well for keeping small batches. Just be sure to seal the container well so it doesn’t absorb smells from the freezer.
How to make it soy-free
If you need soy-free butter, this recipe also works with other plain plant-based milk. The more protein in the milk, the better the consistency, so oat, pea, or hemp milk will work better. If you use almond or cashew milk, add 1 tsp of nutritional yeast to give it enough protein to set correctly.
Note: To make it totally soy-free, you will also need to use sunflower lecithin instead of soy lecithin.
Ways to use the butter
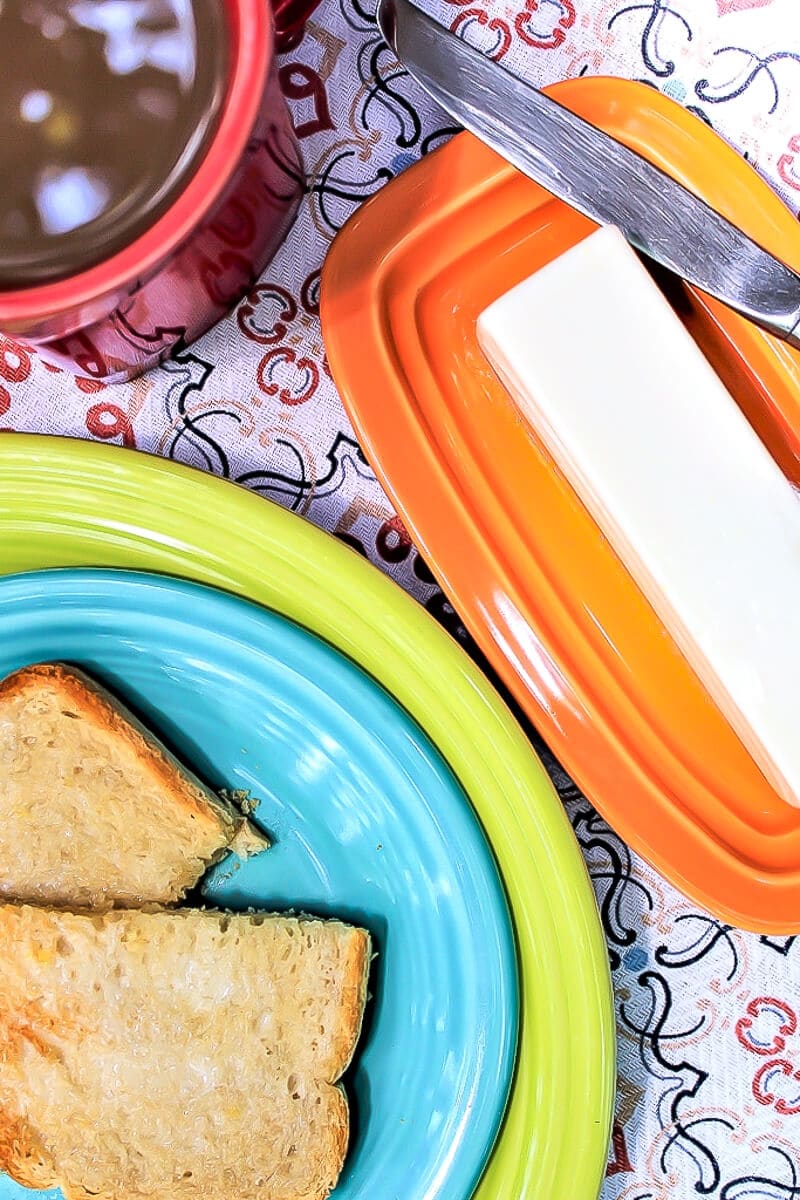
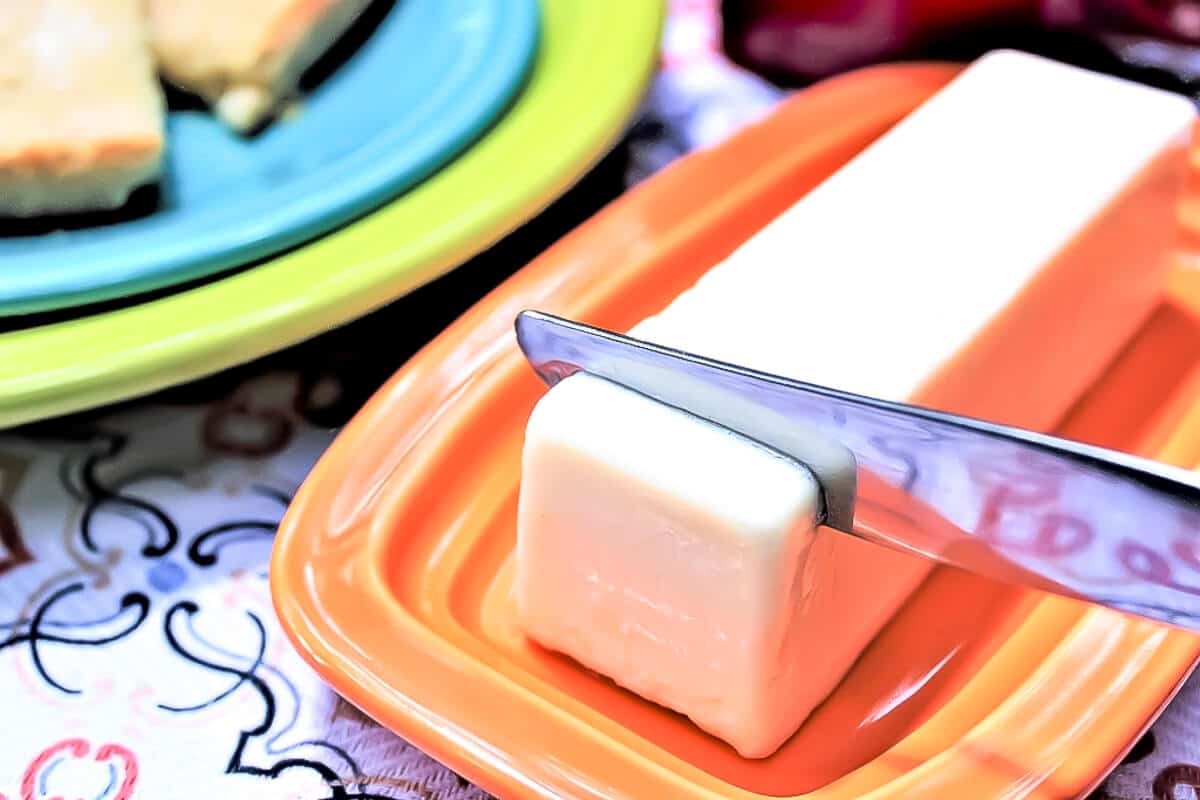
Use this vegan butter the same as you would dairy butter or any other vegan margarine. If you want to bake with it or use it for frying, use the stick version. If you want to use it to spread on bread or toast, or for everyday use, opt for the tub version.
Make butter cabbage and noodles in my vegan Haluski recipe, bake a batch of buttery vegan Cheddar Bay biscuits, and use them for baking cookies, such as vegan chocolate chip cookies.
It also makes the best vegan buttercream frosting you will ever eat! This vegan butter also makes the best darn vegan garlic butter, vegan honey garlic sauce, and vegan buffalo sauce ever!
This dairy-free butter works like traditional butter in most recipes, allowing you to even make vegan brown butter with it.
More homemade vegan staples
I have numerous recipes for homemade dairy-free alternatives on my site and in my cookbook, featuring over 40 recipes for vegan staples such as the following, just to name a few
Vegan butter recipe
Vegan Butter
Ingredients
- 1/2 cup plain soy milk, (or Ripple pea milk for soy-free)
- 1/4 teaspoon lemon juice
- 3/4 cup refined coconut oil, (or 1 cup for the stick version)
- 3/4 cup canola oil, or light olive oil or other neutral-tasting oil (use 1/2 cup for the stick version)
- 1 teaspoon salt
- 2 teaspoon soy lecithin, (optional, but helps it not to separate).
Instructions
- Measure 1/2 cup of plain soy milk, then add 1/4 tsp lemon juice to it and let it sit for about 5 minutes. Don't stir it, just let the milk curdle.
- Microwave the coconut oil until it just barely melts (you don't want it to be hot). Pour the melted oil into a blender or a container for an immersion blender.
- Add 3/4 cup canola oil, 1 tsp salt, and 2 tsp soy lecithin to the blender.
- Pour the soy milk into the blender after it has sat for about 5 minutes and has started to curdle with the addition of lemon juice.
- Blend on high for 1 minute, or until the mixture is well combined.
- Pour into a glass container with a lid or into a butter mold.
- Place in the freezer for at least 1/2 hour until it becomes completely firm, then transfer it to the refrigerator. (It is important that it gets very cold quickly to set up correctly.)
- Keep in the refrigerator for up to 5-7 days or the freezer for up to 3 months.
Notes
- I usually use plain soy milk from Aldi, but for some reason, I find that it yields the best results. Different brands of soy milk will work differently depending on their own ingredients. I have even found that the butter comes out thicker if I use the last of the soy milk from the bottom of the carton, rather than soymilk from a full carton. I have also noticed that the Silk brand comes out a little thicker than other brands. (Whatever brand you use, make sure you use plain and not vanilla flavored.)
- Measure out the soy milk and add the lemon juice first. This will start to curdle while you are measuring out the rest of the ingredients.
- Be sure not to add more than 1/4 tsp of lemon juice, or it will make your butter more of a mayonnaise consistency.
- Make sure to cool the butter in the freezer immediately after blending. Part of the magic happens when it cools quickly.
- Increase the coconut oil to 1 cup instead of 3/4 cup and reduce the canola oil to 1/2 cup.
- Follow all the other ingredients and steps the same way.
- Pour into butter stick molds to shape your butter if desired.
- If you need this recipe to be soy-free, other plant-based milks will also work. The more protein in the milk, the better the consistency, so oat, pea, or hemp milk will work better. If you use almond or cashew milk, add 1 tsp of nutritional yeast to give the mixture enough protein to set correctly.
- Note– to make it totally soy-free, you will also need to use sunflower lecithin instead of soy lecithin.
 Did you make this recipe?Please leave a star rating and review below!
📌 Be sure to follow me on Pinterest for new vegan recipes!
*This was originally posted on 5/3/2019. It was updated on 8/26/20 to include new images and an instructional video showing how to make the spreadable vegan butter.


I assume you use an unsweetened milk for any if the butter/cheese recipes?
You need to use plain soy milk, not vanilla, but I find that the sweetened versions add a nice flavor. Feel free to use unsweetened though.
Made this quite a few times and it’s been fantastic in all my bakes.
I do have a question though, do I have to use carton soy milk for firmer results? I haven’t been able to get the butter to hold up well in frosting, it tends to be wet and melts quickly.
Thank you !
Yes, carton soy milk yields the thickest and creamiest butter. Use the stick version with a higher ratio of coconut oil for baking and things like frosting.
The amount of lecithin in your recipe is for granules. How much for liquid lecithin? I think it’s less.
I have made it with both liquid and granules using the same amount for each and it comes out well using either one.
The sunflower lecithin I found is a dark brown with the density of molasses. Is this normal?
Yes, the sunflower lecithin is a dark brown color. Soy lecithin is more of a dark yellow, but it is such a small amount, it won’t change the color of your butter much. Enjoy!
Wowza! Of all the vegan recipes I’ve enjoyed, this one is my favorite. I’d venture to say that it’s even tastier than butter.
Thanks so much! My non-vegan family members love it too, and always request that I make it so that says a lot.
I’ve made this vegan butter several times and will never buy margarine again! It’s healthier & tastes so much better too. I use it in all my recipes without a hitch.
Do you think it will work with homemade soymilk? I make the Blender Babe’s version, 2 ounces soybeans and 2 cups hot water in the Vitamix for 6 minutes
I have never tested it with homemade soy milk, but I think that it will work well.
Soy Lecithin, instead can I use flaxseed?
I don’t think that will work well. You can omit the soy lecithin, it will just separate a little at room temperature without it. Enjoy!
So thrilled to find you and this butter. I am 76 from oregon usa
I’m so glad that you found my site too! I hope that you enjoy the butter recipe!
Thanks for your recipe! I found a similar one on youtube “unreal deli.” It didn’t have lemon juice. I’ll have to try this!
I haven’t seen the recipe on youtube. I developed this recipe about 15 years ago and it has been my go to butter ever since. You can swap the lemon juice for apple cider vinegar if you want. Enjoy!
This is the second time I made this butter and I absolutely love it! I made 4 sticks of butter and had a small dish left over. I used sunflower lecithin, almond milk & the other ingredients. I remembered to add Turmeric to get the yellow coloring and it’s nutrient benefits. And its really easy to make. Thank you so much!!
You’re welcome! So glad that you like it!
I love this butter! It’s tasty and healthy and I will never buy store bought butter again. I made the stick butter in a butter mold and it lasts a long time in the refrigerator. It needs some perfecting since it’s the first time I’ve tried it so I’m going to put it in a glass container with a snap lid next time. I used almond milk(that’s what I had) and sunflower lecithin and will try olive oil instead of canola since it may be even more healthy. We will see! Thank you for this recipe, it’s easy and quick once you get the hang of it. The video helped a lot too!
I’m so glad that this recipe worked well for you! It has been my go to for years!
Welllll I’ve been making this for a few years without fail but last night I was in a hurry and forgot to let the milk & acid sit for 5 min. and my butter is like a thick yogurt consistency after chilling overnight. My fault! Have you had to fix this issue before yourself? Can I add more coconut oil to firm it up? I assume so, but wonder if everything needs to be brought back down to room temp before blending? Thanks!
This recipe is THE best butter recipe that’s easy with minimal ingredients. I made it just as written. I didn’t heat up the coconut oil too much, and I did leave everything at room temperature for a bit before mixing it together. I microwaved my coconut oil and stopped heating it when there were still a few tiny bits of solid left. Those melted after I took it out. I used Edensoy plain soy milk–only two ingredients (soybeans and water). I used an immersion blender in a cylindrical container. Almost as soon as the mixer hit the liquid, it began to turn to butter! I didn’t have refined coconut oil so I did it with virgin, and it was still OK. Yes, there is a bit of coconut flavor, but I am a curry fan and I’m used to things tasting like coconut! I have some refined now that I will try next. I found it super easy to make, even on the first try.
I’m so glad that you like this recipe as much as we do! 🙂
Will Cashew Milk work?
I have not tested it. Usually plant milks with more protein work better to make the butter thicker and creamier. (This is from the reaction of the acid in the lemon juice with the protein in the milk.
Important notes on what worked for me!
I made this about 4 times with all failing until the last time. It just kept separating which ultimately led to a weird texture that was waxy/grainy and just a bit off-putting. I was using good quality soy milk that met the protein requirements, lemon juice for the acid, refined coconut oil, mixed the granules with the milk and also tried mixing just in with everything in the blender and used soy lecithin granules. Still, all separated and the result was the same-bad texture. Then, on my last try, it finally worked!!!
Here is what actually worked for me.
1. Lecithin: I used soy lecithin granules. Mix the lecithin in with the milk before adding the acid. I didn’t whisk it like crazy, just stirred a bit until it was mostly dissolved then added in the acid.
2. The acid: I had better results with apple cider vinegar than lemon juice but lemon juice would probably be fine too. Main tip here is that my soy milk was absolutely not curdling with the 1/4 tsp, I had to double the acid, maybe even a teeny bit more. It still didn’t curdle significantly (in a way that mimicked buttermilk) but better.
3. VERY IMPORTANT (maybe most important): DO NOT use cold milk. It will not emulsify properly and will cause it to separate. The milk and coconut oil need to be the same temperature (roughly-you don’t need to use a thermometer, just dip your fingertip in). As in, DO NOT use cold milk and warmed coconut oil.
Warm up the coconut oil, even if it’s already softenend/somewhat liquidy. Not hot, but warmed so that no white colour remains at all and then just make sure your milk and oil are about the same temperature (tepid or just lukewarm). Again, just make the oil and milk about the same temperature before integrating.
4. Nutritional yeast: Not essential, but I did add 1 tsp like others suggested.
5. Tumeric: Less is more. It didn’t look yellow enough so I added a teeny bit more. Too much makes it fluoro yellow. Whitish to very pale yellow is the end goal.
6. Salt: Don’t increase the salt, it’s salty enough, maybe a bit too salty. And I love my salt! I would possibly decrease this next time by 25%. Also be sure to label it as ‘Salted’ when freezing or storing as I ruined a batch of homemade vegan cream cheese when I used this as I didn’t decrease the other added salt in the recipe so the cream cheese ended up very salty. The cream cheese was for a cheesecake and way too salty for that but I was able to use it in some savoury dips/cheese ball. So if using this for recipes, be very mindful to decrease any other added salt in the recipe or it will be very salty. I’m going to make some with minimal salt (maybe half the salt) to use for baking.
7. Measurements: I believe this recipe is a US recipe and therefore using US measuring cups. Depending on where you’re located, your measuring cups may be different amounts. 1 cup in the US is generally 240ml and a US tablespoon is 15ml. In Australia (where I am), 1 cup is 250ml and a tablespoon is 20ml. My measuring cup just happens to be a US cup so that’s what I used in mine. I also noticed that if you click on the option to use metric measurements, it doesn’t seem accurate. E.g. 1/2 a US cup is 120ml but the metric option shows 118.29ml which is weird. Maybe not significant for the recipe as written but varying the amounts (up or down) could impact significantly.
All this to say, assume this recipe is based on –
‘1 cup’ being US and 240ml (and 1/2 cup being 120ml) which is what worked for me.
Implementing these changes produced a beautiful vegan butter with excellent texture and creaminess with the perfect consistency!
I love this butter so much!!!! It’s fabulous on toast with nothing else. I’m eating a lot more bread just so I can have this butter on it. 😄 I love your recipes, you are my go to for wonderful vegan recipes, particularly dairy and meat alternatives. The recipes are simple and not too time consuming and always turn out so delicious.
Thanks so much, Fiona! I’m so happy that you like this butter recipe and my other recipes too!
I made a soy free version, but I used Oat Yogurt instead of milk + lemon. I added the teaspoon of nooch and just a smidge of turmeric for a creamier color (not enough to be yellow) I used 1/2c sunflower and 1/4c untoasted sesame oils because it was what I had on hand. The flavor is marvelous! The texture is not perfect, but acceptable and I will try warming up the yogurt a bit and stirring the sunflower lecithin into the warm yogurt until well dissolved to solve for graininess.
Glad that you liked the recipe.
Thank you for this recipe. I have made this recipe 3 times now. Each time I have used a different oil instead of the canola. ( only because I don’t have canola) 1st time I used grape seed, 2nd time olive oil and the most recent time I used sunflower oil. I have to say this last time with the sunflower oil has been my favourite so far. Each time I have been pleased with my results but this last time has been the best. The 2nd and 3rd time I added a bit of turmeric as well. The sunflower oil I think made it a little creamier than the 1st 2 tries but in saying that I’m not sure if the temperature affected it as it was such a warm day and maybe it didn’t cool quick enough. Regardless I’m so pleased I came across your recipe, I will not buy store bought again.
I love the taste. Thanks for the recipe.
You’re welcome. So glad that you like it!
Oh my goodness! First time butter maker. I came across your recipe and thought I’d give it a go. Took me a bit to find the soy lecithin but so glad I did before I attempted to make this. I used grape seed oil instead of canola oil, it’s what I had on hand.
I just took it out of the freezer to sample it on a piece of toast. Hands down absolutely the best tasting vegan butter. I don’t think I could possibly go back to store bought. Thank you for sharing your recipe.
You’re welcome! I’m so happy that you were able to find soy lecithin and make it.
How long will it last refrigerated?
My whole family loves this butter recipe. It’s a keeper!
This makes me so happy! We love it too!
LOVE, LOVE, LOVE! This recipe is amazing! I just wish it hadn’t taken me so long to find it! Thank You, Thank You, Thank You!
I’m so glad that you found it too! I love this butter too, we can’t use anything else! 🙂
I’m a preschool teacher and I want to make this with my class, but we wouldn’t be able to use a blender. Would it work with shaking it like when using heavy cream?
Great question. I have never tested it that way, but I think that it would work with a lot of shaking. Enjoy. 🙂
Your Amazon link https://www.amazon.ca/dp/B074PW33NZ/ref=as_li_tl?ie=UTF8&linkCode=gs2&linkId=17f2e6f3fb672cf92e6822f973384b1f&creativeASIN=B074PW33NZ&tag=thehiddenve0f-20&creative=9325&camp=1789
for soy lecithin is currently out of stock. Could you recommend another Amazon brand.
Thanks
I have also used this one and it’s good… https://amzn.to/3GEFZde
Will sunflower lecithin work with soy milk?
Yes, it will work fine. Enjoy!
I’ve been making this for vegan butter for about a year and am so happy I found this recipe! It really does taste remarkably like cow’s milk butter. The recipe is relatively easy though cleaning oil out of the measuring cups and blender isn’t fun. But I’ve discovered if I put a bit of plastic wrap over the top of the blender before I put the top on it saves cleaning the top. Thank you so much! ❤️
I’m so happy that you like the recipe. 🙂
I’ve NEVER commented on a recipe before. This recipe exceeded my expectations. It was so tasty and smooth. I toasted a slice of bread for my husband, and added the butter. He’s normally easily fooled, but he was this time. Simply delicious!! Thanks so much for sharing!
You’re welcome! Thank you for commenting! I’m so happy that you liked the recipe!
I have been making this regularly for the last few months. I can’t go back to store bought! The first time I made it, it separated but tasted good. Then I followed tips in comments and mixed the lecithin into the soy milk first. Comes out perfect! I do both the spreadable and stick versions. I store the sticks in the freezer and pull them out as needed for cooking/baking.
I’m so glad that you like the recipe, Rosi! I love hearing that people no longer buy store bought after making this recipe! 🙂
Can you make your recipes shareable? Would live to email all my vegan friends your recipes!
You can email them the link to the url. Just copy and paste the link address.
I completely agree with the title “THE BEST VEGAN BUTTER”! This is incredible, and after trying so many recipes, to finally find and use and LOVE this recipe makes me do the happy dance every time we use it.
The best compliment I can give you? We no longer purchase vegan butter at ANY STORE. This is all we use!
Thank you for such a marvelous recipe!
Aww! Thank you so much, Jenna! I spent a long time perfecting this recipe and I’m glad that you like it as much as we do! 🙂
I made this twice now—the first time I messed up because I only put 1/4 cup of canola with 1 cup of coconut oil. It was THICK and it cooked instead of melted… it had good flavor. I used it for a chocolate buttercream. It separated a tiny bit because I had no lecithin. I made more—with the appropriate proportions and I hope it will melt better this time. I’m actually pleased with it. I took pictures to share, but then realized there was no where to share them!!! Anyway, thank you so much for the recipe! I got tired of margarine because the taste was so off. The plant based stick butter is my fave but it can get pricey. This may be slightly cheaper—not sure, but at least I know what I’m eating!
I’m glad that you like the recipe! It is defiantly cheaper if you can find good deals on coconut oil. I find it for a great price at TJ Max, Marshalls, Home Goods, or order in a big tube on line. 🙂
hi, I want to try this.. I have agar agar on hand, will that sub for the lecithin?
asking, because I have that on hand
No, you can’t swap agar agar for lecithin, but you can just leave the lecithin out. It may start to separate a little if left at room temperature without the lecithin added, but it will still work without it. Enjoy! 🙂
Hi
I have tried twice now, and it seperates totally 🙂
By shaking the containers while they froze, I got it to kind of recombine.
I have used sunflower lecithin granulates. This should work according to the recipy as I read it.
Any suggestions?
I’m not sure. I have never had it separate as long as I used lecithin, but I usually use soy lecithin, not sunflower. What type of plant milk are you using?
If I am allergic to coconut & nuts what can I use as an alternative to the coconut oil?
The only alternative to coconut oil is palm oil or Crisco. You need an oil that is solid at room temperature.
Do you think it would if you replaced avocados for the coconut oil? Need something more heart healthy.
I have never tested it, but it may work. Let me know if you try it.
Hi just need to know one thing. Can you use unsweetened soy milk?
Yes, unsweetened soy milk will work well, enjoy!
Amazing! I am so happy I tried this. I found the recipe while looking for vegan carrot cake… at first I thought it would be a lot of work to make the butter for the cream cheese icing, but I was wrong! I can’t believe I haven’t tried this sooner. I followed the recipe to a T, however I forgot to buy soy milk. I took a chance with “half and half” creamer made from oat and coconut milk. It has a 10.5% fat. It worked really well. Next time, I will experiment with other oils such as avocado or sunflower as I am not a huge fan of canola. But thought I would follow recipe first time around. I would also say to put the lecithin in with the milk as suggested above, as mine didn’t fully absorb (little flecks present).
I’m so happy that you liked it. You can put the soy lecithin in with the soy milk and lemon juice, this helps the little yellow flecks dissolve more before blending.
Hi does the milk have to be room temperature before adding? I made this 3 times exactly and the oil still separated completely and I don’t know why.
No, it works best with cold soy milk. Did you use lecithin in it? That should bind the soy milk and oil so it doesn’t separate. I’ve made this countless times and that has never happened to me so I’m not really sure.
Tried this tonight – very easy. However, it didn’t set – believe i got wrong coconut oil – picked the liquid instead of solid. Going to use it as is and get solid oil for next batch. I do find it too salty so will half it next time. Thanks for the recipe!
Yes, you need to use the type of coconut oil that is solid at room temperature. It will not set otherwise. I hope that you try it again with the solid refined coconut oil. Enjoy! 🙂
I would love to try this. I just looked online at Walmart and they have ripple pea milk but the price is outrageous. In store might be priced better but I’m a caregiver to someone who is homebound and never get to the store. Can I substitute almond milk? I always have almond milk in the fridge. Thank you.
Hi Lea, I have made this vegan butter three times now already, and it is absolutely delicious. I will never buy commercial vegan butter again, that’s how much better this homemade recipe is! I have not once used soy milk or ripple milk. I always use oat milk. It has a rounded slightly sweet flavor, and it is thicker than other plant milks. I put in the lemon juice to curdle it, but it never seems to curdle really. Regardless, it comes out perfect in the end: smooth yet firm and creamy all at the same time. One thing I found is that one should not use a deep container to fill it off. I think the idea is to let it take in the freezer as fast as possible. Obviously, if you have a big volume, it takes longer to freeze it all the way through. I now use small glass bowls with a plastic lid, and I only filled them half. This seems to be the most efficient way to get it to thicken properly. After that, I keep all of my little glass bowls in the freezer, and I only take out one at a time to use.
I’m thinking that making stick butter would be also a good idea, because the shape of the stick butter is just about the right volume to make it thicken in the freezer!
How about coconut milk, will that work?
It’s a shame you’re recommending canola oil, it’s so unhealthy…!
Thanks for all the recipes!
Coconut milk doesn’t have enough protein to make it thick and emulsify. You can use coconut milk, but it will have a slightly different texture. My sight has vegan recipes, not necessarily healthy ones. I make no judgment about health.
Stop perpetuating pseudo science that has been disproved over and over again on someone else’s recipe. It’s rude tbh. Also organic non gmo canola oil is completely fine for you and there is no actual scientific evidence linking it to poor health. In fact general consensus says that it can be beneficial and is a good cooking oil with a high smoke point. It’s also affordable and not everyone can spend $14 on a thing of avocado oil (although it is my favorite). Don’t believe everything that comes out of the mouths of unqualified health food bloggers and maybe do actual research before you comment rude things on someone’s blog.
This is amazing! I need vegan butter for so many things; it’s expensive in the shops. This is tasty, easy and so much less expensive. One thing I mention, respectfully: please, please don’t recommend Amazon. I don’t think you want politics on your delightful site, so I will say only that the other sources you mention sell directly. Amazon and its owners do not reflect the ethos or ethics you represent. They have not been good citizens locally or nationally; further, they bully and exploit their workers and vendors, who have little power against the monopolistic bullying. I always find an alternative to Amazon, often the very vendors that are on Amazon, and find I can wait a bit for what I need without a problem. The price is usually favorable. Again, thanks for this recipe and your thoughtful writing.
Hi Monica, I don’t eat soy and you shouldn’t, too – it’s all GMO nowadays, no matter if they brand it like “organic”. What’s an alternative to soy milk? Thank you!
Ripple works well if you don’t want to use soy.
Stop promoting pseudo science and information that has been disproved a million times over. I highly doubt you are a professional and even if so you don’t get to decide what is general consensus or not. Soy is a quality source of plant based protein and vegan ppl already struggle to get enough protein.
Simone, if it’s USDA Organic then it’s non GMO. GMO IS NOT ALLOWED in organic products. Also if it’s got the seal of the non GMO Project then it’s non GMO, organic or not.
Hello Simone, I make my soy milk with organic soy beans, and organic standards require that soybeans are grown without synthetic pesticides, herbicides, or fertilizers. The National Organic Program (NOP) also explicitly forbids the use of genetically modified organisms (GMOs).I am lucky to be able to buy soy beans in bulk from a company that makes tofu and they sell to individuals… I buy 25 lbs bag at a time and use them for soy milk and tofu.
For the soy milk, do you recommend using original or unsweetened?
Hi Laura, I usually use the original, but the unsweetened will also work.
Hi Monica, I’m very new to homemade dairy vegan but very motivated! I made a recipe similar to this: 1-1/2 C Refined coco oil, 1/2 C soy milk, 1/4 C canola, 1/2 tsp salt and 2 tsp lecithin. I meant to add the vinegar but forgot and made this basic recipe. It was unbelievably tasteless. And I’m 100% positive I followed the directions carefully. It was like eating a spoonful of canola oil. Bland!! Does the vinegar or lemon juice make that much of a difference? I intend to use your recipe next time but I wanted to ask you what you think might have been my problem before I invest more ingredients into this project. Thanks so much!
I think that it does add flavor. I also use more salt which will give it more flavor. Sweetened soy milk will also give it more flavor than unsweetened.
This is fabulous! Thank you for sharing this recipe. I will never buy margarine again. Ever.
I’m glad that you gave it a try! It’s so much better than any store-bought margarine! 🙂
Hi Monica!
With the lecithin, did you use liquid or powder? Thank you!
I have used both and both work equally well. I find the powder to be less messy. Enjoy the recipe! 🙂
Hi Monica, in your recipe you mention liquid and granulated lecithin, so I bought lecithin granules, but here you call it powder. What I read today see link https://www.lecitein.com/blog/lecithin-powder-vs-granules-different-uses-and-benefits, after I bought the granules. They say: “Powdered lecithin is easily dissolvable as compared to granules of lecithin”.
Could you please clarify that granulated lecithin is ok to use.
Thank you.
Kind Regards Monika
Any form of lecithin will work interchangeably in this recipe.
Can this be divided to try a smaller batch?
(Just to test it out, don’t want to use all my coconut oil.)
I know some recipes don’t work if made any smaller than amount listed.
Could I substitute some of the coconut oil for palm shortening?
(Snagged a tub of organic fair trade stuff on clearance! Yay!)
Is your blending cup glass or plastic?
Thanks. 🙂
Hi Kat. You can definitely make this in smaller batches. I think that the palm shortening would work to swap out the coconut oil, but I find most palm oil to be a little firmer than coconut oil, so your butter may not spread as easily when cold. My blending cup is plastic, but you can use glass if you have one. I wish I had a glass one, just have the plastic one that came with it. Enjoy! 🙂
Greetings Monica, are there any substitutions for the coconut and soy products? I have a granddaughter that loves to spend her time in the kitchen with me but she’s allergic to just about everything (coconuts, dairy, soy, nuts to name a few) and missed out on amazing foods like cheese, butter, ice cream, etc. due to her allergies. I enjoy your website and hope to find more vegan treasures here so she can enjoy her love of food.
Hi GiGi, I’m sorry that your granddaughter has to deal with that. Being allergic to dairy, soy, nuts, and coconuts, make it very hard to find dairy-free things to eat. You can use palm oil instead of coconut oil, but it’s a little hard to find.
That’s so sad to hear. I’m betting she’s highly vaccinated, and if her doctor hasn’t tested her for “leaky gut” (Small Intestinal Bacterial Overload, or SIBO), he really ought to. Once the gut is healed and the microbiome is working well again, she’ll be able to tolerate a lot of foods she can’t handle now.
OMGosh (and dammit) this is soooo delicious. I made my first batch of this today, and wow, it tastes EXACTLY like dairy butter, much tastier than the margarine I’ve been using since ages ago. The “dammit” is because I don’t know if I will have the self-control to not overindulge in this so delightful butter.
Wish me well, haha.
I have the same problem. Lorri! It’s so darn good! Enjoy! 🙂
I have a friend here hooked on this recipe too. And, I use extra virgin olive oil in mine, despite your saying the flavour is too strong. Not for this chickie, I LOVE it! Sooo tasty, I’m still managing to NOT overindulge in it, which is a good thing for me, haha.
I’m so happy that you like it Lorri, and that the olive oil flavor isn’t too much for you when you make it this way. 🙂
Is this gonna be good for making vegan butter cream? I tried it with other home maid vegan butter but oil and liquid separated after a certain time. But thought this might work because it has lecithin in it? 🙂
Yes, the lecithin will keep it from separating. It is a key ingredient in making butter that acts like store-bought brands. Enjoy! 🙂
Hi,
This is the first time I am trying to make the butter and I didnt have all the exact ingredients (nowhere around in stores) so I substituted canola oil with sunflower oil, and for the refined coco oil I used the virgin one. It didnt set at all. Which one would be the biggest “sin”? The unrefined coco oil?
The virgin coconut oil will give you a strong coconut flavor. You need to use refined to not have that taste. Sunflower oil should be fine. 🙂
Heavens! This recipe is amazing! Don’t think I will ever buy marge again. Recipe rather salty for our tastes, we reduced to half, and I might try unsalted version next. Subbed pinch of xyntham for the letchinin, worked fine. Thank you!
You’re welcome! I’m so happy that you liked the recipe! Enjoy! 🙂
OMG!! THIS IS AMAZING! Thank you so much for the recipe. My husband said it taste better than real butter. Love all your recipes! We are Gf, dairy free, soy free the Sunflower lecithin was a great alternative to soy, wish there were more soy free alternatives. Keep the recipes coming!
I’m so happy that you and your husband liked it! I have family members who eat dairy, but will pass on real butter when mine is on the table! I’m so happy that it is a good alternative for dairy lovers too! 🙂
This looks great! Can’t wait to try it. Do you think this recipe would work with reconstituted soy milk powder? Thanks!
Thanks, I think it would work with soy milk powder, but I’ve never tested it, so I can’t be sure. Enjoy! 🙂
Really very very good for the licithin I put a little boiling water so as not to have a small piece in the butter and it worked really well. I have tried several butter recipes and your recipe is perfect I adopt it. I use milk cashews
I’m so happy that you like it, Marlene! I tested and retested many combinations of ingredients to get to this recipe. I’m glad it works well for you! 🙂
I’ve had this recipe saved for a while, but I’ve yet to make it. Quick question:
One recipe I’d like to use this for is a rough puff pastry. In case you’re unfamiliar, puff pastry is typically created by buttering and folding layer after layer of dough; as I understand, it’s a pretty awful, laborious, time-consuming process. A rough puff pastry is a shortcut version, which requires first freezing the butter and then grating it into the other ingredients. If done properly, this allows the frozen bits of butter to rapidly evaporate in a hot oven, creating little steam pockets which mimic the texture of a traditional puff pastry.
I’ve done this a handful of times with mixed success. I’ve mostly been happy with the results, but I once tried to use a tub margarine, and it turned out terribly. It was much harder to grate than the sticks I’d used other times, and I think by the time I’d finished, the margarine had already melted from its frozen state. I found out later that tub margarine contains more water than the stick kind, which I’m sure is why I had such a difficult time grating it.
Do you think this recipe would work for this purpose? If so, do you think it would be better that I use the stick or the tub variation?
Hi Josh, I have not used this butter to make rough puff, but it has been something on my list of things to try. I think it will work, but you will probably want to use the stick version of this recipe. You may also want to reduce the amount of soy milk to 1/3 cup instead of 1/2 cup to reduce the water content a little more. I think that the extra water content in the tub margarine is what is giving you the problems too. Let me know how it comes out! Enjoy! 🙂
Hi Monica,
I will Josh replied to say if he tried the modified stick version of your recipe for puff pastry. Have you?
Have a good day!
Hi Laetitia, I have not had time to test it yet.
I haven’t made this yet, but I make my own soy milk, which is not as thick as commercially made. Will this work?
Also, canola oil is just about 100% GMO, and I won’t use it. I’m not sure rapeseed (canola) is all that healthy anyway. Is there another cold pressed oil I can use?
Hi Joy, I think that your homemade soy milk will work, but it’s hard to say for sure. You can use light olive oil or any other neutral-flavored oil that you want in place of the canola oil.
Hi Monica,
Thank you for this recipe! I am in search of a good vegan butter to use in my baking. How does this butter fair when making cookies?
Thank you!
Hi Christy, I find that it works great for baking cookies, just be sure to use the stick version for best results in baking. 🙂
As long as you buy canola oil that says “expeller-pressed” (or “cold-pressed”) and “non-GMO” on the container, you will be using a very healthy, non-controversial oil (2nd only to expeller-pressed, extra-virgin olive oil). It may be harder to find and will cost more, but it’s the sure way to get something that is healthy and you don’t have to worry about.
Hi, Monica,
Just had to say that this is a great butter recipe. When I decided to become vegan I tried several butter recipes. By far this is the best I have tried. I was doubling the recipe but last week I quadrupled it with great success. I had to make it in the food processor because my blender broke and it came out really well. I always put the butter in cup measures and keep them in the freezer until ready to use. What I particularly like about this recipe is that it is spreadable right from the fridge. One has to be careful not to leave it out of the fridge too long as it will liquefy. But this is my go to recipe for butter.
Hi Monica! Thank you for your recipe. I tried making it last night. I just didn’t have canola oil so I substituted olive oil. I liked tha flavor of this recipe, i just didn’t get the texture perfectly. it was a bit on the “grainy/waxy” kind. I don’t used the nutribullet. would a food processor work as well? thank yoh.
Hi Karen, I think that some of the coconut oil started to harden when you added the cold milk. Heat up your coconut oil a little warmer next time or let the milk come closer to room temperature before combining them next time.
Hello again! I love this recipe and have made it a few times with success, but today I made the tub version & it was great, but when I went to make the stick version it wouldn’t emulsify and kept separating until I cooled it enough to finally get it to stay together enough to pour into molds. The only difference is that the coconut oil for the stick version was a little warmer than room temp, and I didn’t realize until after blending. Does warm oil cause the butter to split? Thanks as always! :O)
I’m so happy that you like it, Jenbro! I haven’t’ had an issue with it separating unless I didn’t use the lecithin. However, the consistency isn’t as good if I get the oil too hot or don’t put it in the freezer right away. Something about cooling the butter quickly is part of the magic that makes this butter work. Enjoy! 🙂
I’m looking forward to trying this recipe! Do you use plain soy milk that is sweetened? I haven’t seen unsweetened soy milk at Aldi. I always buy Silk unsweetened soy, but I want to get the best results. Thanks!
Hi Parie, yes, I use the plain soy milk that is sweetened. The soy milk that comes in the red carton at Aldi works great, the plain Silk brand also works well. Enjoy! 🙂
Thanks so much for the quick reply. I’ll try the Aldi brand. Can’t wait to try to it!
You’re welcome! Enjoy! 🙂
Hello, I will try the recipe and was wondering if the canola oil should be refined or unrefined. The canola oil I have at home is unrefined and thus has a smell and is very yellow. It doens’t look like you have used unrefined canola oil in your pictures, but would like yu to confirm. I’m looking forward to replacing Earth Balance. Thank you!
I would use refined canola oil for the most neutral flavor. You can use any neutral flavored oil that you wish, but canola oil gives it the flavor most similar to real butter in my opinion. Enjoy! 🙂
Hi there! This recipe looks great! Just wondering — if you’re using soy lecithin granules, do you need to powder them or dissolve them before using? Or do you just use them in their granule form?
Thank you! <3
You can just add the soy lecithin granules as is. I like to add them to the milk and lemon juice and let it sit for 5 minutes. They seem to dissolve better in there and then you don’t get the little flecks of yellow lecithin in your butter.
Your recipes are amazing! I have a question abt the milk – I wonder if you know whether reconstituted powdered soy milk would work here? (unsweetened, no other ingredients) I do have access to Trader Joe’s awesome plain soy milk, but can’t often get there. Thoughts? :O)
Hi! I tried this recipe for sticl butter yesterday and added xanthan gum in replacement of lecithin. However, the vegan butter did not harden up at all. It ended up tasting like margarine and is softer than margarine. I need it to be hard for italien buttercream frosting. Is it because of the xanthan gum?
If you added enough coconut oil, it should be sold after refrigerated. the lecithin makes it so it won’t separate, so the xanthan gum is just not quite as effective at keeping the soy milk and oil from separating.
Hi, I have your guide to homemade vegan staples, which is where I first tried your butter. In that version it calls for 2/3 cup of both coconut and canola oil. This one calls for 3/4 cup of each. Has the recipe changed?
Yes, I found that I liked it with slightly more of each oil.
Hello Monica, I came across your recipe, and out pf all of them im gonna try yours first. My question is, i have liquid sunflower lecthin. will that work alright if this butter is for Italian meringue buttercream frosting, or should i really go for the granules? thanks for your advice.
You can use the lecithin liquid or the granules it really doesn’t matter which. Enjoy!
This is a wonderful recipe. I just whipped up a batch in a few minutes. It’s cooling now.
I was wondering how much butter this is supposed to make. I only got 350gr which is about 1 and 1/2 sticks of butter. I need to frost an 8 inch cake. So I need a few batches.
Can the recipe be tripled all at once??
I’m so happy that you liked it! Yes, you can double or even triple the recipe, but you’ll need a big blender. 🙂
Thank you sooo much, this recipe will be one of my favorites of all time!
Out of curiosity: Do you happen to know why is it necessary to let the milk curd before using it. or what happens if you skip that process? Greeting from Mexico and great job in all your recipes!
The acid in the lemon juice curdles the milk and makes it curdle. It gives it a more earthy butter-like flavor. The acid also helps to thicken the butter when you blend it. Any acid will work for this if you don’t have lemon juice, you can also use apple cider vinegar. If you don’t add it at all your butter won’t be as thick and it will change the flavor slightly. If you add it without letting it sit with the milk for a little bit first, it also won’t be as thick and flavorful. Enjoy! 🙂
Hi I’m in the process of making this right now. I’m using coconut milk instead of soy and it does not seem to be be curdling after 10 minutes. I’m wondering if I should try almond milk instead. Hubby did not buy soy milk as asked 🤷🏼♀️
This butter will only work well with soy milk or Ripple (pea milk). You can add 1/2 tsp of xanthan gum to it if you have any. That will help it thicken. (Almond milk will work better than coconut, but neither will give you optimal results.
Hello! I made this butter (in stick form) to make vegan croissants and it turned out great! I messed up the croissant recipe but the butter did it’s job perfectly (if only I had done mine!). I’ve now made a second batch and I have had a similar problem both times. The butter tastes perfect, and it melts beautifully, but in its hard, non-melted form it has a bit of a grainy texture. The mouthfeel isn’t super smooth. I used the stick-instructions– what am I doing wrong? Thanks!
I’m so happy that you like the recipe, Hosanna! Are you melting the coconut oil completely before you blend the butter? If not, there may be little chunks of coconut oil in it. Also, I have heard some people say that their coconut oil is grainy, so I think that some brands can get that way. Enjoy! 🙂
I was wondering if the soy lecithin is necessary. I wanted to make the butter so that I could make vegan buttercream. Will the separation impact the texture of my buttercream?
I haven’t tried making the buttercream without the lecithin in the butter. I think that it would still work but may not set up quite as well as it would with it. 🙂
Excellent recipe! I used unsweetened almond milk with ACV instead of the lemon juice. I added 1/8 t. turmeric and 1 t. nutritional yeast as one reviewer suggested. Just perfect! Will be making this quite often. Thanks!!
I’m so happy that you liked it, Dana! 🙂
When I left it out at room temperature, the oil settled on top but I just mixed up and refrigerated and it’s fine a cohesive now. Is this a result of using the almond milk and it being lower in protein like you mentioned?
The almond milk could have caused that. It depends on the temperature of the room and how long you left it out. It will start to melt above about 70-72 degrees F.
Hi Monica. I am unable to get unsweetened soy milk. Every soy milk here (Ecuador), even unflavored, has sugar. I am able to get unsweetened, unflavored almond milk. Would that work in this butter recipe? I also have sunflower lethicin powder, is that okay?
Unflavored almond milk will work, it just doesn’t get quite as creamy. The sunflower lecithin powder will work fine. (You can also use oat milk in it – which is easy to make yourself if you can get oats). Hope that helps. Enjoy! 🙂
Phenomenal….nothing else needs to be said.
Thanks Diane! 🙂
Is avocado oil a good alternative to canola oil?
Yes, it may change the taste a little, but it will work well. Enjoy! 🙂
Hi Monica. This recipe is amazing! I did, however, have a problem with it turning into that mayonnaise consistency even though I measured the lemon juice carefully. Does the soy milk/lemon juice mixture need to be room temperature before adding to the blender? My fridge gets quite cold; sometimes even to the point where it freezes stuff from time to time. I’m wondering if its over-cooling the mixture before I can get it to the freezer.
Cheers,
Antonia
Thanks, Antonia! It doesn’t have to be at room tempature. I try not to get the coconut oil to hot (just warm enough to melt) so it will cool faster. They mayo type consistency seems to happen when I use the last bit of soy milk at the bottom of the container. I think that the gums and things they use to make the soymilk thick tend to settle to the bottom and be in higher concentrations. I also did some testing using xanthan gum as an emulsifier instead of the soy lesithin, and it made it gel like mayo too. If you just freeze the butter solid and let it warm up again it will be the right consistency. Enjoy! 🙂
Hey! I wonder if I could use vegan emulsifier instead of soy lecithin, can you help me with that?
Tks, dear
There are not very many commonly found emulsifiers. If you don’t want soy, you can use sunflower lecithin instead. You can also use 1/2 tsp xanthan gum. It doesn’t work quite as well, but it will help it not to separate a little. You can also leave it out of the butter completely and just be sure to keep the butter cold. It will only separate when it starts to warm up to room temperature. I hope that helps! 🙂
The best vegan butter recipe I’ve tried. I add 1tsp nutritional yeast, use apple cider vinegar instead of lemon juice & 1/8 tsp tumeric. I think the equal ratios of both types of oils is what makes this spreadable straight from the fridge (unlike other recipes that need to sit out at room temp in order to soften enough to spread. Thanks for a great recipe 🙂 👍
Your welcome! I’m so happy that you like it! 🙂
Hello Monica!
It is very difficult to find a cheap vegan butter in Portugal. So I have been searching online for a recipe and I found your blog!
Canola oil is rather expensive here, and I wonder if using olive oil, even light, will make it taste like olive oil?
Have you tried it with sunflower oil or know if it might work?
Thank you so much in advance!
It will work with any type of oil as long as you combine it with the refined coconut oil. Each oil has a different flavor and will change the flavor of your butter a little. Try to use the most neutral-flavored oil possible. Light olive oil works well, but don’t use extra virgin olive oil or the flavor will be too strong. I hope this works for you and gives you an affordable option! 🙂
Made it today with Westsoy plain, unsweetened soy milk, scant 1/4 t fresh squeezed lemon juice, refined coconut oil, sunflower oil, 1/2 t Real salt (keeping salt down around here) and no soy lecithin (or any sub). Put into tiny blender for 1 min, then into 1 qt Ball jar with plastic lid. (Just fit!) Into freezer for 30 min, then in fridge. Even marked the container like you did, since I knew I’d be making it often. 😀
When hubs came in, I asked him if he wanted to try it. (Made it as a surprise for him.) We both tried it on a grilled fresh tortilla… YUM!!! This is IT!!!!!!!!!
He’d been buying Miyoko and chowing it down. (He used to eat tons of Earth Balance, which I really hated him doing.) Then we found Miyoko. He loves it. For me, there’s an odd aftertaste so I don’t eat it. And it’s $$$$.
So THIS vegan butter … is FABULOUS for both of us!!! *Perfect with only 1/2 t salt!* For his blood pressure, we’ve been reducing salt. It separates a little w/o soy lecithin. Okay. It’s still perfect!! THANK YOU, Monica!! 🙂
And, I’ll eventually try the stick butter for your cake frosting. Thanks again!! Love your recipes!!
Oops! Put into a PINT jar – not a quart! Just fits in that jar.
I will be making wedding cupcakes for a vegan
couple. I bake regularly but am not vegan.
The price of vegan butter sticks is quite steep.
Your recipe sounds like just what I need to bake
multiple dozen cupcakes. How long can I
freeze the butter stick recipe (as I want to make
a couple trial batches)? Also, how long would the frozen butter need to sit out for making frosting?
You can keep the butter in an airtight container for up to 3 months. The time it will take to get to room temperature is about the same as regular butter. It just depends on the size of the container that you put it in. I would allow 2-3 hours to get soft from frozen. (Make sure you follow the recipe for stick butter so the buttercream is sturdy enough to decorate with). Hope that helps, let me know if you have any other questions! 🙂
The lemon buttercream turned out brilliant. I love that by using your stick butter recipe it didn’t have that ‘greasy margarine taste’. This is going to be my go to recipe from now on.
So happy to hear this Denise! I love that the butter doesn’t have that greasy taste too! That’s the thing I notice the most if I have store-bought vegan butter – it’s super greasy tasting and almost coats your mouth. I never noticed it until I got away from it for a while. Enjoy! 🙂
This recipe looks amazing! I have been looking for a good homemade recipe that will work for my vegan cakes and frostings. I have made some today and frozen in silicone weaning pots. I was doubling up the stick recipe but accidentally measured double the coconut oil for the milk so I ended up making 4 batches😆. Going to make some cupcakes tomorrow so looking forward to trying it in my cakes and going to try your frosting recipe too.
Oh, my that will be a lot of butter! At least it will freeze until you are ready to use it! I love it in the frosting! Hope you do too! (I’m working on my homemade vegan cream cheese frosting at the moment. It should be published today or tomorrow. You may want to try that one too)! Enjoy! 🙂
Molly Nolan, maybe we shouldn’t condemn someone for helping others. So you don’t like coconut, okay, maybe just buy vegan butter then or experiment yourself?
Monica thank you so much for this!! Living in China I have a real hard time finding dairy alternatives and have to make everything from scratch. My milk-allergic baby is celebrating his first birthday and I needed to be able to make a successful icing, so I finally have the butter substitute I need. (And its palm oil free!!!!!!) Thank you so much for this!!!
Thanks Lindsay! I’m so happy that I could help! This butter makes amazing buttercream frosting! Hope your son has a great first Birthday! 🙂 Here’s a link to the buttercream if you need it… https://thehiddenveggies.com/vegan-buttercream/
hi monica
this is so irresistable. i am so much keen to try this.
one question- if i opt to use sunflower lecithin – will powder form be okay? what would be the quantity to use then in place of 2 tsp soy lecithin?
thank you.
Urvi
Hi Urvi, you can use the powder form of the sunflower lecithin. It is an equal exchange, so you will still need 2 tsp. of the lecithin. Enjoy! 🙂
roughly how many grams does this recipe make?? currently trying to substitute my family’s animal products
The recipe makes about 3 cups of butter which is about 680 grams. Hope you enjoy it! let me know if I can help in any other way. 🙂
Hi,
I was wondering, do you think I could make chocolate bars with this? I’ve been looking for a butter/cocoa butter substitute and this looks like an interesting candidate. I’ve tried coconut oil before but was left with a rather grainy texture and I’m wondering if the same thing would happen here.
Thanks for the help!
Hi Dave, it may work for what you are looking for. You would definitely have to use the lecithin in the butter to make sure it doesn’t separate. I use it in my homemade vegan chocolates, but I would have to look at your recipe to see what exactly you’re doing with it. I have a Facebook group called Veganize Your Recipes where you can post a picture of your recipe and I will help you Veganize it. Feel free to post it there if you want. 🙂
That’s so cool. I never knew you could make vegan butter. I’m on it now!
Yes, it’s so easy and delicious, once you start making this, you will never want anything else.
I’m so excited excited to try this! Have you tried using the butter flavored coconut oil? Curious if that makes the flavor more buttery? Also, have you tried using this butter rolled into croissants? Is it firm enough?
Thanks!
I have not seen the butter flavored coconut oil near me, so I haven’t tried it yet. It has a nice buttery flavor with just the refined coconut oil, so I don’t think that you need it, but let me know if you try it. If you want a firmer butter, make the stick version. Enjoy! 🙂
Hi Monica,
I’m looking for a butter recipe that whips (still working on a good snickerdoodle recipe!). Does this butter whip well? I’m trying to avoid using aquafaba, trying to keep the recipe simple. Thanks!
Yes, it should work well for any baking, just be sure to use the stick form of the butter since the fat density is a little higher. 🙂
Thank you for sharing the recipe, I’ve lost the email before I got a chance to try it. Now I just need to get me some canola oil and I’m good to go.
Btw, your mayo recipe is the best ever, I make it all the time. I tend to add dried garlic after blending it for a really fab garlic mayo, it has really become a staple in my kitchen. I use it in salads, sandwich spread and so on. It keeps for a long time too, up to a fortnight so it’s perfect if I make too much.
So happy that you like the mayo recipe! Let me know when you make the butter! 🙂
Really like it. Had to use melted, unrefined coconut oil ( all I had on hand). I added the nutritional yeast to the coconut, almond milk and lemon juice, was that where, when I was supposed to add it?. My only butter replacement recipe that I will use from now on. Thanks again.
So happy that you like it! Yes, you can add the nutritional yeast in with the milk and lemon juice. Enjoy! 🙂
Lucky me, I just found your page on Pinterest and I am soooo thrilled, your videos recipes look absolutely yummie and I can’t wait to try them out! Many thanks from across the ocean (a Germany based plant loving foodie) <3
Anna, I’m so happy that you found me too! I hope that you enjoy the recipes! 🙂
Looks interesting but like 99% of new vegan products, ideas, recipe it is made with coconut. Allergic and hate it. Where is the law that says all things vegan must include coconut oil? Do you include for any other reason than solid at room temp?
Molly, yes, because it’s solid at room temperature and because the refined type has no flavor, it works well for vegan butter. You could also use palm oil instead if you are allergic to coconut. It is also solid at room temperature and will give you the right consistency. (Try to find ethically sourced palm oil if you can though).
Biona make an organic odourless coconut oil it doesn’t taste of anything at all. I buy mine from Ebay where you can buy different amounts of jars so saving you money. You can also find it on Amazon.
I have tried every butter recipe out there and this really is the BEST one!! Easy to make and tastes amazing!
Hi there from NZ! When I first signed up to your site, I didn’t actually receive the vegan butter recipe, oh the joys of cyberspace when you live in rural areas! But we searched around on the internet and must have found the recipe you wrote on vegan.net?? Exactly the same instructions.
And yes, this is the BEST. At first the family were gobbling it down so quickly, that I was making a double batch a few times a week with our buckwheat sourdough bread. They’ve calmed down a bit now! LOL
I encourage everyone to give this recipe a go. Very difficult to get GMO free soy milk, or lecithin. But it can be done! We have also tried an Australian brand Almond & Coconut. Was just fine.
The soy lecithin granules work better than the sunflower liquid lecithin.
We use a high speed blender (ancient 21 years old) with the small size jug, and sometimes add in A FEW SLICES OF ROOM TEMP CARROT. This gives a yellow colour – very uplifting. But if you use carrot straight from the fridge, it upsets the temp for great blending of wet and dry ingredients.
Thanks so much for the info! So happy that you like the recipe! I couldn’t find the other recipe that you were talking about, but people steal things even if you try to make them secret. I’m glad that I decided to just make this recipe public so you can now access it easier and have all the details to make it come out great every time. 🙂