Homemade Vegan Chocolates
These homemade vegan chocolates are a delicious gift for anyone on your list. Put them in a cute little box and they’re a perfect homemade vegan Christmas gift or to show your love on Valentine’s Day!
Want to save this recipe?
Enter your email below and get it sent straight to your inbox. Plus, get more amazing vegan recipes that will satisfy your cravings!
You’ll love this recipe because it’s
- dairy-free, gluten-free, and can be made soy and nut-free, too!
- A huge treat for anyone who doesn’t eat dairy and usually never gets a box of chocolates!
- Easy to make.
- Delicious and even for dairy eaters, they love them!
- An inexpensive gift that anyone will love!
- a great vegan wedding or shower favor!
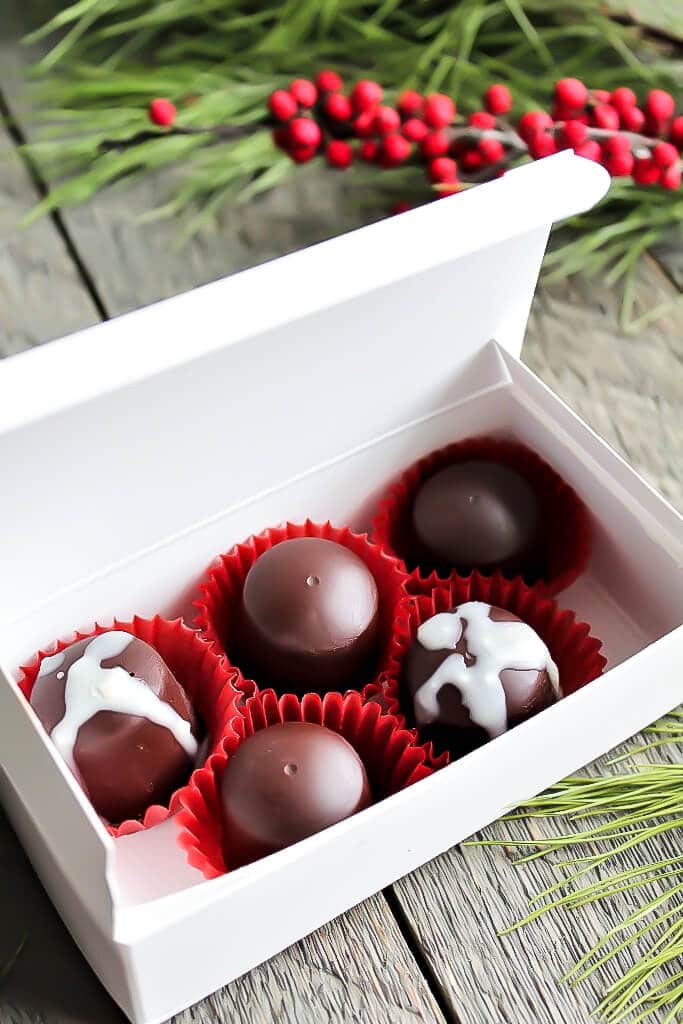
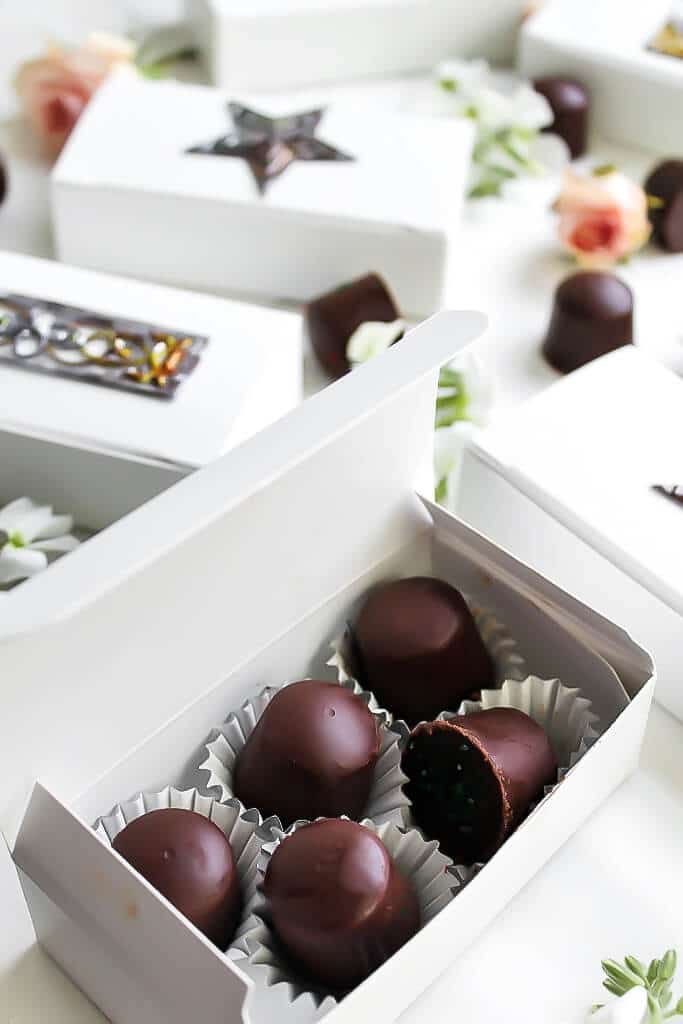
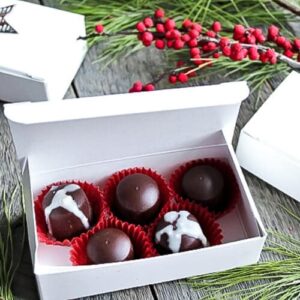
My children and I made these easy vegan chocolates for Christmas gifts for the whole family last year. We set up an assembly line and quickly made dozens of vegan chocolates filled with peanut butter, raspberry, caramel, and peppermint cream. We placed them in simple white candy boxes and decorated them with metallic stickers from The Dollar Tree. They looked beautiful and professional with minimal time or effort.
I like to make these chocolates as a special treat for Valentine’s Day or Easter, too! They would also make a beautiful homemade vegan wedding or baby shower favor!
Fillings
You can use almost anything you like inside your chocolates. You only need about 1/2 tsp in each chocolate. These are our favorite fillings:
- Peanut Butter: Not much tastes better than chocolate and peanut butter. I also like sprinkling a little kosher salt on these bottoms!
- Jelly or Jam: Raspberry jam is one of my favorite fillings for these homemade chocolates, but you can use any flavor you prefer. Jam makes a delicious, effortless filling for these chocolates, requiring no special preparation.
- Caramel: I love using my salted vegan caramel to fill these chocolates! It involves making your own caramel, but once you taste it, you’ll be glad that you went through a little extra effort!
- Butterscotch Sauce: If you want the taste of caramel without the hassle of making it. My vegan butterscotch sauce tastes very similar, and it’s much easier to make.
- Peppermint Cream: This is like the creamy peppermint filling inside of a peppermint patty. It’s super easy to make your own with just a few ingredients.
- To make the peppermint filling, mix 1 cup powdered sugar, 1 drop of peppermint essential oil or 1/4 tsp peppermint extract, and 4 teaspoons of plant-based milk. Stir until it forms a thick paste. (about the same consistency as peanut butter).
Decorating each flavor of chocolate
You want to ensure that all your flavors look slightly different, so people know what they are biting into. I also like to include a little note in the box that says what each flavor looks like. To make your chocolates look different, you can…
Sprinkle something on the bottom.
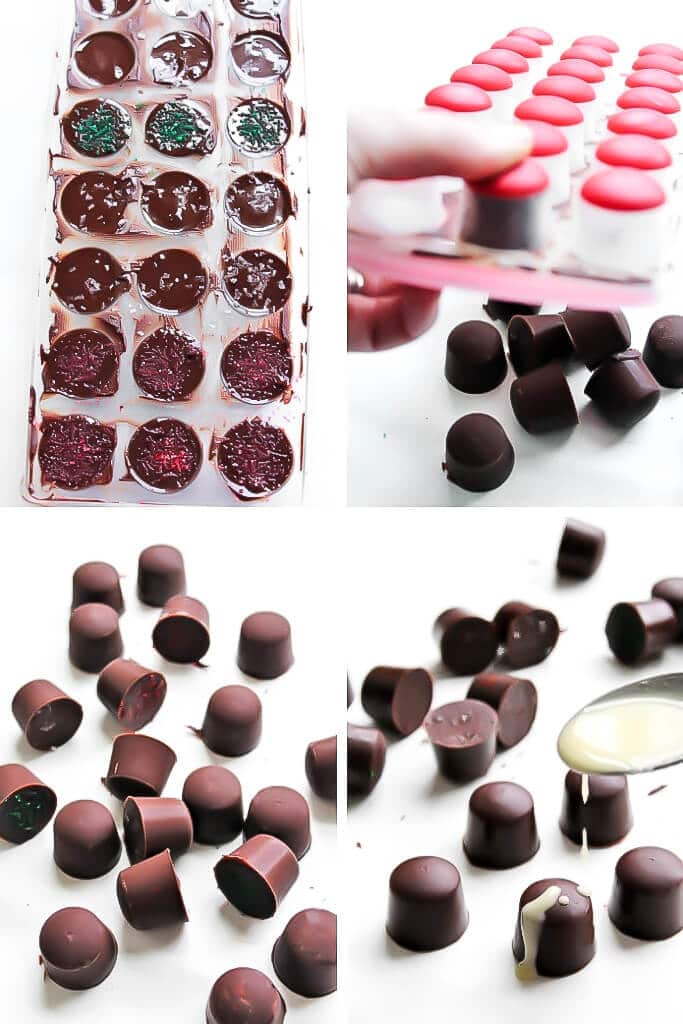
When you finish making the chocolate, and it’s still warm and sticky, add some kosher salt, sanding sugar, crushed nuts, or sprinkles to the bottom of the chocolate. (This will actually be the top of your mold, but the bottom of the chocolate). (Salt tastes great on your peanut butter or caramel chocolates, and some green sprinkles or colored sugar work well for the peppermint-filled ones).
Note: Most sprinkles and colored sugars contain confectioners’ glaze (this is made from insects). Look at your natural food store for vegan alternatives, or order vegan sprinkles on Amazon.
You can also buy vegan sanding sugar (dye-free), or make your own by adding 1 drop of food coloring to 1/3 cup of vegan sugar and stirring for a few minutes until evenly colored.
Drizzle over the top
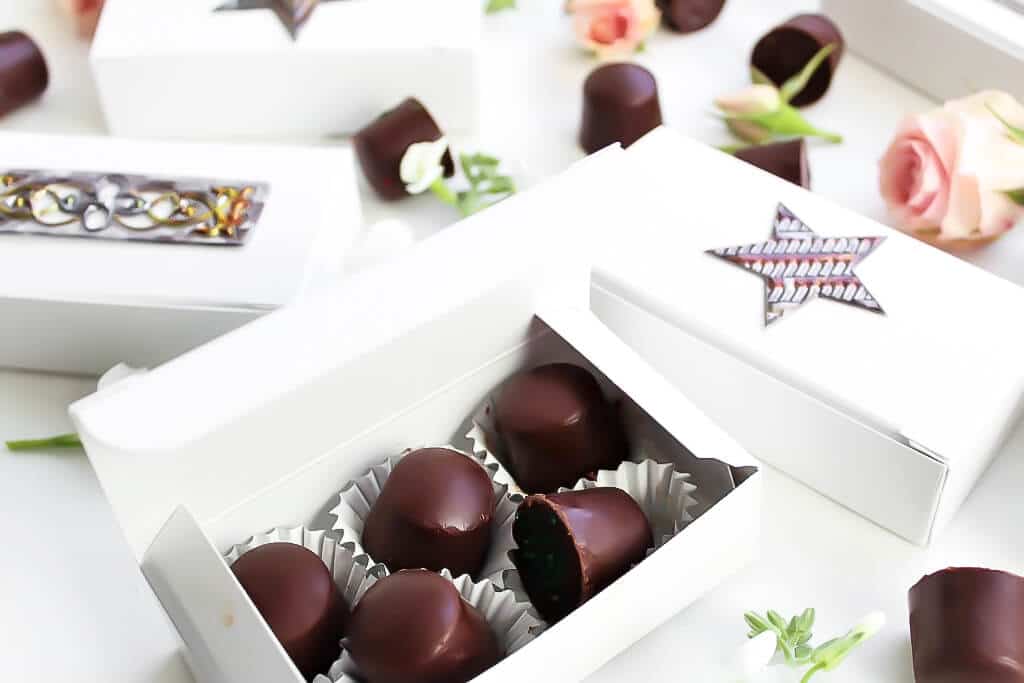
Once your little chocolates have set and you pop them out of the molds, you can drizzle additional chocolate over the top. I prefer using melted white chocolate for this because it looks attractive, and you can add a drop of food coloring to create any color drizzle you like. (I like the taste of white chocolate with raspberry or jam-filled chocolates).
Note: If you want vegan white chocolate, the easiest way is to melt vegan white chocolate chips or a vegan white chocolate candy bar in a double boiler, then drizzle it over your chocolates.
How to make chocolate gift boxes
Find a box
I like plain white candy boxes since they are an ideal size for these chocolates. I find them at my local cake and candy-making store, but you can easily order them online. Any little box that is about an inch high will work. You can also find tan boxes on Amazon for a more natural look.
Use candy liners
To make the chocolates look prettier when you open the box, put each chocolate in a tiny cupcake liner. This also helps protect them from shifting around and breaking while in the box.
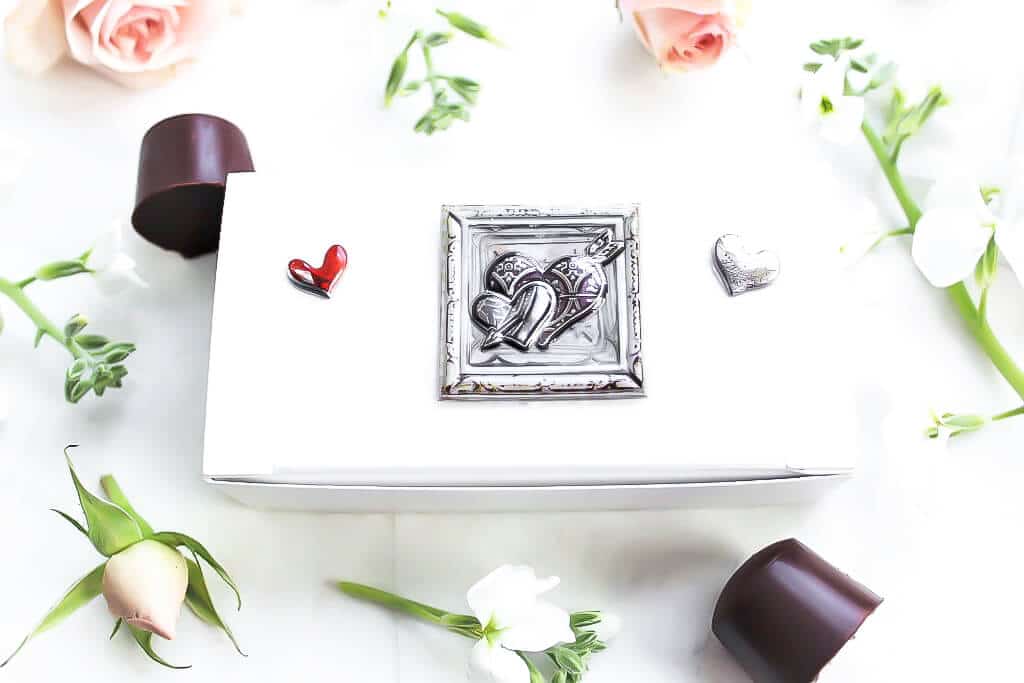
Decorate the gift box.
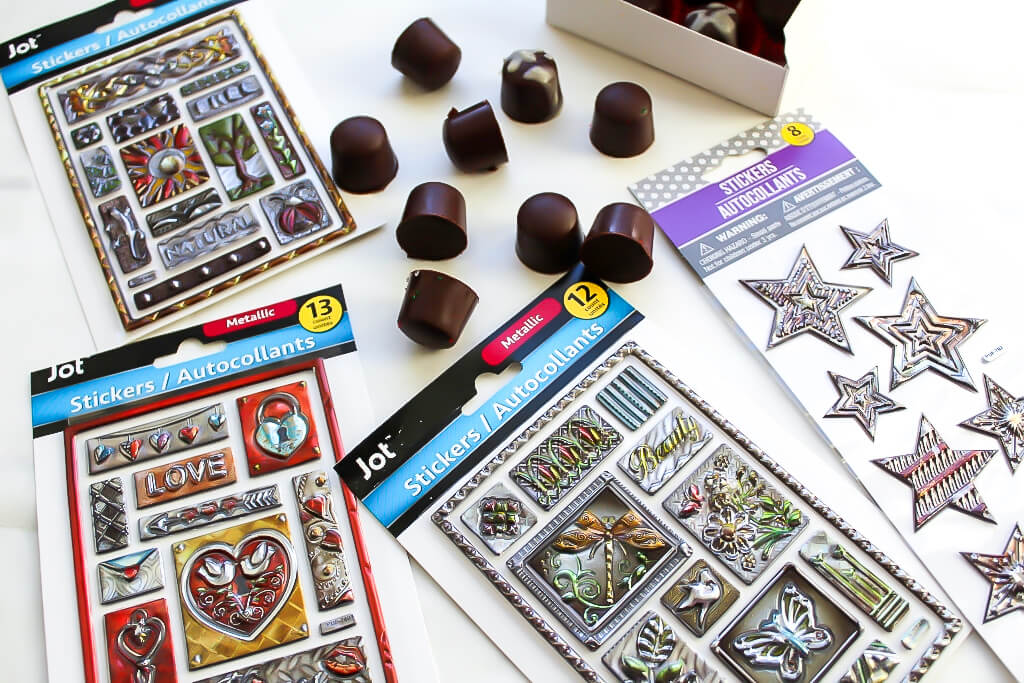
You can decorate the boxes with anything that you like, but I have found these metallic stickers to be perfect! I find them at Dollar Tree. They are simple yet elegant enough to feel like a special gift.
Chocolate molds
You can purchase official chocolate candy molds from your local candy-making store, or you can use silicone ice cube trays. These ice cube trays work better for me than fancy molds and are easy to find. (I got this one at Big Lots.)

Ingredients and substitutions
- Vegan chocolate: I find that vegan chocolate chips work the best. They are easy to find and inexpensive. Trader Joe’s offers a vegan variety, and Enjoy Life is always a great choice if you are giving them to anyone with food allergies.
- Oil: Adding refined coconut oil, vegan butter, or shortening helps the chocolate melt, makes it smooth and creamy, prevents it from becoming too hard when it cools, and imparts a rich flavor. (Use refined coconut oil so your chocolate doesn’t have a coconut flavor.)
- Fillings and garnish: Any fillings listed above, plus anything you want to use for decoration.
Tempering chocolate
Tempering chocolate is a method for making it shiny and smooth after it has been melted and then hardened again. This is achieved by melting the chocolate slowly to 46 °C, then lowering it to 26°C, then raising it to 32 °C again before placing it in molds. This helpful video explains the process.
Note: I never get too technical with these chocolates, and they still come out well. I’m not a perfectionist, though, so if you want yours to have the absolute perfect shine, you need to temper your chocolate properly. I have found that by heating the chocolate slowly until smooth and shiny, then allowing it to cool until it’s slightly thick and sticky, the chocolate is sufficiently tempered.
How to make vegan chocolates
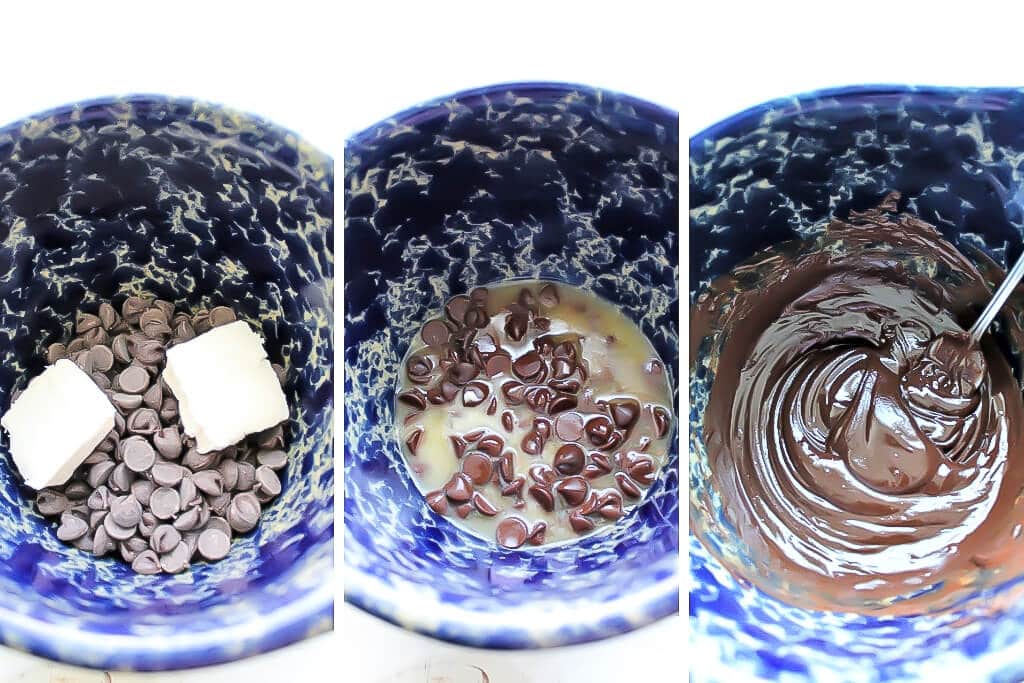
- Melt your chocolate.
- Method 1: Place 1 cup of chocolate chips and 2 tbsp of coconut oil or shortening in a heat-safe bowl, then microwave for 1 minute and 20 seconds. (When it comes out it, the oil will be melted, and the chocolate will only look slightly melted). Stir until smooth. Heat for an additional 10 seconds if needed to melt completely.
- Method 2: Use a double boiler. Boil about 1 inch of water in the bottom of a double boiler, then turn to simmer. Place the chocolate chips and oil in the top bowl and stir frequently until melted.
- Stir with a fork until all the oil and chocolate are mixed and smooth.
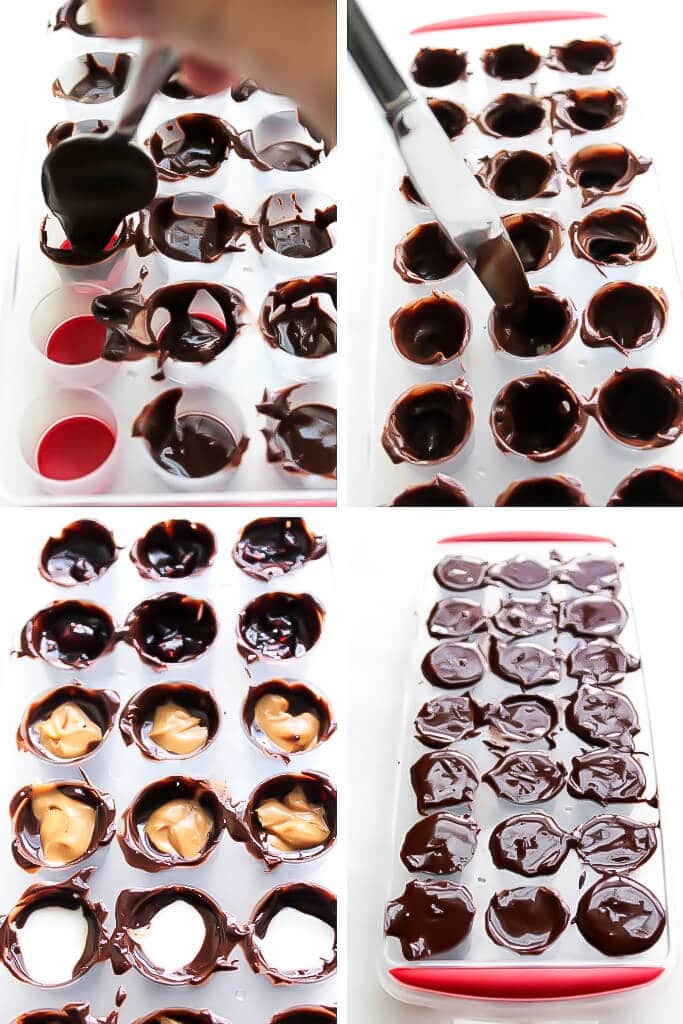
- Allow to cool for a few minutes until it firms slightly and begins to stick to the sides of the molds.
- Spoon in about ½ tsp into the bottom of each mold. (enough to cover the colored silicone bottom).
- Stir each mold with a butter knife, lifting the chocolate up the sides of the candy mold until it covers them.
- Spoon in the filling of choice, like peanut butter, jelly, caramel, or peppermint cream.
- Drop the mold from about an inch above the countertop a few times to flatten the filling. Then add the final layer of chocolate.
- Spoon in more melted chocolate until the molds are completely filled.
- Tap the chocolate mold on the countertop a few times to release any air bubbles and ensure the top is flat and smooth.
- Remove any excess chocolate from the top of the mold.
- Add any sprinkles or garnishes you want to the bottom of the chocolates, like colored sugar, sprinkles, or Kosher salt.
- Freeze your chocolates for ½ hour to make them set.
- Pop the chocolates out by letting them sit at room temperature for a minute or two, then turn the mold upside down and gently push on the silicone part of the mold.
- Drizzle additional chocolate or white chocolate over them if you wish.
- Fill your pretty boxes with chocolates placed in a paper candy cup.
- Store in the freezer.
Pro Tips
- Do not overheat your chocolate!!!
- Use a clean, dry bowl and molds for your chocolates. Even a few drops of water can thicken and ruin your chocolate.
- Use oil, not margarine, when mixing your chocolates. Margarine contains water, which will make your chocolate thicker.
- Your chocolate should be smooth and shiny when melted.
- Allow the chocolate to cool to a slightly thick, sticky consistency before filling the molds.
- Work quickly to put your chocolates into candy boxes. Overhandling the chocolates causes them to melt slightly and leave marks.
Storing vegan chocolates
Keep these chocolates in the freezer until you are ready to give them as gifts. Especially if you are using a caramel or peppermint filling, your chocolates may start to spoil after a week or so in the refrigerator due to the perishable plant-based milk. They will stay good for at least 3 months in the freezer.
More homemade treats
- Vegan Creme de Menthe Squares
- Vegan Snickerdoodles
- Sandbakkels – Vegan Tarts
- Vegan Thumbprint Cookies
- Homemade Vegan Eggnog
- Vegan Candied Nuts
- Vegan Toffee Covered Pretzels
Vegan filled chocolates recipe
Homemade Vegan Chocolates
Ingredients
- 1 cup vegan chocolate chips
- 2 tablespoons coconut oil , or shortening
- 1/4 cup raspberry jam, or any other filling of choice
- 1 tablespoon colored sugar , or sprinkles, chopped nuts, or kosher salt (optional) for garnish
- 1 tablespoon vegan white chocolate , (optional) for garnish
Equipment
Instructions
Melt the chocolate
- Add 1 cup of chocolate chips and 2 tbsp of oil to a heat-safe bowl. Microwave for 1 minute and 30 seconds or use the double boiler method to melt the chocolate and oil.
- Stir with a fork until all the oil and chocolate are mixed and smooth.
- Allow to cool for a few minutes until it starts to firm slightly and will stick to the sides of the molds. (This will temper your chocolate).
Fill the chocolate molds
- Spoon in about ½ tsp of chocolate mixture into the bottom of each mold. (Enough to cover the colored silicone bottom).
- Stir each mold with a butter knife, pulling the chocolate up the edges of the candy mold enough to cover the edges.
- Spoon in the filling of choice, like peanut butter, jelly, caramel, or peppermint cream. Use about 1/2 tsp. in the center of each chocolate.
- Drop the mold from about an inch above the countertop a few times to flatten the filling so you can add the final layer of chocolate.
- Spoon in more melted chocolate, enough to completely fill the molds.
- Drop the chocolate mold onto the countertop a few more times from about an inch above the countertop to get out any air bubbles and make the top flat and smooth.
- Remove any excess chocolate from the top of the mold.
Decorate and freeze
- Add any sprinkles or garnishes you want to the bottom of the chocolates like colored sugar, sprinkles, or Kosher salt.
- Freeze your chocolates for ½ hour to make them set.
- Pop-out the chocolates by allowing them to sit out of the freezer for a minute or two, then turning the mold upside down and giving a little push on the silicone part of the mold.
- Drizzle additional chocolate or white chocolate over them if you wish.
- Fill your boxes with chocolates placed in a paper candy cup.
- Store in the freezer.
Notes
- Do not overheat your chocolate!
- Use a clean dry bowl and molds for your chocolates, even a few drops of water can thicken and ruin your chocolate.
- Use oil, not margarine to mix with your chocolates. Margarine has water in it and it will make your chocolate thick.
- Your chocolate should be smooth and shiny when melted.
- Allow the chocolate to cool back down to a slightly thick and sticky consistency before filling your molds.
- Work quickly to put your chocolates into candy boxes. Handling the chocolates too much causes them to start to melt slightly and leave marks on them.
 Did you make this recipe?Please leave a star rating and review below!
📌 Be sure to follow me on Pinterest for new vegan recipes!


This recipe is fantastic and incredibly easy to follow! I’ve never made chocolates before, but I’m making some for my friend who is allergic to dairy. These turned out incredible, and they were so easy to make I’ll probably do it more often!
One thing to note is that the vegan chocolate melts *really* fast – this isn’t a critique of the recipe, just something to keep in mind that I found!
I’m so happy that you liked the recipe. You are so sweet to make these for your friend!
I made these and they’re really good, I bake oil free so I made these with no oil what so ever, and it really worked out, just so you guys know that you can make them oil free.😁
Good to know. They oil helps the chocolate melt smoother, but I’m sure it depends on the brand of chocolate that you are using. Do you recall which brand that you used?
Made these as Xmas treats. Surprisingly easy to make chocolates with filled centers-I thought it would be difficult but it wasn’t! Thanks so much for sharing the detailed instructions of how to do this! I was delighted when I found ice cube trays the same as yours, and your instructions made the whole process so easy! We made 3 flavours: mint, orange and a hazelnut Nutella type one. Kids loved being involved too. It’s hot where we live so we have to eat them straight from the fridge/freezer but they’ve been a hit with everyone! Thanks 😊
I’m so happy to hear that they worked well for you! They are one of my favorite things to make as gifts for others!
Would a vegan butter like Miyoko’s work in place of oil?
Yes, it will work fine, the chocolates may just be a little softer. Enjoy! 🙂
I’d like to make vegan chocolate bunnies for Easter for my customers but I am worried about shipping since you mentioned keeping it in the freezer. Is it just because you add oil? Do you think if I just melted vegan chocolate chips into the molds they could be kept at room temp and shipped safely?
Hi Anna, the bunnies will need to stay cool. They will start to get melty at about 70 degrees F. If you are going to ship them, I would definitely add less oil. I think you will need a little oil to make the melted chocolate chips smooth. I would do a test batch first. Let me know how it goes. 🙂
If not using oil you would really need to temper these as otherwise by the time it gets to the recipient the chocolate will have bloomed.
All of for tips worked really well for me! I used an all silicone bunny chocolate mould that def nsfe it harder to coat all the weird angles w chocolate …..a round or heart shape would have made life a lot easier like show in your post 😊
You’re welcome! I’m glad that it worked for you. It can be a little fussy to get the chocolate at the right temperature.
A custom box of delicious vegan chocolates would be perfect for Valentine’s Day! Thank you for the inspiration and ideas.
They are hard to find and expensive if you’re lucky enough to find vegan ones, so making them seemed like the only solution!
These look delicious!! I usually use a mini muffin tin for chocolates but I love that you used a silicone ice tray – will definitely try that!!
Thanks so much Cassidy! Those silicone ice-cube trays work great as chocolate molds. Mini muffin tins area a great idea too!