Vegan Thumbprint Cookies
These vegan thumbprint cookies, aka Swedish Sweethearts or jam cookies, are light and airy shortbread cookies filled with your favorite flavor of jam. A perfect tea cookie for Christmas, Valentine’s Day, wedding or baby showers, or just a casual Saturday afternoon!
Want to save this recipe?
Enter your email below and get it sent straight to your inbox. Plus, get more amazing vegan recipes that will satisfy your cravings!
Why make these cookies
My Grandmother always made these at Christmas time and called them Swedish Sweethearts. (However, thumbprint or Jam cookies seem to be the more widely used name). I loved that even with 13 children, 26 other grandchildren, and 28 great-grandchildren, she always remembered that these were my favorite cookies and made sure to save me some.
This was one of those recipes I had to make vegan and gluten-free, so my kids could enjoy them too!
Ingredients and substitutions
- Vegan Margarine: Earth Balance or any equivalent will work. You can also use my homemade vegan butter recipe.
- Sugar: Any white or off-white vegan sugar will work. You can use coconut sugar, but your cookies will be brown.
- Egg Replacer: Ener-G egg replacer works best. The original recipe calls for one egg yolk, so reduce the water in the Ener-G egg to 1 tbsp instead of 2 tbsp. You can also use any egg replacer from my list of vegan egg substitutes.
- Flour: Use all-purpose white flour. If you’re gluten-free, most basic GF flour mixes work well, or you can make your own with my all-purpose gluten-free flour recipe.
- Powdered Sugar – If you want to be sure you’re using vegan powder sugar, look for organic brands at Trader Joe’s or natural food stores, or make your own from regular granulated sugar. This post from Sustainable Cooks shows you how to do it.
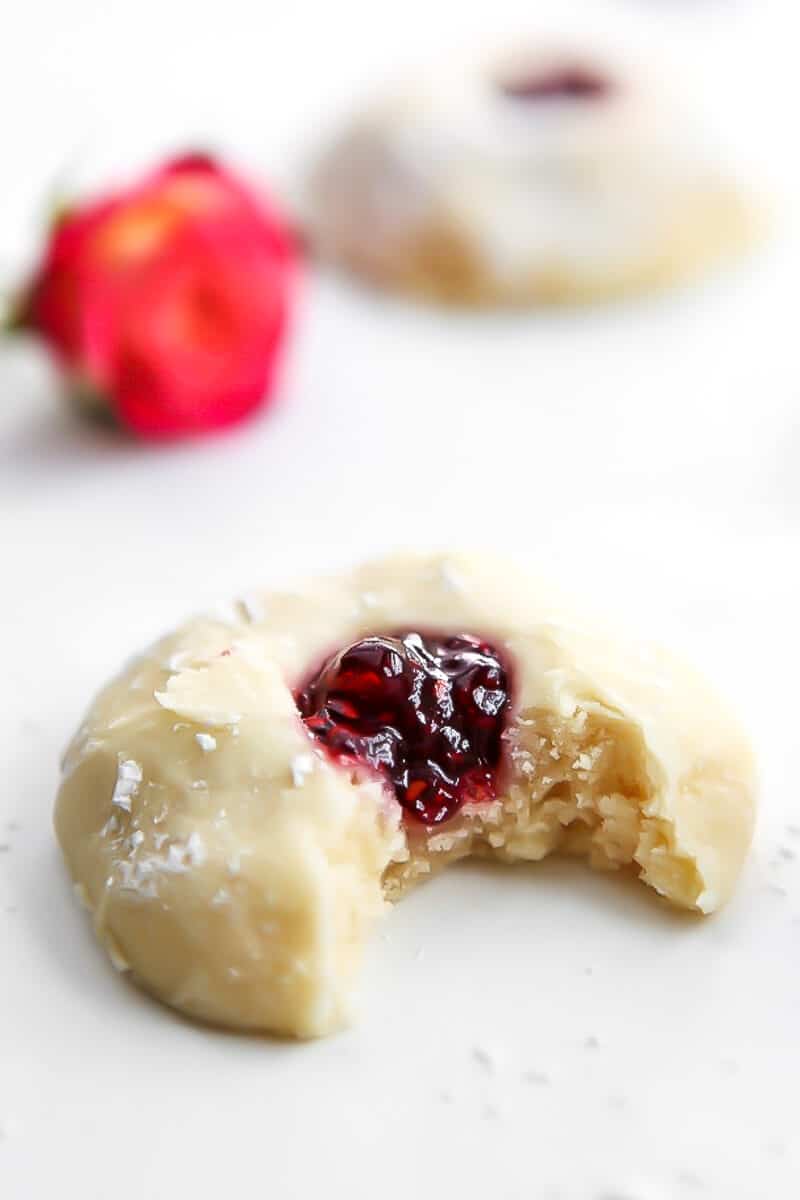
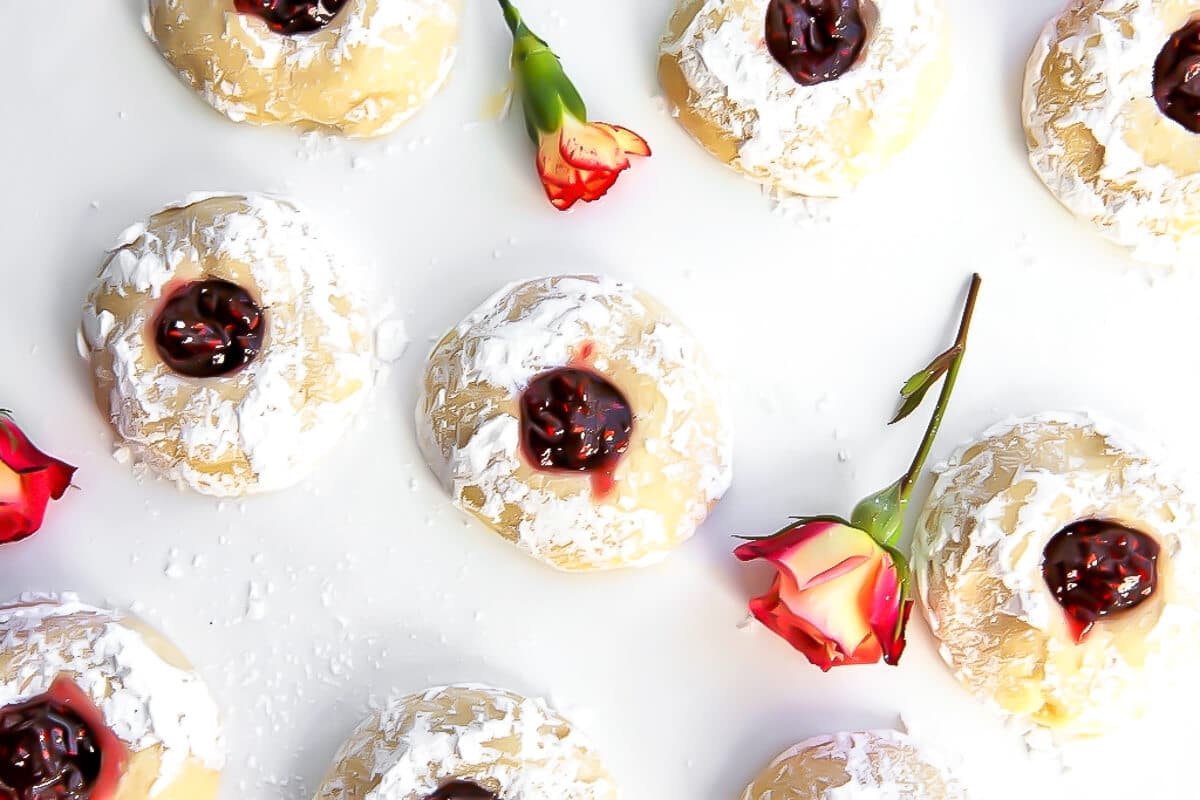
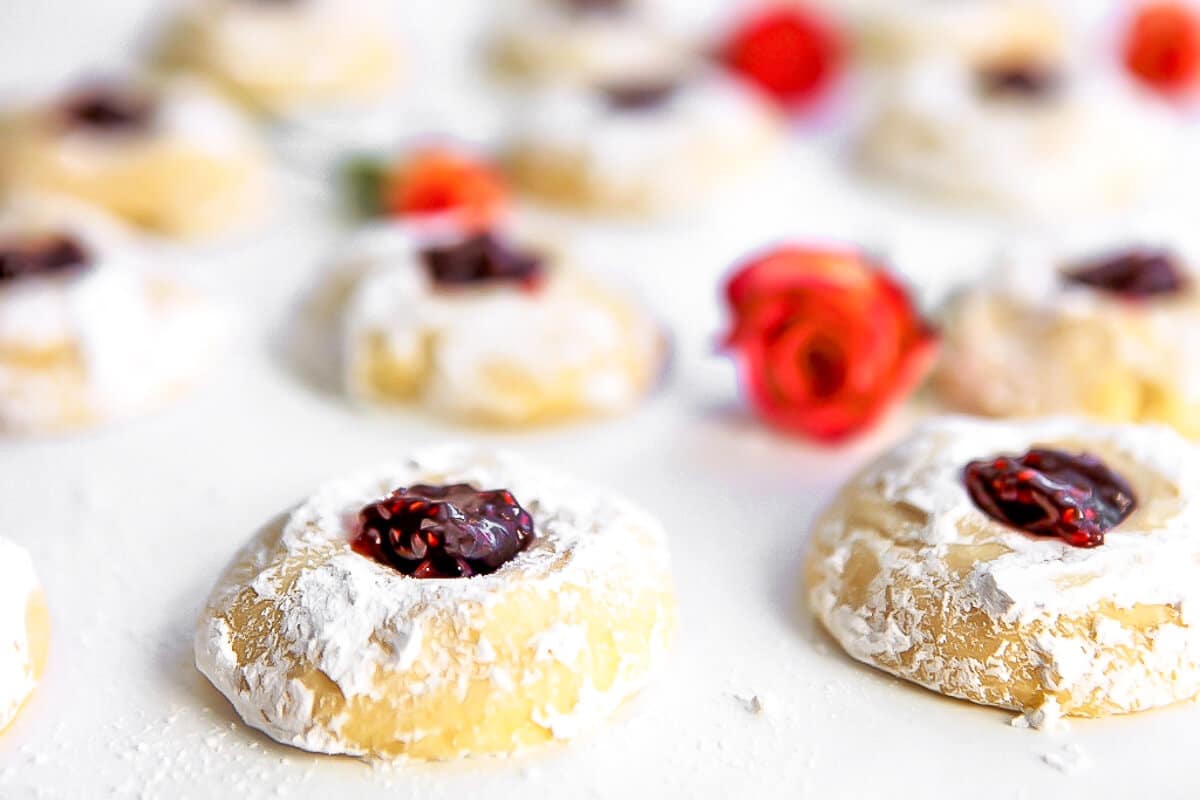
- Jam or Jelly: You can use any flavor you like. My grandmother always used currant jelly, but since that’s hard to find, I usually use raspberry. You can also make quick and easy strawberry chia jam for these cookies.
- Mixer: Any basic mixer will do. I finally purchased this Kitchen Aid after years of drooling over them, and I love it!
- Cookie sheet: I like the AirBake sheets for baking all my cookies. The cookies never burn on the bottom when I use them!
- Parchment paper: This is optional but useful for lining the cookie sheet and keeping powdered sugar from getting all over the countertop.
How to make vegan jam cookies
- Preheat your oven to 350° F.
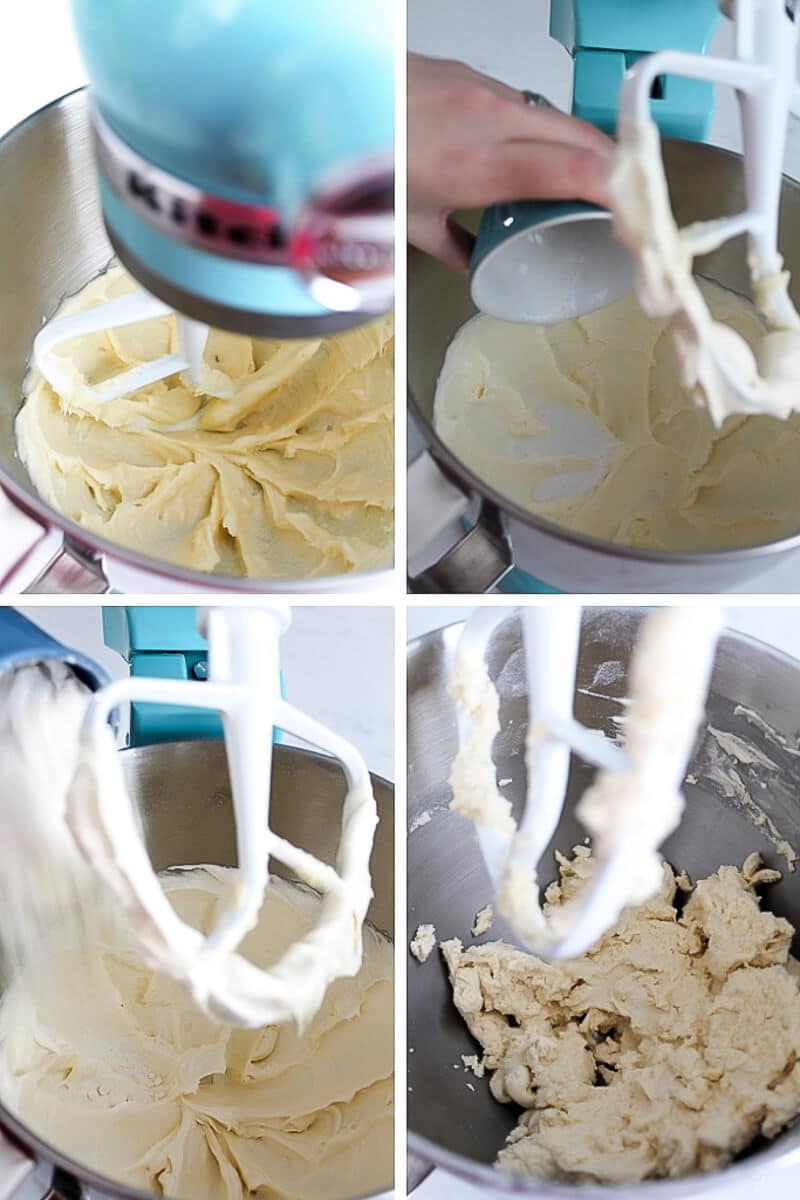
- Cream the vegan margarine and sugar in a mixing bowl for a minute until light and fluffy.
- Make the vegan egg by mixing the egg replacer powder with 1 tbsp of water, then stirring until foamy.
- Add the “egg” to the creamed butter and sugar and mix for another 30 seconds.
- Add the flour ½ cup at a time, beating with a mixer until all the flour is incorporated and you have a soft dough.
- Form small balls of dough by rolling them in your hands, then place them on a cookie sheet.
- Poke holes in the top of the balls. Use the back of a wooden spoon or the end of a rolling pin handle to make a hole that goes almost to the bottom of the ball. (These holes will spread out and get bigger during the cooking process.)
- Bake at 350° F for 12-14 minutes, until small cracks begin to form on the tops of the cookies.
- Let cool on the tray for about 15 minutes.
- Dust the cooled cookie in a shallow bowl of powdered sugar.
- Fill the hole with jam or jelly.

Pro Tips
- Don’t actually use your thumbprint to poke the hole in, or they will be too big and flat.
- Cook until you start to see a few cracks in the top of the cookies, but they are not yet browned.
- While the cookies are still warm, you can shape the divot with your finger to make it deeper or rounder.
- Let them cool for at least 15 minutes before dusting them with powdered sugar so they don’t crack and break.
How to make gluten-free thumbprint cookies
Swap out the flour for an all-purpose grain-based gluten-free flour mix. If you make them with my homemade all-purpose gluten-free flour, be sure to measure by weight or add an additional 3-4 tbsp of flour since the freshly sifted oats are fluffier and take up more space than store-bought flour.
Storage
Store in a sealed container on the countertop for up to 5 days, or in the freezer for up to 3 months.
Egg replacers
I find that the Ener-G egg replacer works best in this recipe as a replacement for the egg. It keeps the cookies white and pretty. A chickpea flour egg also works well and keeps the cookies a pretty white color. You could also use a flax egg instead, which will bake up the same, but it will leave brown spots from the flax. (To make a flax egg, mix 1 tbsp flax meal with 2 1/2 tbsp water.)
More vegan desserts
- Vegan Swedish Tarts
- Vegan Fudge
- Easy Vegan Shortbread Cookies
- Vegan Millionaire Bars
- Dairy-Free Butter Cookies
- Vegan Macaroons
Vegan thumbprint cookie recipe

Vegan Thumbprint Cookies
Ingredients
- 3/4 cup vegan butter , (The stick version of my homemade butter or any vegan margarine).
- 1/2 cup vegan sugar
- 1 1/2 teaspoons Ener-G egg replacer powder, (or other egg replacer)
- 1 tablespoon water, (to mix with the egg replacer powder)
- 1 1/2 cup all-purpose flour, or gluten-free flour mix or my gluten-free flour mix recipe
- 1/3 cup jam , or jelly of choice
Instructions
- Pre-heat oven to 350°F (177°C).
- Cream 3/4 cup vegan butter and 1/2 cup sugar in a mixing bowl for a minute until light and fluffy.
- Make the vegan egg by mixing 1 1/2 tsp of Ener-G egg replacer powder with 1 tbsp water and stir until foamy. (This is replacing only one egg yolk, so I add only 1/2 of the water suggested on the Ener-G package).
- Add the “egg” to the creamed butter and sugar and mix for another 30 seconds.
- Add 1 1/2 cups flour ½ cup at a time while beating with a mixer until all of the flour is incorporated and you have a soft dough that is able to be rolled into balls without sticking to your hands.
- Form small balls of dough by rolling them in your hands and placing them on a cookie sheet.
- Poke holes in the top of the balls. Use the back of a wooden spoon or the end of a rolling pin handle to make a hole that goes in almost to the bottom of the ball. (These holes will spread out and get bigger during the cooking process).
- Bake at 350°F (177°C) for 12-14 minutes.
- Let them cool on the tray for about 15 minutes.
- Dust the cooled cookies in a shallow bowl of powdered sugar.
- Fill the hole with jam or jelly.
Notes
- Don’t actually use your thumbprint to poke the hole in or they will be too big and flat.
- Cook until you start to see a few cracks in the top of the cookies, but they are not yet browned.
- Once you have taken the cookies out of the oven and they are still warm, you can shape the divot with your finger to make it deeper or rounder.
- Let them cool for at least 15 minutes before dusting them with powdered sugar so they don’t crack and break.
- Store in a sealed container on the countertop for up to 5 days or in the freezer for 3 months.
- I find that the Ener-G egg replacer works the best in this recipe to replace the egg. It keeps the cookies white and pretty. You could also use a flax egg instead, which will bake up the same, but it will leave brown spots from the flax.
 Did you make this recipe?Please leave a star rating and review below!
📌 Be sure to follow me on Pinterest for new vegan recipes!


Hi , I would love to make these. How much flax seed mixture do I need to make for this recipe. I can’t get egg replacer where I live. Thank you
You can use 1 tbsp of flax meal mixed with 2 1/2 tbsp of water as an egg replacer in these. Enjoy 🙂
These are awsome!👍
Thanks! I’m glad that you like them! 🙂
Made these gluten free today and they are excellent! I will definitely be making them again and again and again … 😘
I’m so happy that you like them Ann! It wouldn’t feel like Christmas to me without them! 🙂
These were so easy and fun to make with my kids…and tasted amaaazing. Thank you for sharing!
Those look like awesome cookies, and so pretty! I love your process shots, too. I need to add more of those ot my blog posts haha 😉
Thanks Sarah! I’ve made it my goal this year to work on my photography. It’s a slow painful process! I have included process shots in almost all of my posts from the beging because I think that it really helps to show how to make the recipes, yet hate when I get done and realize that I didn’t grab a shot of one of the steps. 🙂
These are so pretty! What a great treat for Valentine’s Day!
Thanks! This is what I will be making for my sweethearts on Valentine’s Day. 🙂