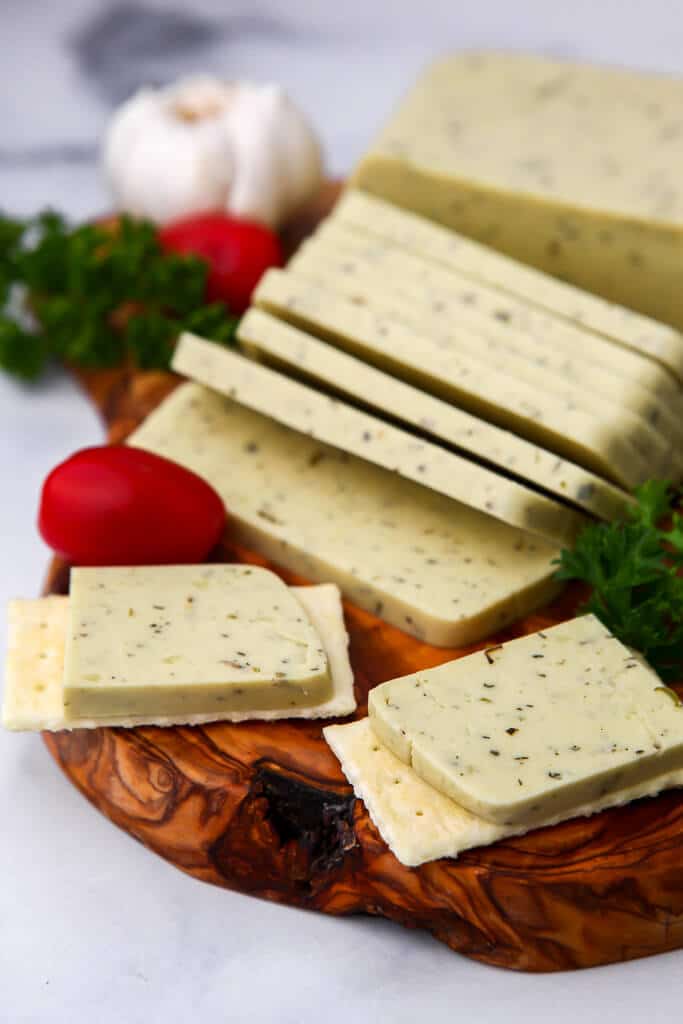
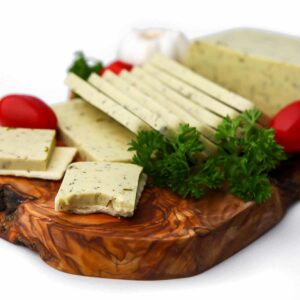
Vegan Cheese with Garlic and Herbs
This vegan cheese with garlic and herbs is perfect for slicing and eating on crackers. Made with rich and creamy coconut milk, it’s dairy-free, gluten-free, and nut-free, everyone can enjoy this delicious cheese.
Want to save this recipe?
Enter your email below and get it sent straight to your inbox. Plus, get more amazing vegan recipes that will satisfy your cravings!
This rich and creamy cheese is bursting with flavor. It’s perfect to serve with crackers on a vegan cheese board or slice to put on sandwiches. It’s so creamy and flavorful, that even non-vegans love this cheese!
Ingredients and substitutions
With just a few ingredients, you can make the most delicious vegan cheese you have ever had!
- Coconut Milk – a 13.5 oz can of coconut milk or coconut cream works best. You can also use any other type of plant-based milk or cashew cream, but coconut milk will give you the richest and creamiest texture. See below for alternative methods.
- Water – to add the correct amount of moisture.
- Agar Agar Powder – to make the cheese firm. This is a vegan gelatine that comes in the form of a powder. I get mine for a good price at my local Asian market or they also sell it at many natural foods stores. (If you can not find the powder, you can use agar agar flakes, but you will need to triple the amount of flakes and use 6 tbsp in total). You can also use Kapa carrageenan instead of agar agar powder.
- Nutritional Yeast – for a cheesy flavor. (Read this post if you want to know more about nutritional yeast.)
- Salt – for flavor
- Herbs – I usually use 2 tsp of dried Herbs de Provence, but you can use any dried herb mix that you would like or 2 tbsp of fresh finely chopped herbs.
- Garlic or Garlic Powder – for flavor. I use 2-3 cloves of minced garlic, but you can also add 1/2 tsp of garlic powder instead.
- Lemon Juice – for flavor and acidity. You can also use apple cider vinegar instead.
- Tapioca Starch – aka tapioca flour – to make the cheese able to melt and stretch. (Only use for the meltable variation). I have tested and retested the amount of tapioca starch needed. Anything less than the recommended amount will need high heat to melt, anything more than the recommended amount will be too soft to grate or slice. *You can’t use any other starch to get the same stretchy effect as tapioca starch. Only tapioca starch will let your cheese melt and stretch similarly to real cheese.
Did you know that not all brands of coconut milk use ethical treatment of animals and therefore not truly vegan? Read more about it and see which brands of coconut milk are vegan.
A note about agar agar
- Use agar agar powder, not flakes if you can, and measure carefully. Make sure to use 2 tablespoons, not 2 teaspoons!
- I use Telephone brand agar agar, since I can easily find it at my local Asian market, it comes in small packs so it won’t go bad, and I know that it sets well. I can’t vouch for other brands.
- If your cheese is too soft or jello-like, your agar agar is not strong enough. (Some people from different areas in Europe have reported that the cheese does not set hard enough. This is due to the different strengths of agar agar sold in different places. Double the agar agar next time you make it).
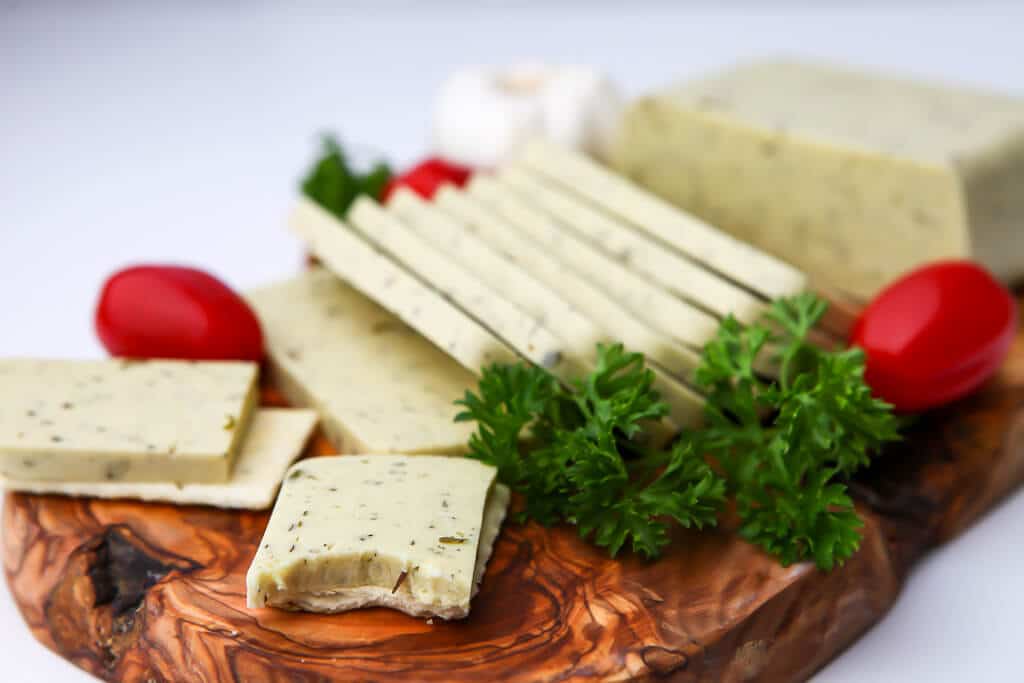
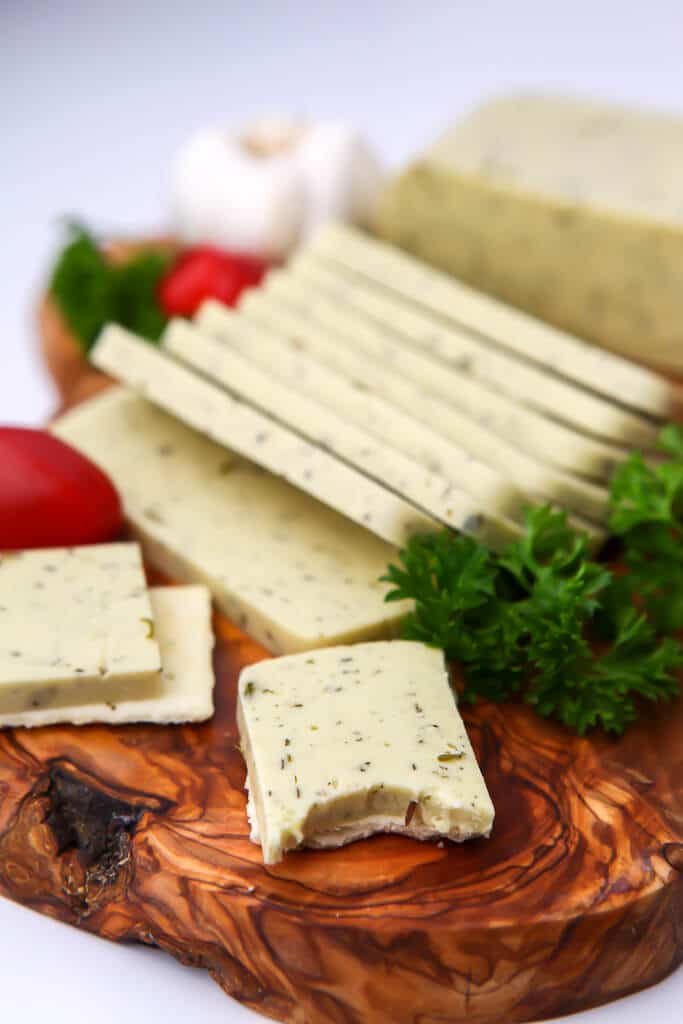
Sliceable vs meltable cheese
You will also need to decide if you want a firm sliceable cheese or a softer cheese that will melt and stretch when heated. (You can’t have both, you must choose one or the other).
- The firm version – is best for slicing for eating plain or on crackers.
- The meltable version – is best for cheese that you can melt on pizza, and use in grilled cheese sandwiches, or quesadillas. The only difference between the two versions is the addition of tapioca starch and the reduction of agar agar to allow it to melt and stretch better.
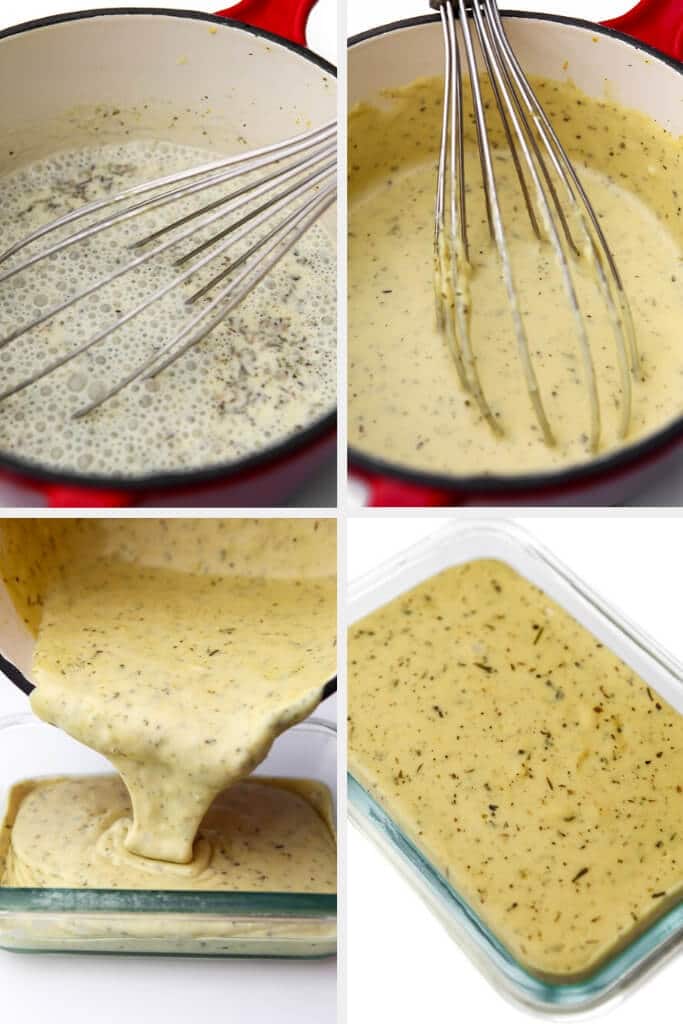
Sliceable cheese instructions
Step 1 – Simply put all the ingredients into a saucepan and stir with a whisk.
Step 2 – Heat to a slow boil stirring constantly for 6 minutes. This allows the agar-agar to melt completely and set properly. (It may seem ready after 3-4 minutes but keep it at a low boil for 6 minutes to make sure that it’s completely smooth).
Step 3 – Then pour into any shape container that you wish. (One batch makes almost 2 cups of cheese).
Step 4 – Allow to cool for about 15 minutes uncovered on the countertop, then cover and refrigerate for at least 2 hours to let it set.
Meltable cheese instructions
Step 1 – Add all of the ingredients to a saucepan except only add 1/4 cup of water instead of 1/2 cup and only add 4 tsp of agar agar instead of 2 tbsp.
Step 2 – Heat the cheese sauce over medium heat until it begins to boil.
Step 3 – Turn down the heat until it is just barely bubbling and allow it to boil for 5 minutes while stirring frequently.
Step 4 – Add 2 tbsp plus 1 tsp of tapioca starch (7 tsp) to 1/4 cup of cold water and stir until it dissolves.
Step 5 – Add the starch and water mixture to the boiling cheese sauce while stirring it in with a whisk and then cook for an additional 1 minute. (Your cheese will become very thick and stretchy).
Step 6 – Pour into a glass container and allow to cool uncovered in the refrigerator for at least 3 hours before shredding.
*This will make the cheese softer so it melts and stretches when heated, but it is not as good for slicing since it is not as firm when cold.
Pro Tips
- Make sure to measure the ingredients carefully! Slight changes in the amount of liquid, the agar agar, or tapioca starch can change the texture of your cheese a lot!
- For a cheesier flavor, add an additional tbsp of nutritional yeast and/or 1 tsp of miso paste to your cheese sauce.
- Store the cheese in a sealed container in the fridge for up to 5 days or in the freezer for 3 months.
- If you want to grate the meltable version, pop it in the freezer for about 30 minutes after it has been set to make it firmer and easier to grate.
- I like to use these Snapware containers because they are made of glass and won’t affect the flavor and they have a lid with a good airtight lid to keep the cheese fresh longer.
Does this taste like coconut?
If you flavor the cheese with garlic and herbs, there is almost no taste of coconut. My son who hates the flavor of coconut still loves this cheese when I make it with garlic and herbs.
Alternatives to coconut milk
- Cashews – you can use 1/3 cup cashew soaked and drained then blended with 1 3/4 cup water to replace the coconut milk and water in this recipe.
- Any Plant-Based Milk – you can also use 1 3/4 cup of any plant milk plus 1/3 cup of any neutral-flavored oil to replace the coconut milk and water in this recipe.
Pair with gluten-free crackers
This cheese recipe is naturally gluten-free. However, if you want gluten-free crackers that taste good, those are harder to find. I started using quinoa to make my own crackers. You won’t believe how easy and simple it is to do. You can check out my gluten-free cracker recipe that will amaze you here!
If you love garlic as much as I do, be sure to try my vegan garlic butter, vegan garlic aioli, and vegan garlic knots recipes.
More vegan cheeses
If you are interested in learning how to make more easy homemade vegan cheeses, check out all of my vegan cheese recipes on the blog or my cookbook, “The Ultimate Guide to Easy Vegan Cheese Making.”
- Vegan Smoked Gouda
- Vegan Cheese Ball
- Healthy Veggie Cheese Sauce
- Vegan Pepper Jack
- Melty Vegan Mozzarella
- Vegan Cheddar
- Vegan Cream Cheese
Vegan garlic herb cheese recipe
Vegan Cheese with Garlic and Herbs
Ingredients
- 1 13.5 oz can coconut milk, full fat
- 1/2 cup hot water
- 1 1/4 teaspoon salt
- 2 tablespoons nutritional yeast
- 2 tablespoons agar agar, powder or 6 tbsp flakes
- 1/2 teaspoon lemon juice
- 2 teaspoons herbs de Provence, or other dried herbs of choice
- 2-3 cloves garlic, minced
- 1 spray oil, on the glass container
Instructions
- Prepare cheese molds by spraying a glass bowl or container with spray oil or rub any neutral-flavored oil on the molds to prevent sticking. (Recipe will make about 2 cups of cheese).
- Pour the can of coconut milk into a saucepan.
- Put 1/2 cup of hot water into the empty coconut milk can to melt all the remaining coconut milk and add the water to the pan.
- Add all remaining ingredients to the saucepan and stir with a whisk.
- Turn heat on to medium and stir frequently until it boils.
- Turn down the heat until the cheese sauce is just barely boiling and stir constantly for 6 minutes until it is very smooth.
- Immediately pour into the prepared cheese molds.
- Let it cool with the lid off for about 15 minutes at room temperature, cover, and then transfer to the refrigerator for at least 2 hours to firmly set.
- Once the cheese is cooled completely cover and store in the refrigerator in a sealed container for up to a week.
Notes
How to make meltable vegan cheese
- Add all of the ingredients to a saucepan except only add 1/4 cup of water instead of 1/2 cup and only add 4 tsp of agar agar instead of 2 tbsp.
- Heat the cheese sauce over medium heat until it begins to boil.
- Turn down the heat until it is just barely bubbling and allow it to boil for 5 minutes while stirring frequently.
- Add 2 tbsp plus 1 tsp of tapioca starch (7 tsp) to 1/4 cup of cold water and stir until it dissolves.
- Add the starch and water mixture to the boiling cheese sauce while stirring it in with a whisk and then cook for an additional 1 minute. (Your cheese will become very thick and stretchy).
- Pour into a glass container and allow to cool uncovered in the refrigerator for at least 3 hours before shredding.
A message about Agar- Agar
- Use agar agar powder not flakes if you can and measure carefully. Make sure to use 2 tablespoons, not teaspoons!
- If your cheese is too soft or jello-like, your agar agar is not strong enough. (Some people from different areas in Europe have reported that the cheese does not set hard enough. This is due to the different strengths of agar agar sold in different places. Double the agar agar next time you make it).
 Did you make this recipe?Please leave a star rating and review below!
*This recipe was originally published on May 4, 2018. It was updated on May 16, 2020, to include new images and more detailed recipe instructions.
📌 Be sure to follow me on Pinterest for new vegan recipes!


Am I just missing the measurements? You didn’t leave any instructions for measurements how much of each items does one use to create this? You only said mix all the ingredients but unsure of measurements. That’s an important part. If you can add that in would be so helpful. Thank you
All measurements are in the recipe card at the bottom of the post. Enjoy! 🙂
Do you know what would happen if I just use cashew milk, with no added oil? Will it hold together ok? Trying to avoid oil and Salt if at all possible
Yes, you can use cashew milk with no added oil. It will hold together just fine. Enjoy!
So, Hi Monica!
I made your garlic herb cheese, but had to leave out the nutritional yeast for allergy reasons. The texture is really wonderful. I just need to work on the right spices. Sure would like to find a good substitute for the yeast. I’ve read about using cashew spread. What do you think of that? Any other suggestions?
Thank you so much for doing this!
Sheila Storms 🙂
These recipes look wonderful and I’m planning to try one this afternoon. I’m looking for one for CREAM CHEESE or SOUR CREAM made from coconut milk. Do you have that? I LOVE coconut milk!! Thank you so much!!
I hope that you enjoy the recipe. I use tofu to make my cream cheese and sour cream, but I have a lot of other coconut based cheeses. You may also like my alfredo sauce made with coconut milk and my coconut mac and cheese recipes. Enjoy!
Thank you so much for writing me back, and so soon! I cannot use soy. Any thing else to use for sour cream or cream cheese?
I will look for your alfredo and mac and cheese! Yeah!! 🙂
I made this recipe. It’s very easy and delicious. However, I noticed the color of my cheese is darker than the picture shown in the recipe. Could the nutritional yeast have changed the color? I was expecting it to be whiter.
It could be the nutritional yeast some brands seem darker than others.
What would you recommend using instead of agar agar?
Hi Tara, You can’t just swap it out with something else, but I have full instructions for how to make cheese without agar agar in my free mini vegan cheesemaking book that you get when you subscribe to the blog. 🙂 You can get it here… https://view.flodesk.com/pages/60a913073a1f1d563171d1fd
This was a delicious cheese and i recomend you saute your herb and minced garlic and add your milk and let that boil to infuse it more with the flavor, I did this and it was AMAZING!!!!!!
Hi, I’m just wondering if I can use a little vinegar instead of the lemon juice in this recipe? Or would that ruin it? I was about to try this out but have no lemons!
Yes, you can swap out some vinegar or just leave it out completely. It will still taste great without it. 🙂
Made it and it’s delicious. I used vinegar in place of the lemon juice and garlic granules as I didn’t have enough fresh. I also added a bit of dijon mustard. Seems to have worked really well. I’ll be trying out more of your recipes, thank you for your innovation!
I’ve tried all your recipes and love them but I was wondering if I could sub tomato sauce instead of water to make tomato basil cheese? If so would you still use the lemon juice since tomatoes have acid in them? Thanks
Thanks, Marjorie. I think that you could sub with any liquid. I think that the acid in the tomatoes would be all you would need and could omit the lemon juice. Let me know how it turns out. 🙂
Hi Monica. I attempted to make a meltable cheddar cheese and a firm garden herb yesterday. The meltable has the consistency and texture of hummus. The firm has the consistency and texture of super firm mashed potatoes. I even found the Telephone agar and I used soy milk and coconut oil. Wondering if the texture and consistencies are correct or do I have an epic fail. They both taste great.
Something definitely went wrong. Both should set firm and be sliceable. Are you sure you used 2 tablespoons and not teaspoons of agar agar?
Hi there, should the cheese still be liquid when pouring into the containers? Mine is very thin?!
Thank you 🙂
It will be like a thick pancake batter when very hot. It will start to firm up quickly when it cools.
What can be used in place of the agar agar powder/flakes? Where i am they have the agar agar in a long stick form and i am not sure if that can be used and how to use it.
The only other thing that you can use instead of agar agar is Kappa Carrageenan, which is also a seaweed product and also a little hard to find. 🙂
Would you use the same volume of carrageenan as you would agar agar in these recipes?
Yes, you can swap them out in equal parts. Enjoy! 🙂
I plan to try making this cheese today. Regarding the Coconut milk, do I have to drain the “water” from the can of Coconut milk first or use the whole can?
Thank you.
You will need the contents of the whole can of coconut milk. Enjoy! 🙂
This is the first Vegan herb cheese I tried making. It was very easy to make given the great recipe directions given by Monica. I used Garlic and Dill as my herbs. It turned out superbly and tasted excellent. I made the solid version of the herb cheese and look forward to trying the softer version of the recipe. I am also excited about trying different herbs with this recipe.
Thank you, Monica, for sharing this excellent recipe. I will be trying other versions of your cheese recipes as well.
I’m so happy that you liked it, James! You are very welcome for the recipe. I hope that you enjoy my other varieties too! 🙂
The texture of agar agar can be too rubbery for some people. Definitely play around with the ratio to achieve a texture that you like better. You can add more nutritional yeast for a cheesier flavor.
I made mine without tapioca starch and white it tasted amazing hot, it became too gelatinous when it’s set, as some of the previous comments said.
I might have added too much agar agar? I followed the recipe and it doesn’t look “crumbly” like the photo.
Wonder what I did wrong…
If the cheese is a jello like texture then you didn’t use enough agar agar. Make sure you use 2 tablespoons of agar agar, not teaspoons. Also make sure to use powder not flakes. The only other thing that would make it come out that way is using too much tapioca starch. Hope that helps. You could try leaving the tapioca starch out completely if you want. That will make it a very firm cheese. 🙂
Made this last night and it turned out really well! I had wanted to switch to less dairy after being vegetarian lacto for few years now..
tbh have never tasted vegan cheese before but it is all too expensive .. nobody at home is a fan of coconut milk though so I will be the only one eating haha
today steamed some cheese between 2 slices of brown bread and some of it actually melted 🙂 it also tastes great with crackers! Will try with pasta next, it must be really yummy!
I put more salt and nutritional yeast to cover the taste of the coconut milk .. I had used Premium canned Ayam brand coconut milk, it had a thicker taste of coconut. Will try with a milder milk next round 🙂 thanks a lot for this recipe!’
I’m so happy that you liked it! I’ve noticed that some brands do have more of a coconut flavor. I’ve noticed that the ones with higher fat content seem to have less of a coconut flavor. Enjoy! 🙂
Is it possible for me to use reduced fat coconut milk? Will it taste the same?
You can use the low fat, but it does change the taste a little and it’s less creamy. 🙂
Love the flavor of this cheese. I left out the tapioca starch for a firmer cheese but the texture is rubbery. Does the starch charge the texture?
The tapioca makes the cheese a little softer. The rubbery texture is from the agar agar. You can try adjusting the amount of agar that you use. Adding less will create a softer more jello-like cheese, and more will make it firmer, but it always has a bit of a rubbery texture.
I don’t know what happened, mine turned out horribly. It was like jello rather than creamy 😭
I wonder if you used 2 tsp of agar agar instead of 2 TBSP? The agar agar is a type of gelatine though, so it does have a similar texture as jello, but should be much firmer. If you don’t think you used enough agar agar, you could try remelting it, adding, more and recooking it. Hope that helps. 🙂
I’m so glad I finally tried out one of your cheese recipes! this is so delicious and simple to make!
I look forward to trying out the other cheese recipes too. Thank you!
I’m so happy that you tried it too! Let me know what you think of the other ones too. 🙂
Hello I was wondering if you could add rejuvelac to the recipe?
Yes, you can use it instead of the water. I haven’t used it in a long time. I just keep it simple, but let me know what you think! 🙂
I’m so excited! I’ve never tried making cheese, much less vegan cheese. I have got to try this. It looks like the perfect thing to pair with crackers.
Thank you for this recipe. I just made my first ever vegan cheese and it’s really yummy,. But my cheese is very soft. I can’t cut it into slices. It’s spreadable. It looks like I used to much liquid. With all the ingredients mine did not look like in picture 2 even not after over 10 min cooking time. I had to add about 24 g of agar agar and two tbsp more of topic flour. Can you tell me which weight the coconut can has? Maybe mine is bigger here in Europe then this one you have in USA?
I use 13.5 oz cans of coconut milk to make this cheese. If you want a firmer cheese, leave out the tapioca flour. The tapioca makes it stretchy and better for melting, but it will not firm up as much. I like to leave it out completely for cheese that I will just slice for crackers. I only use the tapioca starch for cheese that I will melt on pizza or quesadillas. (Did you use agar agar flakes or powder? That may be another issue since the powder is more concentrated than the flakes. If you are using flakes, you will need more).
In regards to the Nutrition Facts, how much is a serving?
A serving size is 1/8 of the total amount, so about 1/4 cup since it makes about 2 cups total. Hope you enjoy it! 🙂
Hi.
Here in Brazil i can’t find canned coconut milk, but there is a concentrated bottled strongly flavoured coconut milk, carton and powder coconut milk (and there’s always the option to make it homemade). Which one would be best for the recipe?
I would think the homemade version would be your best option. You will need to blend it very well and make creamy milk. Let me know how it works for you. 🙂
Hi! I’m excited to try this recipe! Do you think this would work with regular coconut milk and not canned? I try to avoid using canned food.
It will work, but the type of coconut milk you buy in a carton to drink has much less fat, so it won’t be as rich and creamy. Hope that you enjoy it! 🙂
Thank you so muvh for this recipe! I just got my first batch into the fridge and am looking forward to a grilled cheese with it tomorrow…I added the 2 tbsp extra tapioca starch to make it stretchy. I’m hopeful this recipe will work out just in time for some dishes I want to make Christmas Eve.
So happy to hear that you made it! I hope that you enjoy the cheese as much as we do! 🙂
I tried all of your cheeses …they are all great. This one is SO good on crackers. Thanks for posting!
Thanks Sarah! I’m so happy that you like them as much as we do!
I just made this cheese and I must say it is the best vegan cheese that I have tried! So rich and creamy and the herbs flavor it perfectly!
What is the size of the coconut milk can you use? Thank you.
Hi Jen, Use a 13.5 oz can of coconut milk. Enjoy! 🙂
Can I use gelatin instead of agar and coconut flour instead of tapioca?
Since gelatin is not vegan, I have never used it. I think that it would work, but I don’t know if the ratio would be the same. There is no substitute for tapioca flour, nothing else will give the cheese the same stretch. You can just leave it out and have a firm cheese that’s great for slicing and eating cold, but if you want it to melt and stretch, you have to use tapioca flour (aka tapioca starch). Hope it works for you!
Actually, potato starch will substitute tapioca (really can’t tapioca here), and carageenan powder can sub the agar. Kappa carageenan is better in my opinion than agar as it doesn’t require the sustained heat to activate it, it is also less rubbery.
Thanks for the info Dean. Potato starch will work okay if you can’t do tapioca, but it just doesn’t stretch the same as tapioca. I’m excited to do some recipe testing with Kappa Carageenan, thanks for the suggestion. How much do you use? Is it a 1:1 swap for agar agar?
My favorite vegan cheese recipe so far! All though I used coconut cream instead of milk cause that’s what I had, the texture was perfect but it did taste a little bit like coconut so I’ll use the coconut milk next time and try again, I added minced jalepeno and garlic and herbs, super cool it melted on my hot vegan sausage sandwhich like real cheese! Seemed kind of like mozzarella to me. Gonna try to make a smoky version tomorrow and a chive now that I see that suggestion above that sounds good. 👌
Hi Mandy, So happy that you liked it! I love the smoked Gouda style. It’s fun to throw in different herbs and spices and get different flavors! Enjoy! 🙂
Hi can I use soy milk instead of coconut milk?
Hi Ellie, Yes you can just use 1 1/4 cup of plant milk and ½ cup oil instead of the coconut milk and water. This works well, but it’s not as rich and creamy as the coconut cheese. Let me know how it goes! 🙂
How do you think coconut cream would work? I’m still trying to find a homemade vegan cheese without a weird consistency and hope this will be it! Thank you for sharing!
Hi Allison, Yes, coconut cream will work! Hope you enjoy it! 🙂
I am so thrilled to try out this recipe!! Since the right amount of agar agar is really important, I (as someone who doesn’t own cups and uses the metric system) am not too sure how much one tbsp of agar agar is – Google says 5 gr, but that didn’t seem right to me.
One teaspoon = 5 grams, but you want to use tablespoons. One tablespoon = 21 grams. For this recipe, 42 grams of agar agar should work for you. However, agar seems to come in different strengths in different countries. Many of my readers in Europe report that they need to use more. You may have to do a test batch and then adjust for the second time.
Just wondering when using the coconut milk if you discard the water in the can or mix it with the solid in the can. This looks delicious! I can hardly wait to try it. Your homemade crackers also look amazing. Thanks.
Hi Margy, You need to use everything in the can. When coconut milk sits on the shelf, it separates out, but you need it all. Hope that you enjoy it! 🙂
Will xanthan gum work instead of or subbing in for some of agar ? Had an idea to add brewers yeast towards end to minimize nutrient boil-off , any thoughts on that ?
Hi Carl, xanthan gum will not work the same as agar. The agar is like a gelatin that makes it firm up. You can add less for a softer cheese. I don’t know much about brewers yeast, so I can’t answer that question. You could add the agar to the 1/2 cup of water and boil that for 6 minutes and then add the rest of the ingredients and just cook those for just a minute to minimize the time you are cooking the majority of the ingredients. Hope that helps! 🙂
Very much so. Boil thickening agent separate, po$$ibly use le$$. Will probably apply concept to some other recipes, so, thank you.
This recipe looks like the answer to my prayers with non dairy cheese in the supermarket being a ridiculous price, that tastes disgusting with crackers! Love the idea that you can also melt it. Mmmm…….miss melts toasty cheese sandwiches! Just wondering how long it would keep in the fridge? Do you reckon I could grate it and freeze it? Very many thanks Nikki ?
Hi Nikki, It keeps well in the fridge for about 5 days. My family eats it all every time I make it, so I have never frozen it, but I’m think that it would be fine to freeze it. Enjoy! 🙂
Would love to make this recipe but I have an allergy to garlic ( as well as to dairy, eggs, and a few more) so this sounds good for someone with allergies. Can I leave out the garlic or sub with shallots which I often do in recipes calling for garlic? I hoping it would not alter the taste.
Hi Catherine. You can definitely leave out the garlic. You can use what every you would like to flavor the cheese instead. Shallots, green onions, or chives would also give it a nice flavor. Just make sure to chop them up very fine. Hope you enjoy it!