Vegan Smoked Gouda
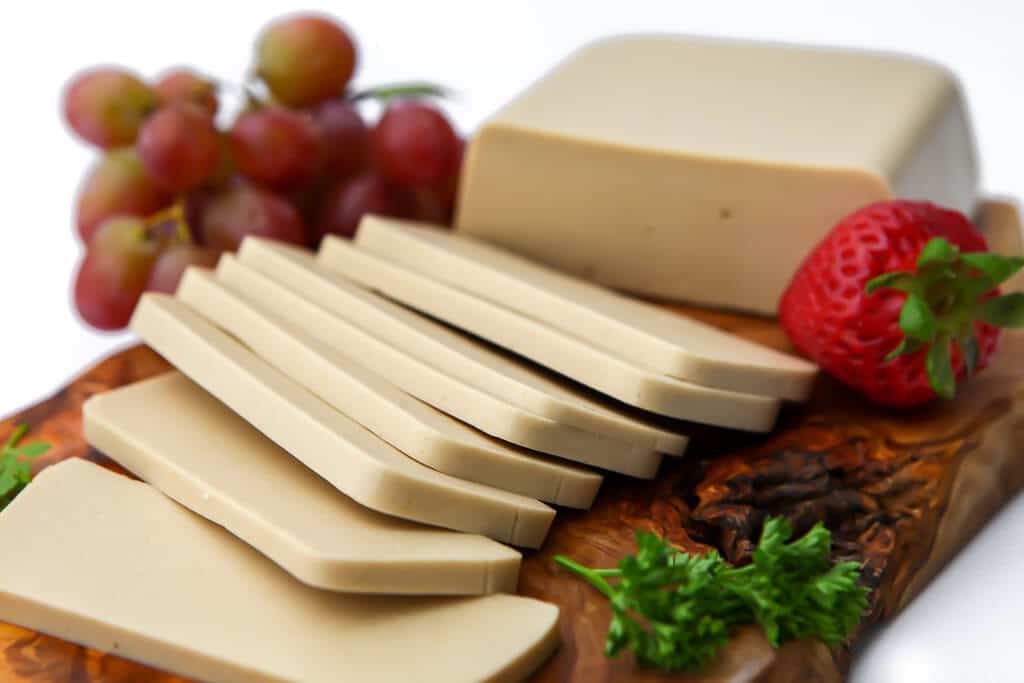
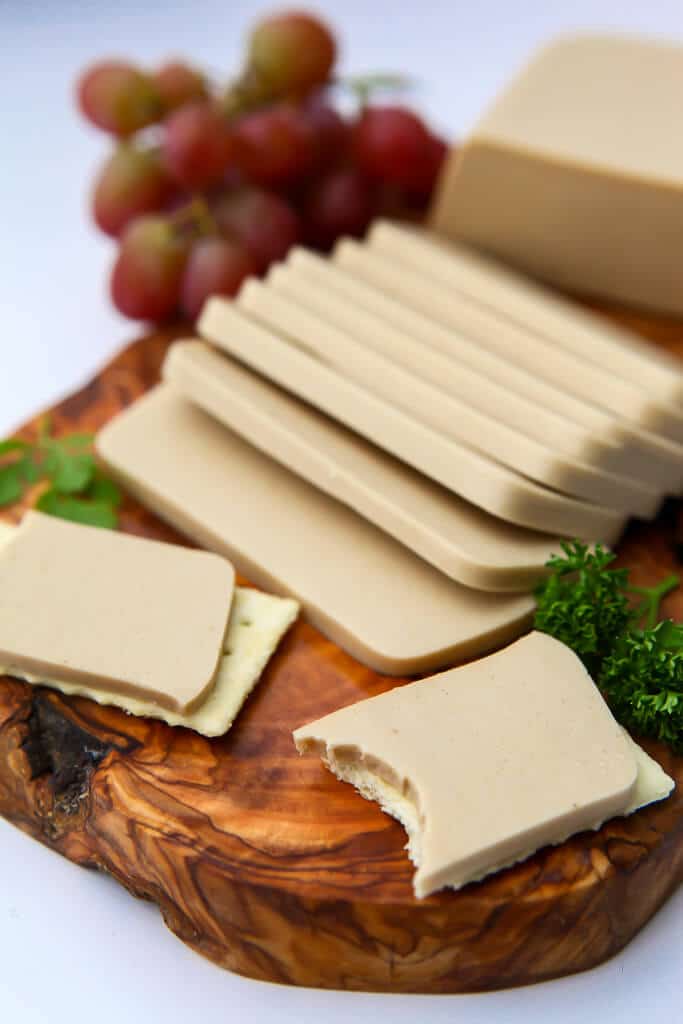
Vegan Smoked Gouda made with coconut milk may be the all-time best dairy-free cheese! It has a rich creamy texture with a subtle smoky flavor. This is a cheese that you just have to try to believe how good it really is.

Want to save this recipe?
Enter your email below and get it sent straight to your inbox. Plus, get more amazing vegan recipes that will satisfy your cravings!
I’ve made many types of vegan cheeses over the years, but this vegan smoked gouda may just be my favorite! Super rich and creamy cheese with a smoky flavor that slices perfectly and it delicious on crackers, sandwiches, and more.
Ingredients and substitutions
- Coconut Milk: There are many different methods of making vegan cheeses, but I have found the richest and creamiest vegan cheese is made from a can of full-fat coconut milk. You could use other plant-based milk instead or even cashew cream, but I find that coconut milk gives it the rich creamy texture that I crave in cheese.
- Water: for the correct moisture content.
- Nutritional Yeast: To give it the cheesy flavor. (Read this post if you want to know more about nutritional yeast.)
- Salt: for flavor.
- Garlic Powder: for flavor. (optional)
- Liquid Smoke: For that smokey goodness of smoked Gouda. You can also use smoked paprika if you prefer.
- Agar Agar Powder – to make the cheese firm. This is a vegan gelatine that comes in the form of a powder. I get mine for a good price at my local Asian market or they also sell it at many natural foods stores. (If you can not find the powder, you can use agar agar flakes, but you will need to triple the amount of flakes and use 6 tbsp in total). You can also use Kapa carrageenan instead of agar agar powder.
A note about Agar agar
- Use agar agar powder not flakes if you can and measure carefully. Make sure to use 2 tablespoons, not 2 teaspoons!
- I use Telephone brand agar agar, since I can easily find it at my local Asian market, it comes in small packs so it won’t go bad, and I know that it sets well. I can’t vouch for other brands.
- If your cheese is too soft or jello-like, your agar agar is not strong enough. (Some people from different areas in Europe have reported that the cheese does not set hard enough. This is due to the different strengths of agar agar sold in different places. Double the agar agar next time you make it).
How to make vegan smoked gouda
First, you will also need to decide if you want a firm sliceable cheese or a softer cheese that will melt and stretch when heated. (You can’t have both, you must choose one or the other).
- The firm version – is best for slicing for eating plain or on crackers.
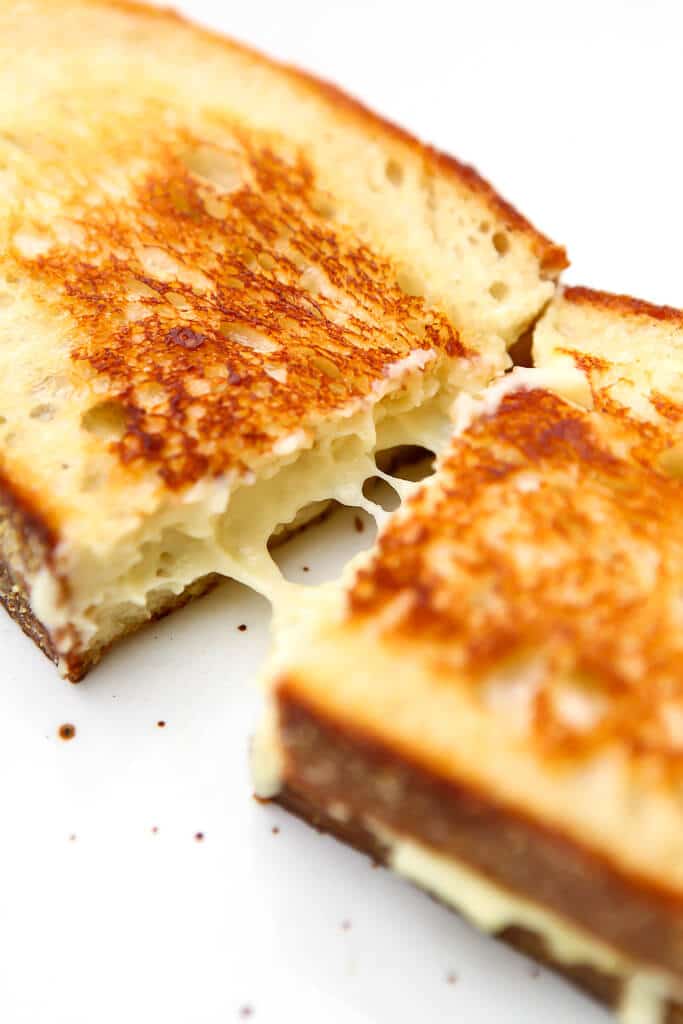
- The meltable version – is best for cheese that you can melt on pizza, use in grilled cheese sandwiches, or quesadillas. The only difference between the two versions is the addition of tapioca starch and the reduction of agar agar to allow it to melt and stretch better.
Sliceable instructions
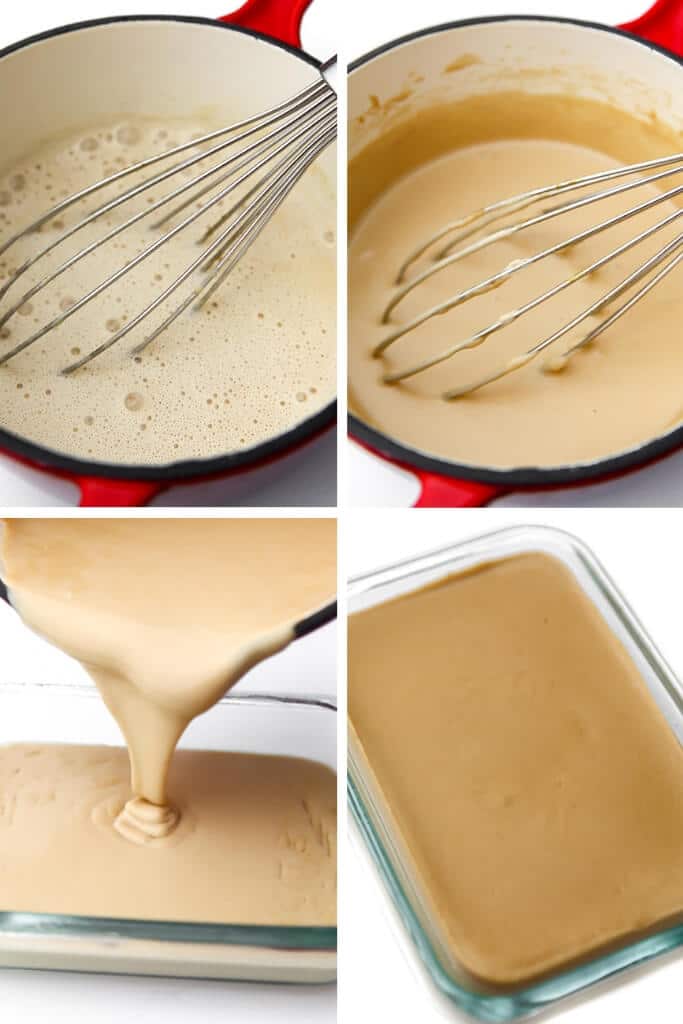
- Simply put all the ingredients into a saucepan and stir with a whisk.
- Heat to a slow boil stirring constantly for 6 minutes. This allows the agar-agar to melt completely and set properly. (It may seem ready after 3-4 minutes but keep it at a low boil for 6 minutes to make sure that it’s completely smooth).
- Then pour into any shape container that you wish. (One batch makes almost 2 cups of cheese).
- Allow to cool for about 15 minutes uncovered on the countertop, then cover and refrigerate for at least 2 hours to let it set.
It’s that easy!
Meltable instructions
- Add a can of coconut milk, 1/4 cup of water, nutritional yeast, 5 tsp agar agar, liquid smoke, garlic powder, and salt to a saucepan.
- Heat the cheese sauce over medium heat until it begins to boil.
- Turn down the heat until it is just barely bubbling and allow it to boil for 5 minutes while stirring frequently.
- Add 2 tbsp plus 1 tsp of tapioca starch (7 tsp) to 1/4 cup of water and stir until it dissolves.
- Add the starch and water mixture to the boiling cheese sauce while stirring it in with a whisk and then cook for an additional 1 minute. (Your cheese will become very thick and stretchy).
- Pour into a glass container and allow to cool uncovered in the refrigerator for at least 3 hours before shredding.
*This will make the cheese softer so it melts and stretches when heated, but it is not as good for slicing since it is not as firm when cold.
Pro Tips
- Make sure to measure the ingredients carefully! Slight changes in the amount of liquid, the agar agar, or tapioca starch can change the texture of your cheese a lot!
- For a cheesier flavor, add an additional tbsp of nutritional yeast.
- If you want to grate the meltable version, pop it in the freezer for about 30 minutes after it has set to make it firmer and easier to grate.
- I like to use these Snapware containers because they are made of glass and won’t affect the flavor and they have a lid with a good airtight lid to keep the cheese fresh longer.
- Store the cheese in a sealed container in the fridge for up to 5 days or in the freezer for 3 months.
Make this vegan smoked Gouda into a smoked gouda grilled cheese! Delicious with caramelized onions too!
More vegan cheeses
If you want a lot more details about making vegan cheeses, check out my post How to Make Vegan Cheese!
- Vegan Garlic Herb
- Healthy Veggie Cheese Sauce
- Vegan Pepper Jack
- Vegan Blue Cheese
- Melty Vegan Mozzarella
- Vegan Cheddar
- Vegan Cream Cheese

Vegan Smoked Gouda
Ingredients
- 1 13. 5 oz can coconut milk, full fat
- 1/2 cup hot water
- 1 1/4 tsp salt
- 1 tbsp nutritional yeast
- 2 tbsp agar agar, powder
- 1/4 tsp garlic powder
- 2 tbsp liquid smoke, hickory flavored (or 1 tsp smoked paprika)
Instructions
For hard sliceable cheese:
- Prepare cheese molds by spraying a glass bowl or container with spray oil or rub any neutral-flavored oil on the molds to prevent sticking. (Recipe will make about 2 cups of cheese).
- Pour the can of coconut milk into a saucepan.
- Put 1/2 cup of hot water into the empty coconut milk can to melt all the remaining coconut milk and add the water to the pan.
- Add all remaining ingredients to the saucepan and stir with a whisk.
- Turn heat on to medium and stir frequently until it boils.
- Turn down the heat until the cheese sauce is just barely boiling and stir constantly for 6 minutes until it is very smooth.
- Immediately pour into the prepared cheese molds.
- Let it cool with the lid off for about 15 minutes at room temperature, then cover and transfer to the refrigerator for at least 2 hours to firmly set.
Notes
How to make meltable vegan cheese:
-
- Add a can of coconut milk, 1/4 cup of water, nutritional yeast, 5 tsp agar agar, liquid smoke, garlic powder, and salt to a saucepan.
- Heat the cheese sauce over medium heat until it begins to boil.
- Turn down the heat until it is just barely bubbling and allow to boil for 5 minutes while stirring frequently.
- Add 2 tbsp plus 1 tsp of tapioca starch (7 tsp) to 1/4 cup of water and stir until it dissolves.
- Add the starch and water mixture to the boiling cheese sauce while stirring it in with a whisk and then cook for an additional 1 minute. (Your cheese will become very thick and stretchy).
- Pour into a glass container and allow to cool uncovered in the refrigerator for at least 3 hours before shredding.
A message about Agar- Agar:
- Use agar agar powder not flakes if you can and measure carefully. Make sure to use 2 tablespoons not teaspoons!
- If your cheese is too soft or jello-like, your agar agar is not strong enough. (Some people from different areas in Europe have reported that the cheese does not set hard enough. This is due to the different strengths of agar agar sold in different places. Double the agar agar next time you make it).
 Did you make this recipe?Please leave a star rating and review below!
📌 Be sure to follow me on Pinterest for new vegan recipes!
*This recipe was originally published on May 4, 2018. It was updated on May 16, 2020, to include new images and more detailed recipe instructions.


I’ve made this twice now and I love it! The first batch wasn’t as firm as I hoped, but it seems a common issue. However, this was no problem for me, because it reminded me of the cheese logs you see around Christmas, you know the spreadable cheese? I spread it on crackers and bread just like I used to with a cheese log and it was divine. Second batch I added an extra tablespoon of agar agar to see if that makes it firmer. I really appreciate all the recipes!!
I’m glad that you were able to figure out how much agar agar that you needed to make it set. What brand of agar agar do you use? The firmness seems to depend on the brand.
My gripe with most vegan cheeses is that they lack protein and I like my food to be nutritious. I have been making my own soy yogurt and found this site looking for ways to make soy cheese. My first batch with soy milk came out great. I look forward to making more batches. I’m curious if anyone has used soy yogurt instead of milk as a base. This would add a natural tang if it works.
Hi, i made the meltable Gouda for the first time but without the smoke flavor. To give it some more umami flavor I added a little bit of miso, and to give it an earthy flavour a bit of cumin and coriander, not much but to give it a hint of the flavor. I actually put in a bit too much, but melted over a vegetable or bread it’s fine. Learning from another recipe that said that when doing an open melt a little bit of olive oil, about a tea spoon, gives it a bit of grilled surface. It turned out really well, better than any store bought vegan cheese I tried.
can I use gelatine instead on agar agar, I can’t seem to find it here.
I want to make the vegan cheese. I realise it won’t be vegan once I add it, but I want to try the recipe.
I think that you can, but I have never tested it, so I don’t know if they swap 1:1. Also, do don’t believe that you will need to boil gelatine to activate it.
Delicious! Thank you for this recipe! This cheese turned out perfectly. I appreciate that it’s so quick to make. My usual go-to vegan cheese recipe required more time and steps, and a food processor, so this one-pan recipe felt so simple and easy. I reduced the liquid smoke to 1 tablespoon and added garlic-onion-salt instead of garlic powder, and it was just delicious! Thank you again for this great recipe!
I’m so happy that you liked the recipe, Sal!
Hello!
If I wanted to make this a neutral cheese instead of “Gouda” would I just not put in the smoked flavor? Alternatively, do you suggest any spice to make this cheese go well with an Asian flavored dish? I have tried your recipe as is and it was amazing!! So I thought I’d come to you for any tops tips! Thank you!
Yes, if you want this more neutral, just leave out the smoke flavor. You can also add a teaspoon of soy sauce to the cheese for a more umami flavor.
I made this recipe a few months back and absolutely LOVED it! I would rather eat this then the store bought version! This time around I am going to make it with a mix of almond milk with cashews. I would like to try and lower the fat content. Hope it turns out!
I’m so happy that you like it! I love this cheese too!
The almond/cashew milk turned out amazing! I made the meltable version and ….WOW! Thanks so much for sharing this awesome recipe!
I’m so happy that you liked it, Judy! 🙂
Hello Monica, sounds like this is a winner. I was hoping you’d suggest a substitute for coconut milk. I am really watching my cholesterol and want to avoid it.
Thank you.
You can swap it out for soy milk or oat milk, but coconut milk does make it the creamiest.
I made your cheddar cheese and while the taste is passable (just barely, to be honest, but edible) I can’t get past the texture. I wonder if there is something that could be done to not have it come out rubbery? Reluctant to try this,one, though it sounds good.
The rubbery texture comes from the agar agar. Some people just hate that texture, but there are not a lot of replacements for it. I have a recipe that uses chickpea flour instead of agar agar in my free cheesemaking ebook that you can sign up for. You may like that texture better. Here is the link to the free ebook… https://view.flodesk.com/pages/60a913073a1f1d563171d1fd
Hi
Can I use homemade coconut milk instead of store bought can?
I think that you could, as long as it’s blended super creamy. Enjoy!
If I wanted to use cashews is it 1/2 soaked and then 1 and 3/4 cup like in your Swiss cheese?
Yes, that same method will work with this recipe too. Enjoy! 🙂
Hi Monica! So glad to have found you. Two questions. Will the cheese turn our creamy and rich if you use the cashews with a plant based milk like almond? I am very leery of using a lot of coconut anything as it’s a very high saturated fat and really not healthy. And if you use cappa carrageean will the cheese still melt and stretch? Thank you in advance for all of your efforts!
Hi Monica!
The taste is amazing! Wowza! But I am a little worried about it texture wise. I made the meltable cheese version. Everything looked great, thick and stretchy when in saucepan. I put it in the fridge and just went to go check on it and it’s really hard. Is it supposed to be like that? I’m wanting to use it on nachos and scrambled eggs. Would I just heat it back in a saucepan to get it to melt?
Thanks!
Hi Chelle, It is supposed to be firm enough to be able to slice or grate. Just grate it and put it on your nachos it should melt like shredded cheese. (It does need to get pretty warm to melt.)
I would like to combine two of your recipes and make Smoked Swiss. Would I just add the liquid smoke to that recipe? BTW I’ve just made your pepper jack cheese and it’s been firming up in the fridge for one hour. One more hour until cheese and crackers!
Yes, that should work fine, Michelle. Have fun experimenting with flavors. Hope that you love the pepper jack! 🙂
Hello, i would like to make one of the cheeses but i am not sure what you mean by:
Add 2 tbsp plus 1 tsp of tapioca starch (7 tsp) to 1/4 cup of water and stir until it dissolves.
Is that then 3 tbsp or 7 teaspoons? Do you also have it in grams the recipe since it is difficult to know how much a tbsp is when it needs to be exact.
Thank you in advance!
To make the meltable cheese I add 2 tablespoons plus 1 teaspoon of tapioca starch to 1/4 cup of cold water. This is the same thing as 7 teaspoons, but I just find it easier to measure the other way. Enjoy! 🙂
Sine the starch is a powder, it may have a similar weight as flour of 125 grams or approx 4oz for one US cup. I’m guessing the measurement to be 16 grams for 2 US Tablespoons. Grams are more accurate but I am usually successful estimating when the volume is given.
Look forward to making this. Could I respectfully request the quantities to also be given in grams? I get slightly nervous when recipes state exact amounts when cups spoons etc seem to be slightly different. Thanks.
Hi Sandra, If you click on the word “metric” below the ingredient list in the recipe card, it will convert it to grams for you.
Hi Made this Gouda cheese for the first time and really enjoyed it. But the hitch is that I am all alone and no one to share it with. Made according to your recipe and have too much. Dunno what I am going to do with it. It is going to last for ages!!
Glad that you like it, Joe. It freezes well. 🙂
I’ve made this Gouda cheese a number of times, and also really enjoyed it. Am the only one in the household who eats it, and that’s a good thing. All the more for me :^) I put it in pasta, in sandwiches, on crackers, or just by itself with a bit of paprika on top. Correction: My dog likes it too, but I don’t give her too much.
I’m so happy that you like it! I think that it’s my favorite of all of the vegan cheeses that I make. My dog likes it too! 🙂
Tried this according to the recipe as originally posted but split the difference with the smoked paprika and liquid smoke. Used half of each. The product is one of the best vegan cheese recipes I’ve tried which is quite a few. Thanks for the post! I wish we could post pics – it turned out very nicely!
I’m so glad that you liked it! If you use Pinterest you can post pictures attached to the pin for this recipe. You can also tag me #thehiddenveggies on Instagram. I would love to see your results! 🙂
Fantastic recipe thank you! I made it with oat milk first then again with coconut milk as per your recipe – the coconut milk version was much better – much creamier.
I’m looking forward to trying more of your recipes!
I’m glad that you liked it. I like it better with coconut milk too! 🙂
Been vegan for quite awhile and this is certainly the best smoked gouda (which i personally consider to be the best type of cheese) recipe i have come across. Must have been a lot of trial and error in the development, round of enthusiastic applause to you! Going to try a variation on one of your milder cheeses by adding sundried tomato and dried herbs. Thanks!
Thanks so much, Micah! I’m so happy that you liked it! It’s my favorite too! 🙂
Thank you for sharing amazing recipes, Monica. I made the sliceable version, measuring everything down to a gram, and following the instruction. It came out great and tastes fantastic, except the texture is kind of waxy, like Kraft Singles, and not exactly creamy as indicated. I used Chaokoh Coconut Milk and NOW Foods agar powder. Any idea what I did wrong?
I’m glad that you liked the flavor of the cheese, Gigi! It’s hard to say what went wrong. You may not like the texture of agar agar. You can try kappa-carrageenan instead of agar agar.
Can you use light coconut milk or possibly another non dairy milk or do you need to use full fat? If so will there be any difference in taste or texture
I think that the lite coconut gives it a funny taste and it’s not as creamy. You can use any other plant-based milk that you want, but also it’s not nearly as rich and creamy. Enjoy! 🙂
Hi Michael, your cheese should have set up firm. Did you let it cook for 6 minutes after it began to boil? If it doesn’t boil for the full 6 minutes the agar agar won’t activate correctly and set firm.
Hi!Thanks for this recipe!How many cheese can be done with this recipe? Thanks, I struggle
to picture what a serving look like…thanks!!
This will make about 2 cups of cheese. I have it calculated that 1/4 cup of cheese is a serving.
Greetings!!! 🙂I did not want to spend days soaking cashews, and for my nut-free friends, I tried this recipe. This was my first attempt at a vegan cheese, and it turned out amazing! Thank you so much for sharing. I love the fact that it has very few ingredients, and nothing hard-to-find!!! 🙂
You’re welcome, Susanna! I’m so happy that it was what you were looking for! 🙂
I made the smoked Gouda and the Provolone yesterday and used Kappa Carrageenan instead of agar agar and followed the meltable cheese option wirh tapioca starch, These cheeses Boyer turned out beautifully, delicious, so simple and amazing! Can’t wait to make the rest of them. I couldn’t believe how fast they set up- it was 15 minutes and it had already formed their shape,super fast. These recipes are awesome.
Thanks so much! I’m so happy that they worked well for you! Enjoy! 🙂
Is the amount of kappa carrageenan the same as the amount of agar agar powder?
Yes, you can swap out the agar agar for equal amounts of kappa carrageenan. 🙂
Two questions. So glad I found your site. Will the cheese melt with kappa carrageenan? Also, if you make the cheese with cashews and plant based milk, will it turn out creamy? I hesitate to use too much of any coconut as it’s very high in saturated fats which is not good for us. Can’t wait to make your cheeses!
Hi Deb, I’m glad that you found my site too! I don’t notice a big difference between kappa carrageenan and agar agar, but some people prefer one over the other. I would test out both and see which texture you like better. The only way to get it to melt is to add tapioca starch to it as I do in my vegan mozzarella recipe. Coconut milk gives it the creamiest texture by far, but it’s still good with plant-based milk too. Part of what makes it taste like cheese is the fat content and mouth feel from the fat in the coconut milk. Enjoy!
Will keep you posted! Thanks!
Go ahead and use the full fat coconut milk. That fat is healthy for you. It’s Veg seed oils that aren’t.
Hi Monica,
Was just wondering the refrigerate for 1 week part is part of the process? Or how long the cheese will last? BTW smells good already tho 😋 don’t know if I can wait a week for it.. Haha
Jonathan
Jonathan, you can eat it as soon as it sets! It will stay good in the fridge for up to a week, but no need to wait! Enjoy! 🙂
It sounds like something was wrong with your agar agar powder! There should be absolutely no taste or smell! I usually use the Telephone brand since I can get it inexpensively at my local Asian market.
I’ve been making several vegan cheeses and the “I’ll eat these in the future” remnants have been sitting in my freezer for a while. Your provolone is indescribably good! Best cheese I’ve ever made and I’ve been studying Miyoko Schinner’s cheese cook books for a while. Thank you for your generous gift and for sharing your recipes.
My provolone accidentally turned into smoked Gouda because I added a few things. Here are substitutions.
No lemon juice
I added 2 teaspoons of sauerkraut instead
I added a few dashes of liquid smoke
1/4 teaspoon of xanthan gum
1/4 cup of coconut cream
Blend everything in a magic bullet
Leave on the countertop (covered) for up to 24 hours to develop a lemony and tangy cheese taste (fermentation makes the most authentic cheese flavour and is indescribable)
Next time I will try and add a little kappa carrageenan which I bought and haven’t tried yet. I love this recipe and can’t wait to try out the other ones. Cheddar cheese, here I come! Thank you again!!!!!
Note: I added all these ingredients to your regular provolone recipe
Finally I’ve found nice and cheesy vegan cheese! I added 1 Tbsp of tapioca starch and a bit of a liquid smoke. It taste very nice when it’s warm! Next time I will add more tapioca for stretchiness. Cold version is ok but a bit rubbery. Thank you for sharing this recipe with the world!
I’m glad that you liked it, Agata. 🙂
Hi Monica! I just discovered your fantastic magical site and an so glad I did! I just made this extraordinarily wonderful delicious vegan Gouda! It’s the most delectable creamy Gouda that doesn’t require me to soak cashews in hot water for two days! I had everything in my pantry and, let me tell you, I am over the moon with it! I gave up dairy and became vegan about a year ago, and of course, cheese is the hardest thing to leave behind. But not anymore!! I’m going to embark on a vegan cheese expedition and fake out my cow-cheese addicted hubby! Thank you again, Little Vegan Angel!
Aww, thanks Janeth! You made my day! Of all the different types of vegan cheeses that I make, smoked Gouda is my favorite! I’m so happy that you liked it too! 🙂
I’ve originally commented on the mozzarella recipe, but just wanted to add the 5 star rating and to let you know that I have already made this Gouda cheese twice! First time I made as written using coconut cream, except tapioca because I didn’t have any, but the finished product was great! It smelled really smoky but it had a moderate smoky flavor, which was good for my personal preferences. When I made it for the 2nd time (with coconut cream as well), I omitted tapioca again (still don’t have it but it’s finally coming in the mail, lol) but added 2 good shakes of smoked paprika (no idea how much that was, maybe 1/2 tsp?) and strangely enough, the smoky taste mellowed even further, even though I still used the liquid smoke as directed in the recipe! I am not sure if smoked paprika has any sweetness to it, but it sure worked great to perfect the taste to my preferences, and it added very subtle red specks throughout my cheese. Thank you for this wonderful recipe! Once I get my refined coconut oil (in the mail, along with the tapioca, haha) I will be tackling the cheddar recipe!
Just remembered that I also added a sprinkle of the onion powder to the 2nd batch – that must have mellowed out the smokiness too.
Delicious. Made it with no changes. Makes a great sandwich with lettuce, marmite and chopped red onion.
It sounds like a delicious sandwich, Matthew! I’m so happy that you liked it! 🙂
Not sure why this recipe has so few comments compared to the other as these cheeses are INCREDIBLE!! If you’re scrolling through to check comments for success stories, well here it is! These cheeses (I’ve tried all the varieties!) are what you’ve been looking for!! They firm up, they grate, they melt, they slice, THEY TASTE INCREDIBLE! Now go on & get started on your own batch, your only regret will be not starting sooner.
Aww, thanks so much for such a great review! 🙂 I can never get enough of the smokey flavor in this variety!
Can I use any no flavored vegan gelatin iin place of agar agar? I’m getting a lemony flavor and I dont know where it’s coming from. I’ve added extra liquid smoke and less lemon juice but I can’t place where that flavor is coming from.
The agar agar shouldn’t have any flavor. There are some varieties that come with sweetener added for making candy. I’m not sure what would be causing a lemon flaovr.
You do not mention if the coconut milk has to be additive free (guar gum, locust bean, gellan, carrageean) which prevents jelling. I make a lot of Rejuvelac cashew, brazil or tofu cheeses but have not tried with coconut milk yet so this should be fun. But making sure about the additive free or not…..I know yogurt won’t culture when the coconut milk has additives. But I have four cans of Native Forest which I bought not realizing they put additives in their milk so if it doesn’t make a difference with this recipe I’ve found something to do with those four cans. Thanks for the recipe.
Hi Davilyn, I usually make mine with full-fat coconut milk (15 grams of fat in 1/3 cup) that contains coconut extract, water, citric acid, and sodium metabisulfite. I had a cheap can of coconut milk from the dollar store with guar gum in it, so I just tested it out for you. It worked fine and had no issues jelling. I didn’t have as much fat in it and I don’t think the flavor and richness were quite as good, but it worked well. Hope this helps! 🙂
just went shopping for all the ingredients, or ordered on Amazon. Vegan foods like this are hard to find locally. I’m so so excited to try this! thank you for sharing all your wonderful recipes all for FREE !! With the holidays around the corner i’m super jazzed to get this going. ….will be sharing all over social media! Oh and i’m leaving 5 stars just because i already know i will love it 🙂 🙂 🙂
Thanks so much! I’m glad that this recipe helps you out! Enjoy! 🙂
I only have almond milk – what do you think about adding a little vegan butter or refined coconut oil to improve creaminess? Or any other tricks?
Hi Lauren, You can use 1 1/4 cup almond milk or any other plant-based milk plus 1/2 cup refined coconut oil for a similar texture. Just make sure it’s plain milk and not vanilla or it will taste weird. (Almond milk tends to be a little sweet too). Enjoy! 🙂
Another amazing cheese recipe. This time I added the additional 2 tbsp of tapioca and made a grilled cheese. It didn’t melt yet it definitely melted in my mouth when I ate it. WOW! best grilled cheese of my life! I cannot believe how tasty it was!
I read the comments and saw your note about the cheese needing to be at a high enough temperature to melt, so I’ll try making another one again.
I’ve seen the swiss and provolone recipes, are there others, especially a cheddar? Thank you!!
So happy that you like it! Yes, I have a whole section of my blog on vegan cheeses! Here it is… https://thehiddenveggies.com/category/vegan-cheeses/
Enjoy! 🙂
Is it possible to actually smoke this and the other cheeses traditionally ?
Hi Neil, I have never personally tried it, but I think that it should work. Let me know if you try it! 🙂
Would another starch work instead of tapioca?
Sorry, no other starch works to make it melt and stretch as well as the tapioca does. You can just leave it out for a firmer sliceable cheese.
Hi, I want to know before doing that’s recipe, -that by the way looks delicious- without salt. Only the salt that have the nutritional yeast. I’m trying doing good with low or no salt at all. But I don’t want to mess not the flavor but the texture. I can deal with the no salt flavor… thanks for great recipe!!!
I would add at least a little salt or I think the sweetness of the coconut milk will take over the flavor more. You can definitely reduce the salt, but I wouldn’t omit it completely if you want a cheese-like taste. Let me know how it comes out! 🙂
Hi Monica!
I just made this recipe and the taste is absolutely delicious, however the texture is a bit on the gelatinous side- should I be putting less Agar or maybe putting in no tapioca starch at all?
Thanks for the recipe and your help! 🙂
Hi Emily, Glad that you liked the flavor! You can try making it without any tapioca starch. I prefer this texture for slicing and eating cold, but it will not melt easily. The agar agar is a vegan gelatine, so it will have a gelatinous texture that some people may not like. You can play around with the amount of agar agar and starch and see if you get a texture that you like better. Let me know. 🙂
Hi. I was wondering if tapioca starch would work well instead of the agar agar?
No, you can not omit the agar agar and get a solid cheese. The agar agar is essential for making it firm and set up like cheese. If you don’t use it, it tastes delicious, but you get wonder cheese sauce, not a slice-able cheese. Hope that helps! 🙂
Not sure if I missed it in the comments but I’m wondering if this freezes well?
Yes, it freezes well, but we usually eat it all the same day I make it so I’ve only done it once or twice. 🙂
Monica, I just finished making your smoked gouda for the first time and it is so rich and delicious! I completely forgot it was made with full-fat coconut milk because like you said, you can’t taste it at all! I didn’t realize I was so short on liquid smoke, so when I went to measure it, I had exactly one tablespoon left. I didn’t want to wait another day, so I used a tablespoon of Bakon powdered hickory smoked seasoning. I was concerned about adding the powder, thinking it would clump up, so I poured the whole recipe into my Bullet and ran it just to mix everything up then poured it in the pan to cook. It turned out beautifully. I had a little leftover after pouring it into my mold and poured it into a little cup. I just checked on it and it firmed up really well! I am really pleased with this recipe and I’m happy I found a good vegan cheese with no nuts. I’m not allergic to nuts, but it’s good to have variety. Thanks so much! I’ve gone through your website, but I haven’t found your cheddar cheese recipe. is it in the making? I love cheddar!
Thanks so much Wanda! I’m glad that you like it! I am still perfecting my cheddar recipe. Thanks for the reminder to get it on the blog. It will be coming soon. Enjoy! 🙂
Thanks! Can’t wait for that cheddar!
Just made this this morning, licked the spoon and saucepan and now really not sure how I’m going to be able to wait until it’s set! Already delicious!
So happy that you like the flavor Amanda! I frequently take a slice of the end where it cools faster because I just can’t wait! 🙂
Looks amazing! Do you think I can substitute the liquid smoke for smoked paprika?
Do you think this would work ok with smoked paprika instead of liquid smoke? I know it’s not quite the same but I don’t use liquid smoke. Thanks ?
Yes, you can add whatever herbs or spices that you would like. I’m sure smoked paprika is delicious, yet I haven’t tried it myself yet. It will have a different flavor than the liquid smoke, and it’s more powerful than liquid smoke, so you will not need as much. I would add 1/2 tsp to start and then add more to taste until you get the desired amount. Let me know how it goes! 🙂
OMG ….Best vegan cheese….EVER!
Thank you for your posts!
Made this yesterday. So good! I only had mesquite flavored liquid smoke, but it still tastes amazing. Yummy as a grilled cheese (will have to add the carmalized onions next time) and with spicy mustard on crackers. Thanks for the recipe! Since becoming vegan, smoked Gouda is the one cheese I miss the most! And I usually have all these ingredients at home. Only had to purchase the agar agar powder!
I’m so happy that you liked it! It is my favorite vegan cheese for sure! Caramelized onions are amazing with this cheese. We make caramelized onion pizza or just top crackers with this cheese and the onions! So glad that you gave this recipe a try! 🙂
Bonjour de la province du Québec au Canada,
Merci beaucoup pour ces délicieuses recettes qui ne ressemblent pas à la tradition culinaire…
De plu je suis reconnaissante pour toutes les heures passées à inventer pour nous offrir le meilleur
de ton inspiration !!! J’ai hâte à la la prochaine découverte gastronomique avec une autre recette exceptionnelle!!!
Thank you Denise.
OMG! This was amazing! I made the kind for just slicing. I had to stop myself from eating the whole block of cheese myself! My new favorite vegan cheese!
I’m so happy to hear this Amy! It’s my favorite vegan cheese too! Give me this with some crackers and wine and I’m happy! 🙂
Thanks for this recipe! It was really fantastic. I used 2 teaspoons of smoke instead of 2 tablespoons, 2T nooch, and 2T tapioca starch. I also added a fourth teaspoon ground mustard. The taste was spot-on, but it didn’t melt well. Not sure what I did wrong.
Hi Kate. I’m glad that you liked the flavor! I’m not sure why it didn’t melt for you. Make sure to use 2 tablespoons plus 1 teaspoon of tapioca starch. That is what makes it stretchy and helps it melt easier. Also, make sure that the cheese is warm enough to melt. When using it in a grilled cheese or quesadilla, make sure to heat it slowly so the middle gets warm enough to melt or stick it in the microwave for about 20 seconds to get the temperature up. It has to reach a high enough temperature to melt. (slightly higher than cows cheese). I hope that helps!
Thanks for your recommendations! Do you think it works better if you shred it? I cut mine into thin slabs, but now I’m thinking it would have been better to shred it.
The cheese has to heat all the way through, so shredding it will definitely help it to melt faster. 🙂
Is it possible to substitute the coconut milk with an avocado and some nut milk instead?
I have never done that before, but it’s a good idea! I think that it would work. I would puree the avocado with the plant milk first before adding it to the pan. Just make sure the total volume of the avocado/milk mixture equals 17.5 ounces. (That would be 2 cups + 1 1/2 tbsp.) (That is the volume of the liquid in the recipe). Let me know how it turns out!
OMG! Just made this – The BEST vegan cheese that I have ever had!!! Thanks you so much for the recipe!
You’re welcome! I’m so glad you made it and love it too!