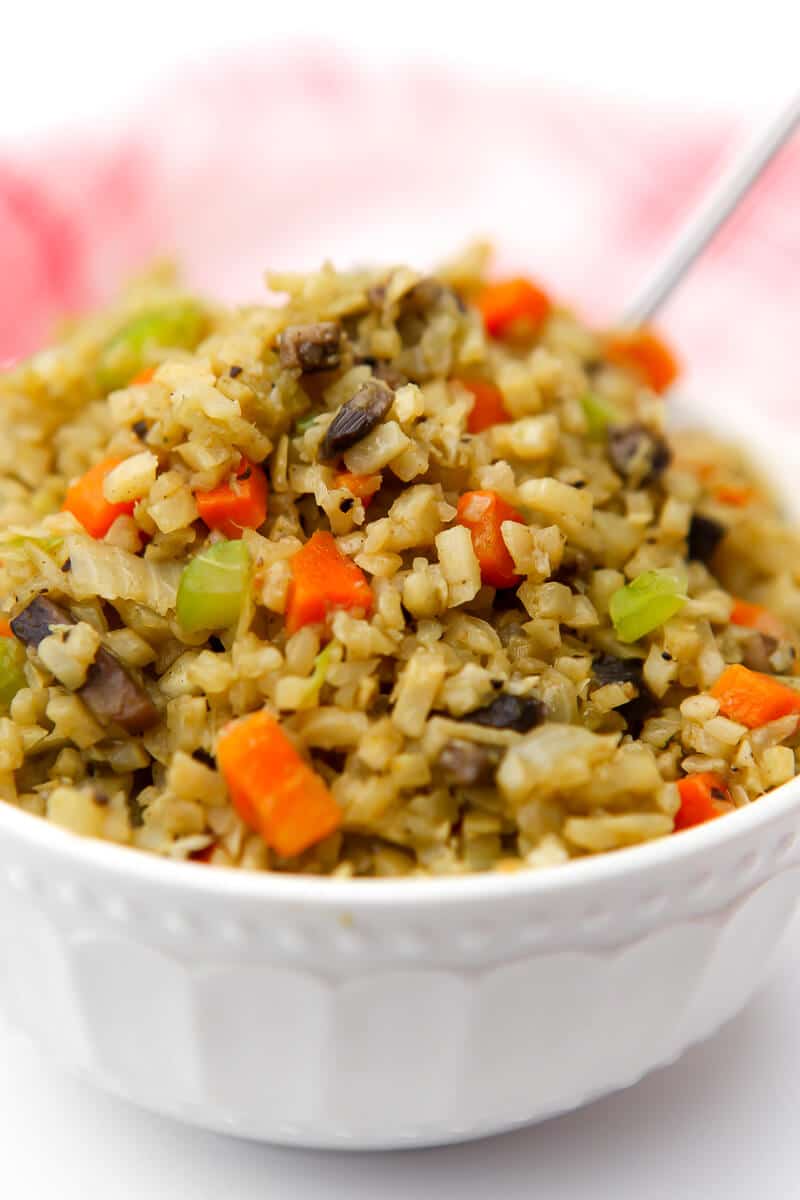
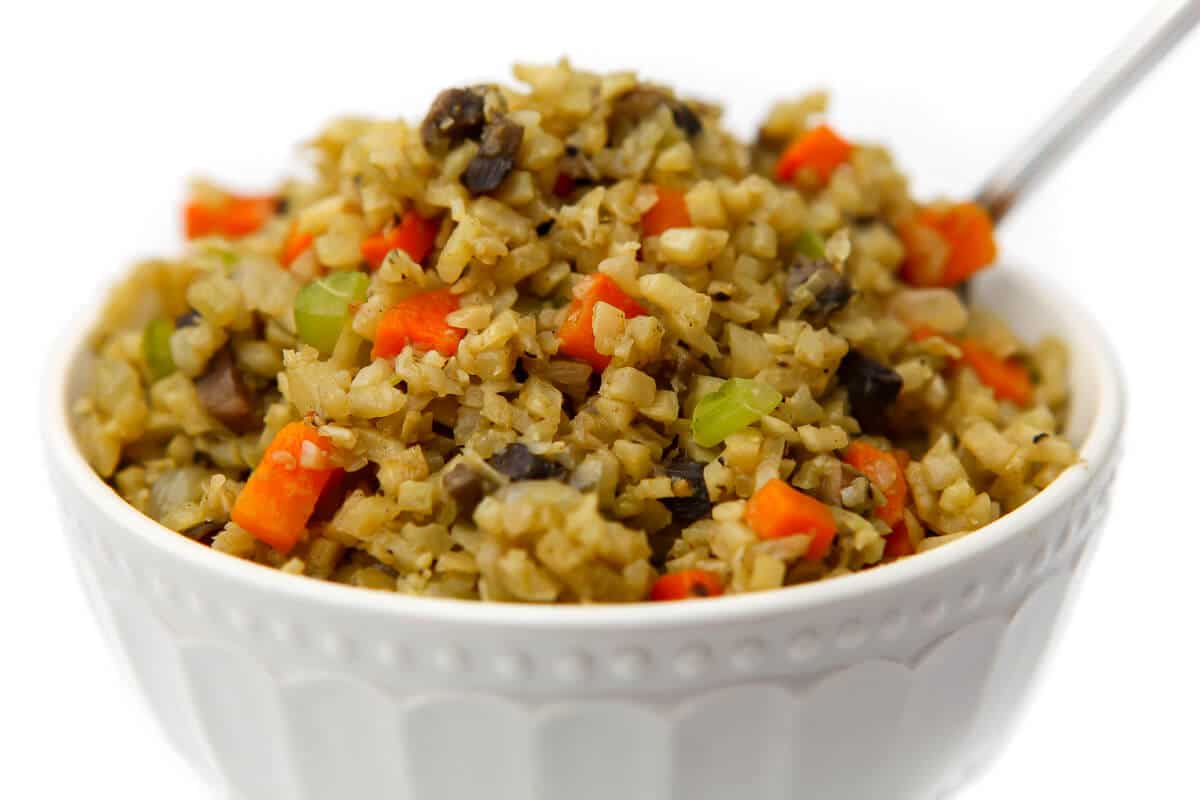
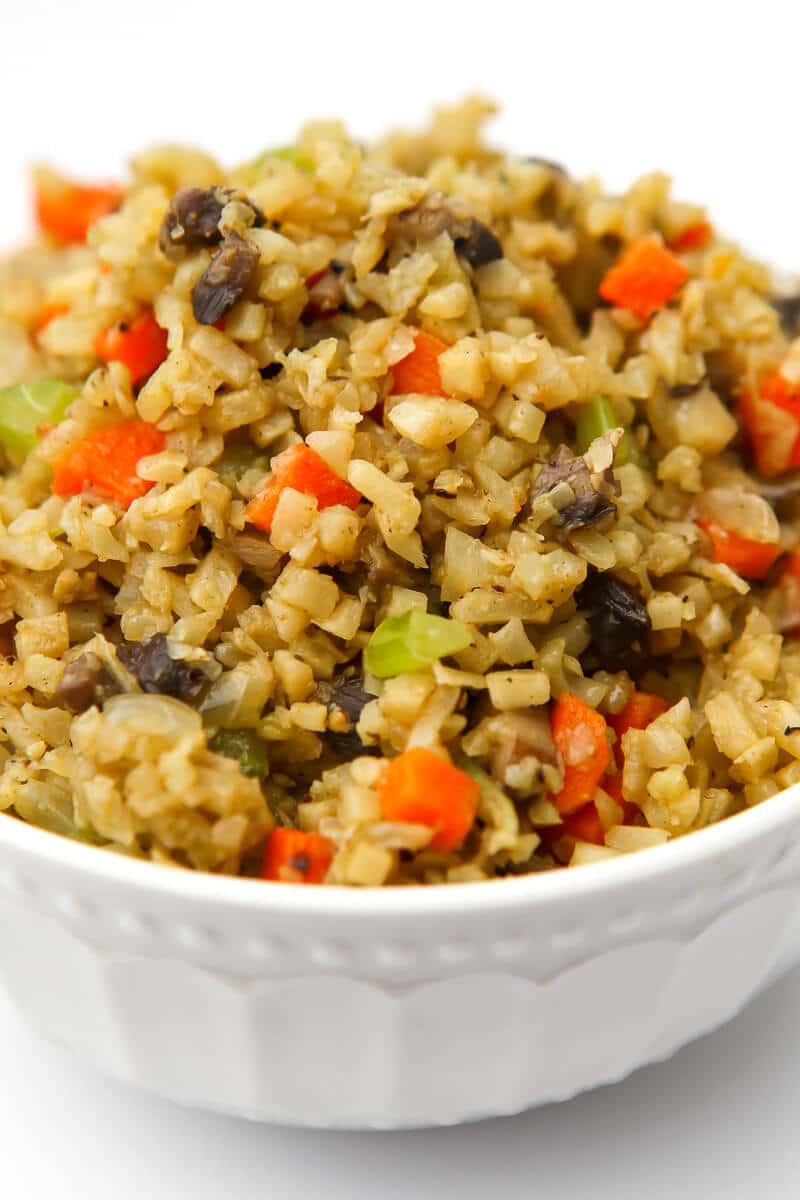
Easy Cauliflower Stuffing
This easy cauliflower stuffing recipe delivers the classic stuffing taste, yet it’s vegan, gluten-free, paleo, keto, and low-carb. Packed with veggies and seasoned to perfection, everyone at your holiday table will be able to enjoy this classic side with a twist!
Want to save this recipe?
Enter your email below and get it sent straight to your inbox. Plus, get more amazing vegan recipes that will satisfy your cravings!
Stuffing has always been a Thanksgiving favorite in our house, but when my family had to go gluten-free, there weren’t many options for us. I could make my own stuffing from gluten-free bread, but gluten-free bread, which is also vegan, is hard to come by, so I had the idea of using cauliflower instead of bread.
I must admit that I was skeptical at first, but my family was thrilled with the result! A gluten-free, low-carb stuffing that tastes great!
I just made some of this for a side along with some potatoes and vegan chicken nuggets. I couldn’t believe that my kids loved it and ate it all. I will be making this again for Thanksgiving!
—Kate
We love cauliflower in my house, and I use it in numerous gluten-free recipes such as cauliflower cheese casserole, baked cauliflower nuggets, roasted rainbow cauliflower, whole roasted cauliflower, and deep-fried cauliflower. It’s excellent for orange cauliflower and buffalo cauliflower, too.
Why you’ll love this recipe
- It has all the flavor of stuffing without dairy, gluten, or carbs.
- It’s easy to make in one pot in under 20 minutes!
- Nearly anyone who follows a special diet, such as a vegan, gluten-free, Paleo, or Keto Diet, can eat it!
- It has all the savory goodness of classic stuffing!
- You can enjoy a large serving without feeling guilty.
- It’s healthy and packed with vitamins.
This stove-top cauliflower stuffing is made in about 20 minutes, with no need to roast, so it doesn’t take up precious oven space on holidays.
Ingredients and substitutions
- Riced Cauliflower – 1 bag of pre-cut riced cauliflower makes this recipe super easy, but you can break up a head of cauliflower and chop it into very small pieces with a food processor.
- Vegan Margarine – you can use my homemade vegan butter, olive oil, or substitute the oil with vegetable broth for a fat-free option. For a rich, nutty flavor, you can also use my vegan brown butter or vegan garlic butter.
- Onion – for flavor. White or yellow onions work well. You can also use shallots for a milder flavor. Feel free to omit or swap out with 2-3 cloves of garlic.
- Carrots – to add a little sweetness and pretty color.
- Celery Stalks – to give it a little crunch. Feel free to omit it.
- Mushrooms – you can use any variety that you wish.
- Poultry Seasoning – for flavor. These are the herbs in traditional stuffing that give it the savory flavor you know and love. If you don’t have poultry seasoning, you can season it with sage, parsley, rosemary, and/or thyme. You can use dried or fresh herbs.
- Nutritional Yeast – It’s optional, yet it gives it a rich and slightly cheesy flavor. If you don’t know what nutritional yeast is, you can read more about it in my post about nutritional yeast.
- Salt and Black Pepper– for flavor.
Tools
A Pan or a large skillet for sauteing the vegetables.
A Food Processor – if you want to rice the cauliflower florets yourself.
How to make cauliflower stuffing
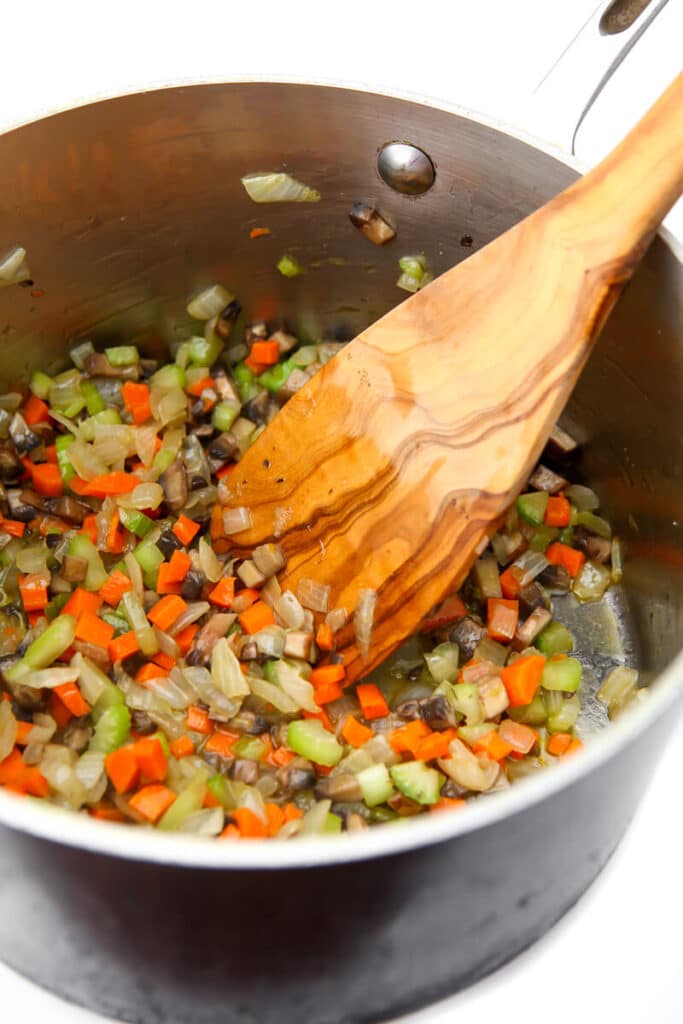
Step 1 – Start by sautéing an onion in vegan margarine or light olive oil over low heat for a few minutes. (Or use ¼ cup vegetable broth for a fat-free version).
Step 2 – Chop the carrots, mushrooms, and celery, and add them to the onion. Sauté on medium-low heat for about 5 minutes. (or about 2 cups of any veggies you would like).
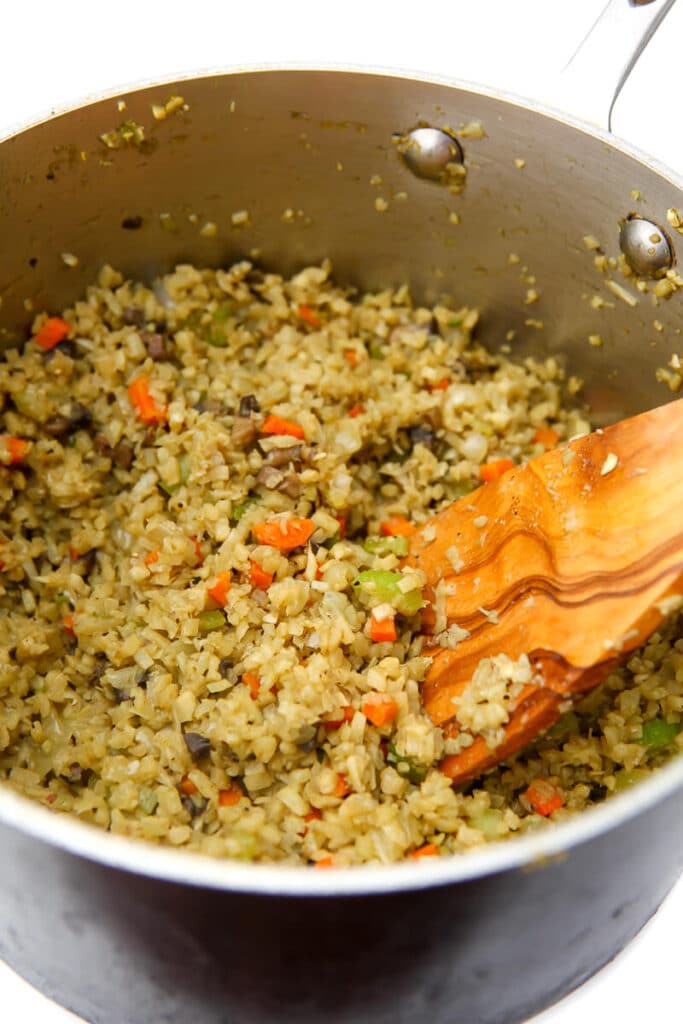
Step 3 – Add a bag of pre-chopped cauliflower (also known as riced cauliflower) or chop a large head of cauliflower in your food processor and pulse it until it becomes very fine.
Step 4 – Sprinkle the veggies with salt, poultry seasoning, and nutritional yeast. Then stir well, ensuring the ingredients are evenly coated in the seasoning.
Step 5 – Continue to sauté over medium-low heat, stirring frequently, for about 10 minutes, until all the vegetables have softened and are tender. Then, serve as you would stuffing.
Pro Tips
- Sauté the onion and all the veggies slowly to bring out the sweetness and soften them.
- Cook the vegetables and cauliflower over medium-low heat, stirring frequently to ensure even cooking.
What is riced cauliflower?
Riced cauliflower is simply a head of cauliflower chopped up into tiny pieces the size of rice. They sell it already washed, chopped, and ready to use in most grocery stores.
You can simply dump in a 16 oz. bag, or you can make your own by using a food processor and pulsing many times until your cauliflower is chopped into tiny pieces. Unless you can find very inexpensive cauliflower, I find the bags of riced cauliflower to be less expensive and much easier to use.
Be sure to try my vegan cauliflower risotto with spinach recipe, which is also made with riced cauliflower!
How to store cauliflower stuffing
Store your leftover cauliflower stuffing in the refrigerator in an airtight container for up to 5 days. You can also freeze the stuffing, but it will slightly alter its texture.
More holiday favorites
- Vegan Gravy
- Vegan Lentil Loaf
- Gluten-free Vegan Green Bean Casserole
- Vegan Cornbread Casserole
- Vegan Butternut Squash Risotto
Or check out my 10 favorite vegan Thanksgiving main dishes, or this list of Gluten-free Vegan Thanksgiving Recipes!
You will be amazed by how delicious cauliflower stuffing can be, and you don’t have to forgo one of the best holiday sides just because of your special diet!
Riced cauliflower stuffing recipe

Cauliflower Stuffing
Ingredients
- 3 tablespoons vegan butter, or oil of choice or 1/4 cup vegetable broth for fat-free
- 1 medium onion, peeled and diced
- 1/2 cup carrots, peeled and diced
- 1/2 cup mushrooms, washed and diced (I used portabella)
- 1 cup celery, washed and diced
- 2 cups cauliflower, chopped (or a 16 oz bag of riced cauliflower)
- 1 tablespoon nutritional yeast, (optional)
- 2 teaspoons poultry seasoning
- 1 teaspoon salt, (or salt to taste)
- 1/4 teaspoon pepper
Instructions
- Start by sautéing an onion in vegan margarine or light olive oil over low heat. (Or in ¼ cup vegetable broth for a fat-free version).
- Chop up the carrots, mushrooms, and celery and add them to the onion. Sauté on medium-low for about 5 minutes. (or about 2 cups of any veggies you would like).
- Add a bag of pre-chopped cauliflower (also known as riced cauliflower) or chop a large head of cauliflower in your food processor, pulsing it until it becomes very fine.
- Sprinkle the veggies with salt, pepper, poultry seasoning, and nutritional yeast. Stir well, coating them in the seasoning.
- Continue to sauté over medium-low heat for about 10 minutes, stirring frequently until all the veggies have softened. Serve as you would regular stuffing.
Notes
- Sauté the onion and all the veggies slowly to bring out the sweetness and soften them.
- Cook the vegetables and cauliflower over medium-low heat, stirring frequently to ensure even cooking.
- The nutritional yeast in the recipe is optional, but it gives a rich and slightly cheesy flavor.
 Did you make this recipe?Please leave a star rating and review below!
📌 Be sure to follow me on Pinterest for new vegan recipes!
*This recipe was originally posted on 10/30/2018. It was updated on 10/2/20 to include new images and more detailed instructions.


Can I freeze this? I want to make this part ahead of time and the tofu roast later.
Yes, you can, but it will make the cauliflower softer after it has been frozen and reheated.
Thank you! I have found my Thanksgiving stuffing. Trying to get around GMO corn, gluten, and make something diabetic friendly. Thought a cauliflower base might do the trick and low and behold . . here is the perfect recipe. :
You’re welcome Belinda! I’m so happy that it works for you! It’s amazingly delicious for a healthy GF stuffing! 🙂
This was a hit. Left out the mushrooms (added more of the other veggies). Then added a little garlic and kicked up the pepper and left out the salt. Yummy. Plan to play with this more. Our first Thanksgiving with any gluten or corn and so very good with turkey.
I am so glad I came across this information. I always loved fixing dressing for my family. Over the years, the idea of family has changed, my way of cooking has changed, so I have had to scramble for other ways to enjoy fixing this type of dish. I found a recipe fixing dressing/stuffing using millet instead of all of the bread. I fixed it and liked it, but after a few times fixing it, I realized millet still has a lot of carbs. The recipe is very close to this one, so I believe switching to cauliflower and using nutritional yeast will be a good switch for us. I haven’t fixed it yet, but I am sure I will. I enjoyed cooking it on top of the stove, but then putting it in a nine by thirteen pan to bake for maybe twenty minutes. This made it lean toward being crunchy on top. With all of the textures and the added poultry seasoning, this is very satisfying comfort food. Thanks for sharing this!!
You are very welcome Carmen. So glad that this recipe works for your family. That’s a great idea to bake it as well to get it a little crispy! Enjoy! 🙂
I made this and it was AMAZING! I highly recommend it!
Thanks Laurie! I’m so happy that you liked it! 🙂
What a great twist on stuffing – I will have to try this for sure!!! I love that it’s low carb 🙂
Thanks! It’s surprisingly tasty for stuffing made without bread!
This is such a clever idea for a stuffing alternative. I would make this anytime of the year lol
Made this last night for my family with a roasted chicken, mashed potatoes, and for me (I’m vegan & gluten free). It was sooo good. I could’ve eaten the whole pan. Really has that great taste of traditional stuffing. Next time I might add some apples or cranberries. I used a bag of frozen riced cauliflower from Trader Joes. I will be making this again for Thanksgiving! Thank you
You’re welcome Molly! I’m so happy to hear that you liked it! It would be delicious with the addition of some apples or cranberries! Great idea! 🙂
I just made some of this for a side along with some potatoes and vegan chicken nuggets. I couldn’t believe that my kids loved it and ate it all. I will be making this again for Thanksgiving!
Thanks Kate! I’m so happy to hear this! It’s on our gluten free vegan Thanksgiving list too!
I eat stuffing even when it isn’t Thanksgiving time. It is so delicious.
Me too! I love that blend of herbs! I even put it on my popcorn!
I am absolutely crazy about this recipe! It has been pinned and I’m looking forward to giving it a go! Thanks for sharing!
Thanks Jules, I hope that you enjoy it!